All about the border property
Everyone is familiar with the css border parameter, but are there things we don’t know about it?
Everyone knows this use:
This is a single pixel solid frame. We change the syntax a bit:
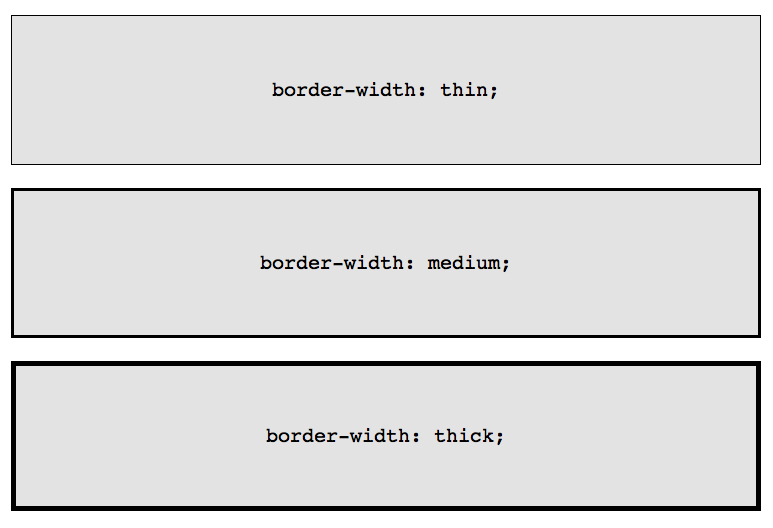
For example, the border-width parameter has three parameters: thin, medium, thick:
If you need to change the border color when you hover on an object:
But this is easier and more correct to implement:
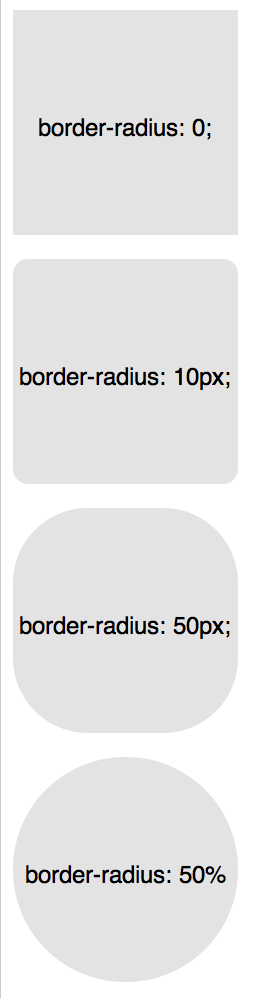
border-radius is a new CSS3 parameter for displaying rounded corners that works correctly in all modern browsers, with the exception of Internet Explorer 8 (and older versions).
For each corner you can assign your own rounding:
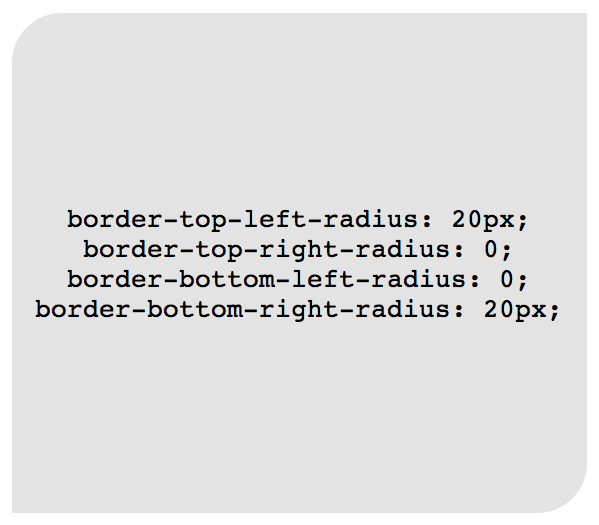
In the example above, it is not necessary to assign “0” border-top-right-radius and border-bottom-left-radius, unless they inherit the values that need to be changed.
The whole structure can be compressed into one line:
Here’s how to draw a lemon using CSS:
Here are the most simple and popular examples of the use of the border parameter. We turn to more complex.
solid, dashed, and dotted are the most popular values for the border-style parameter, but let's look at others, for example, groove and ridge.
Or in more detail:
The most popular way to create a double border is the outline parameter:

This method works fine, but is limited to creating a double frame. If you need to display multiple borders of the element, you must use a different technique.
You can use this design:

Perhaps this is not the most elegant solution, but it works.
Another way to apply shadows:
Two values can be applied to the border-radius parameter using "/", for example:
This is the same as:
This technique is useful if you want to simulate a curvature, not a rounding. For example, you can get the effect of curled paper:
The following examples assume this markup:
And such a basic css:
The most common example of using CSS shapes is the display of arrows. To understand how this works, you need to figure out how to use a separate border-color for each side and set the value to “0” for width and height:
Or the same:
Or so:
Now leave only the blue triangle:
Our basic markup:
And styles:
Now you need to place the arrow-triangle in the right place. Here is our colored box:
We leave only a quarter of a square:
Now move below and paint over:
Application examples:
minus the use of line-height with vertical centering in the restriction of the text in one line. To solve this problem, you can apply display: table to our Speech Bubble and display: table-cell to the text:
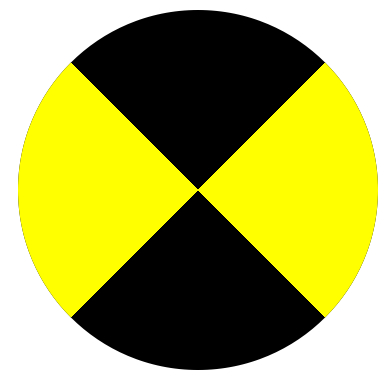
Another example of non-standard use of boundaries:
The use of the border parameter is not limited to just “1px solid black”, using borders you can create different shapes, and it’s enough to write the CSS class once and apply it to the many elements on the page.
The basics
Everyone knows this use:
border: 1px solid black; This is a single pixel solid frame. We change the syntax a bit:
border-width: thick; border-style: solid; border-color: black; For example, the border-width parameter has three parameters: thin, medium, thick:
If you need to change the border color when you hover on an object:
.box { border: 1px solid red; } .box:hover { border: 1px solid green; } But this is easier and more correct to implement:
.box { border: 1px solid red; } .box:hover { border-color: green; } Border-radius
border-radius is a new CSS3 parameter for displaying rounded corners that works correctly in all modern browsers, with the exception of Internet Explorer 8 (and older versions).
For each corner you can assign your own rounding:
border-top-left-radius: 20px; border-top-right-radius: 0; border-bottom-right-radius: 30px; border-bottom-left-radius: 0; In the example above, it is not necessary to assign “0” border-top-right-radius and border-bottom-left-radius, unless they inherit the values that need to be changed.
The whole structure can be compressed into one line:
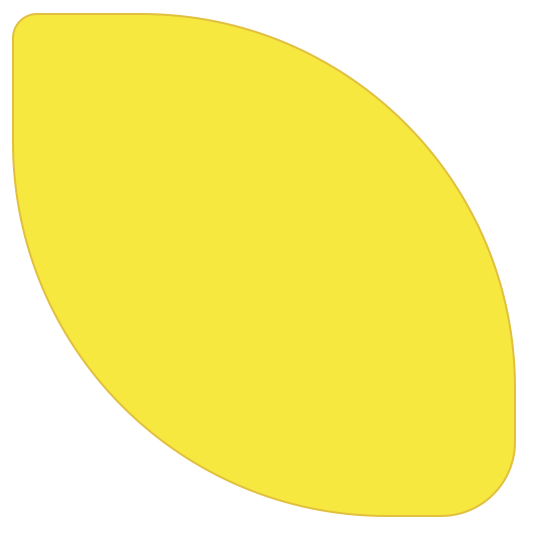
/* top left, top right, bottom right, bottom left */ border-radius: 20px 0 30px 0; Here’s how to draw a lemon using CSS:
.lemon { width: 200px; height: 200px; background: #F5F240; border: 1px solid #F0D900; border-radius: 10px 150px 30px 150px; } Here are the most simple and popular examples of the use of the border parameter. We turn to more complex.
Several borders
Border-style
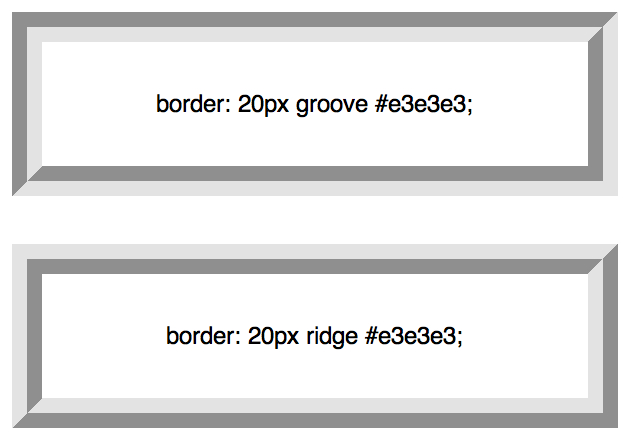
solid, dashed, and dotted are the most popular values for the border-style parameter, but let's look at others, for example, groove and ridge.
border: 20px groove #e3e3e3; Or in more detail:
border-color: #e3e3e3; border-width: 20px; border-style: groove; Outline
The most popular way to create a double border is the outline parameter:
.box { border: 5px solid #292929; outline: 5px solid #e3e3e3; } This method works fine, but is limited to creating a double frame. If you need to display multiple borders of the element, you must use a different technique.
Pseudo-elements
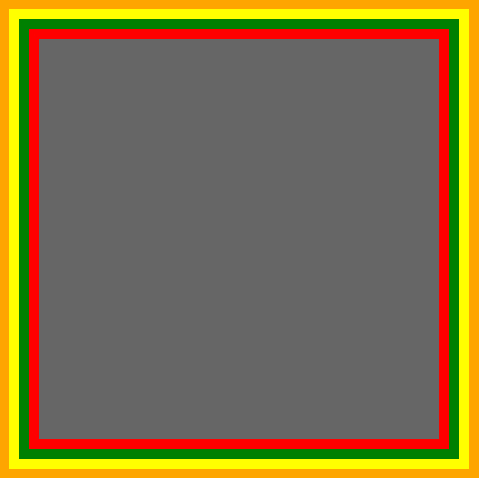
You can use this design:
.box { width: 200px; height: 200px; background: #e3e3e3; position: relative; border: 10px solid green; } /* Create two boxes with the same width of the container */ .box:after, .box:before { content: ''; position: absolute; top: 0; left: 0; bottom: 0; right: 0; } .box:after { border: 5px solid red; outline: 5px solid yellow; } .box:before { border: 10px solid blue; } Perhaps this is not the most elegant solution, but it works.
Box-shadow
Another way to apply shadows:
.box { border: 5px solid red; box-shadow: 0 0 0 5px green, 0 0 0 10px yellow, 0 0 0 15px orange; } Changing angles
Two values can be applied to the border-radius parameter using "/", for example:
border-radius: 50px / 100px; /* horizontal radius, vertical radius */ This is the same as:
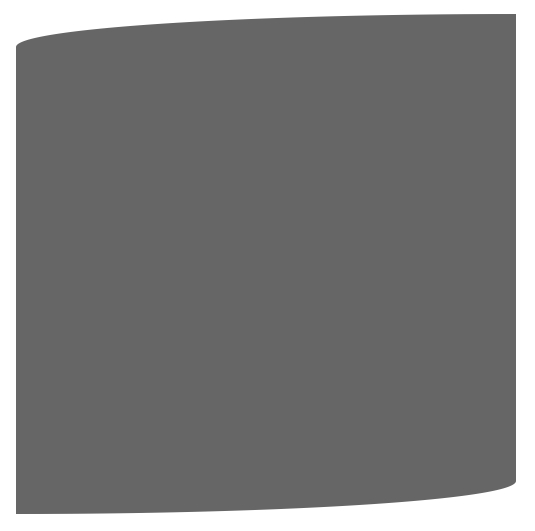
border-top-left-radius: 50px 100px; border-top-right-radius: 50px 100px; border-bottom-right-radius: 50px 100px; border-bottom-left-radius: 50px 100px; This technique is useful if you want to simulate a curvature, not a rounding. For example, you can get the effect of curled paper:
.box { width: 200px; height: 200px; background: #666; border-top-left-radius: 15em 1em; border-bottom-right-radius: 15em 1em; } CSS shapes
The following examples assume this markup:
<div class="box"></div> And such a basic css:
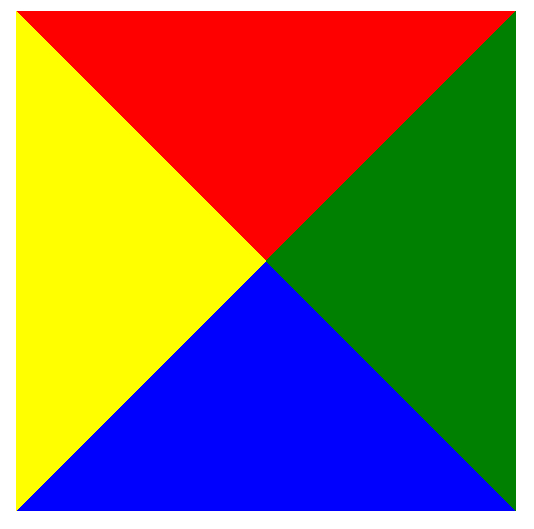
.box { width: 200px; height: 200px; background: black; } The most common example of using CSS shapes is the display of arrows. To understand how this works, you need to figure out how to use a separate border-color for each side and set the value to “0” for width and height:
.arrow { width: 0; height: 0; border-top: 100px solid red; border-right: 100px solid green; border-bottom: 100px solid blue; border-left: 100px solid yellow; } Or the same:
.arrow { width: 0; height: 0; border: 100px solid; border-top-color: red; border-right-color: green; border-bottom-color: blue; border-left-color: yellow; } Or so:
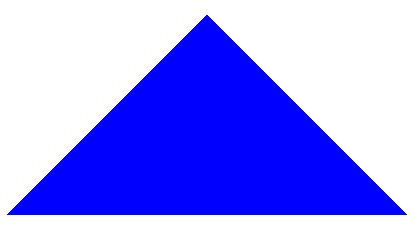
.arrow { width: 0; height: 0; border: 100px solid; border-color: red green blue yellow; } Now leave only the blue triangle:
.arrow { width: 0; height: 0; border: 100px solid; border-bottom-color: blue; } Making Speech Bubble
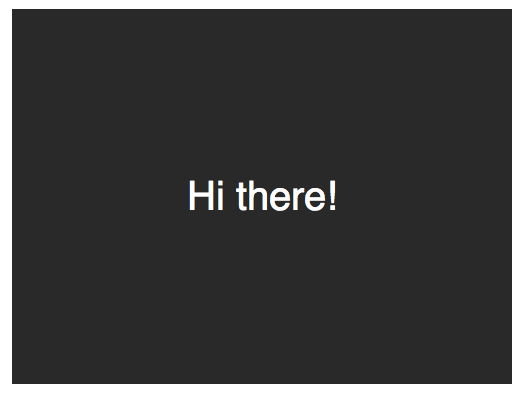
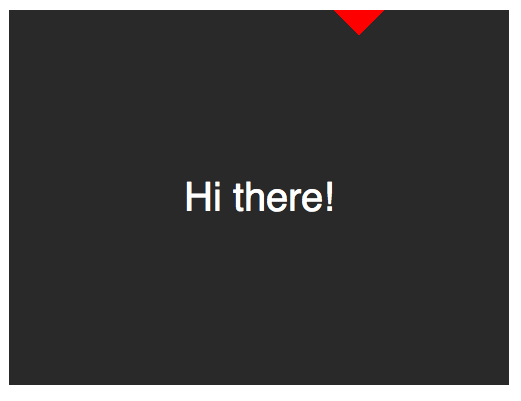
Our basic markup:
<div class="speech-bubble">Hi there!</div> And styles:
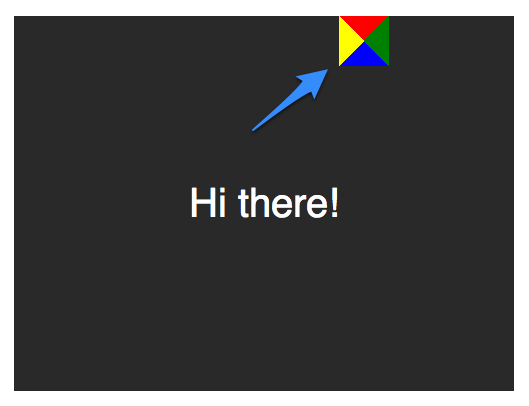
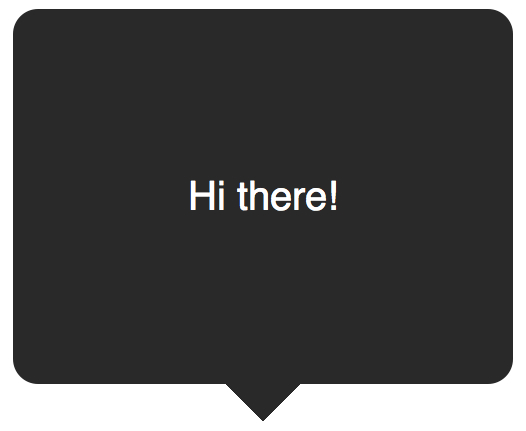
.speech-bubble { position: relative; background-color: #292929; width: 200px; height: 150px; line-height: 150px; /* vertically center */ color: white; text-align: center; } Now you need to place the arrow-triangle in the right place. Here is our colored box:
.speech-bubble:after { content: ''; position: absolute; width: 0; height: 0; border: 10px solid; border-color: red green blue yellow; } We leave only a quarter of a square:
.speech-bubble:after { content: ''; position: absolute; width: 0; height: 0; border: 10px solid; border-top-color: red; } Now move below and paint over:
.speech-bubble { /* … other styles */ border-radius: 10px; } .speech-bubble:after { content: ''; position: absolute; width: 0; height: 0; border: 15px solid; border-top-color: #292929; top: 100%; left: 50%; margin-left: -15px; /* adjust for border width */ } Application examples:
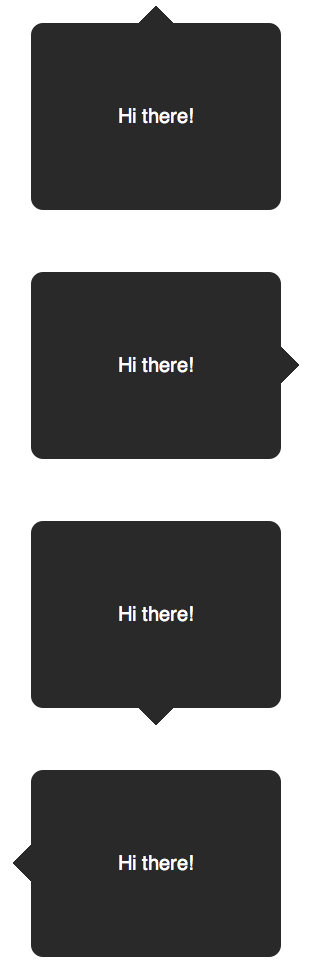
/* Speech Bubbles Usage: Apply a class of .speech-bubble and .speech-bubble-DIRECTION <div class="speech-bubble speech-bubble-top">Hi there</div> */ .speech-bubble { position: relative; background-color: #292929; width: 200px; height: 150px; line-height: 150px; /* vertically center */ color: white; text-align: center; border-radius: 10px; font-family: sans-serif; } .speech-bubble:after { content: ''; position: absolute; width: 0; height: 0; border: 15px solid; } /* Position the Arrow */ .speech-bubble-top:after { border-bottom-color: #292929; left: 50%; bottom: 100%; margin-left: -15px; } .speech-bubble-right:after { border-left-color: #292929; left: 100%; top: 50%; margin-top: -15px; } .speech-bubble-bottom:after { border-top-color: #292929; top: 100%; left: 50%; margin-left: -15px; } .speech-bubble-left:after { border-right-color: #292929; top: 50%; right: 100%; margin-top: -15px; } Vertical text centering
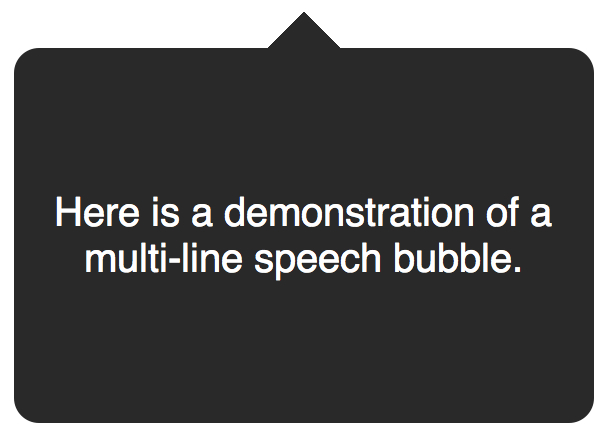
minus the use of line-height with vertical centering in the restriction of the text in one line. To solve this problem, you can apply display: table to our Speech Bubble and display: table-cell to the text:
.speech-bubble { /* other styles */ display: table; } .speech-bubble p { display: table-cell; vertical-align: middle; } Another example of non-standard use of boundaries:
.biohazard { width: 0; height: 0; border: 60px solid; border-radius: 50%; border-top-color: black; border-bottom-color: black; border-left-color: yellow; border-right-color: yellow; } Total
The use of the border parameter is not limited to just “1px solid black”, using borders you can create different shapes, and it’s enough to write the CSS class once and apply it to the many elements on the page.
')
Source: https://habr.com/ru/post/141658/
All Articles