Basics of setting up disproportionate scaling algorithms in Web-to-Print
In one of our past publications, we talked about how, on the basis of our Web-to-Print module, you can configure flexible scaling of print layouts via a web interface — so that the customers themselves can automatically resize layouts to the dimensions they need without using designer services.
The article shows how this function looks from the point of view of the user - how he can change the proportions of the layout literally in three clicks and get files ready for printing. Today, I present to your attention the reverse side of the medal - due to which all this lightness is achieved and how algorithms are set up for automatic re-flip layouts.
I immediately reject the algorithms for proportional increase in layouts, as in the previous article, because everything is elementary there - just the dimensions of all elements change in proportion to the increase in layout. All the “salt” is in disproportionate scaling, when, for example, a narrow horizontal layout for a banner, an elongated vertical for some roll-up, and so on will be made from the A1 poster.
')
In order for the user to easily make such resize, you must first configure the appropriate layout template. Usually, this setting is entrusted to the same designer who developed the template itself. First of all, he sets the “reasonable limits” - that is, to what extent it is possible to change the proportions of the layout. Then, based on these settings, sets the algorithms for changing the size and position of each element of the layout on the page.
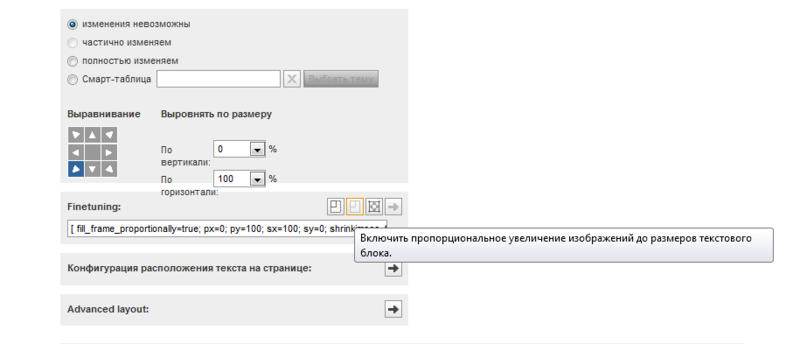
Let's start by changing the position of elements on the page. Alignment matrices are used to configure it. There are two variants of such matrices - 3x3 and 4x4:

The alignment determines how the position of the block changes as the document increases. You can “attach” a block to one of the sides or corners of the layout using cursors, and when the document changes in size, the space between the block and the required angle will not change. In most cases, a block of 3x3 cursors will be enough, but for layouts with a large number of elements or with specific corporate style requirements, linking blocks to sides and corners may not be enough and additional points will be needed.
In fact, with the help of this simple tool, the overall structure of the layout, the relative position of all blocks, is maintained. It is the turn of the second stage.
Next to the alignment matrix are two fields with which you can adjust the size of the blocks.
Depending on the alignment field used (3x3 or 4x4), you can choose how much the block will grow if the document is resized. These changes are given as a percentage of changes in the height and width of the layout.
That is, for example, if you should have a company logo in the lower right corner of the page, and its size does not depend on the page proportions, then zero values for both parameters are set for it.
And, for example, for a frame that runs along the edges of the page, on the contrary, you will need to set the size adjustment to 100% both horizontally and vertically, and it will change after changes in the size of the canvas.
The layout may contain an element such as a color bar that serves as a background for something — for example, a logo. And, let's say, it should always be the same in height, but in width it should follow the changes in the canvas. To do this, set 0% for vertical changes and 100% for horizontal.
The blocks containing raster images can also be enlarged without distorting the image, but for this you need to ensure that the image used in the layout has a “margin” in size. That is, if you intend to increase the layout, you need to use a high-resolution raster in the source code. If this is not the case, then it is better to limit the extent of the size of the layout immediately.
Thus, using only two parameters, the system can configure scaling algorithms for most layouts.
The article shows how this function looks from the point of view of the user - how he can change the proportions of the layout literally in three clicks and get files ready for printing. Today, I present to your attention the reverse side of the medal - due to which all this lightness is achieved and how algorithms are set up for automatic re-flip layouts.
I immediately reject the algorithms for proportional increase in layouts, as in the previous article, because everything is elementary there - just the dimensions of all elements change in proportion to the increase in layout. All the “salt” is in disproportionate scaling, when, for example, a narrow horizontal layout for a banner, an elongated vertical for some roll-up, and so on will be made from the A1 poster.
')
In order for the user to easily make such resize, you must first configure the appropriate layout template. Usually, this setting is entrusted to the same designer who developed the template itself. First of all, he sets the “reasonable limits” - that is, to what extent it is possible to change the proportions of the layout. Then, based on these settings, sets the algorithms for changing the size and position of each element of the layout on the page.
Alignment
Let's start by changing the position of elements on the page. Alignment matrices are used to configure it. There are two variants of such matrices - 3x3 and 4x4:
The alignment determines how the position of the block changes as the document increases. You can “attach” a block to one of the sides or corners of the layout using cursors, and when the document changes in size, the space between the block and the required angle will not change. In most cases, a block of 3x3 cursors will be enough, but for layouts with a large number of elements or with specific corporate style requirements, linking blocks to sides and corners may not be enough and additional points will be needed.
In fact, with the help of this simple tool, the overall structure of the layout, the relative position of all blocks, is maintained. It is the turn of the second stage.
Size adjustment
Next to the alignment matrix are two fields with which you can adjust the size of the blocks.
Depending on the alignment field used (3x3 or 4x4), you can choose how much the block will grow if the document is resized. These changes are given as a percentage of changes in the height and width of the layout.
That is, for example, if you should have a company logo in the lower right corner of the page, and its size does not depend on the page proportions, then zero values for both parameters are set for it.
And, for example, for a frame that runs along the edges of the page, on the contrary, you will need to set the size adjustment to 100% both horizontally and vertically, and it will change after changes in the size of the canvas.
The layout may contain an element such as a color bar that serves as a background for something — for example, a logo. And, let's say, it should always be the same in height, but in width it should follow the changes in the canvas. To do this, set 0% for vertical changes and 100% for horizontal.
The blocks containing raster images can also be enlarged without distorting the image, but for this you need to ensure that the image used in the layout has a “margin” in size. That is, if you intend to increase the layout, you need to use a high-resolution raster in the source code. If this is not the case, then it is better to limit the extent of the size of the layout immediately.
Thus, using only two parameters, the system can configure scaling algorithms for most layouts.
Source: https://habr.com/ru/post/141529/
All Articles