Install FeedBurner for your blog on Blogger.com
At leisure, I wondered about installing FeedBurner on my own blog (Blogger). For those who do not know, FeedBurner is a web service that feeds RSS feeds redirected from your website / blog, adds the ability to subscribe to a blog via email, and also provides certain statistics.
According to the materials from the instructions on the site, FeedBurner wrote a small manul: a step-by-step installation with images and some explanations.
This information, I think, will be interesting for beginners or those who have not yet figured out exactly how to work with FeedBurner. Consists of 3 items:
1. Create FeedBurner Feed
2. Redirect Feed from Blogger to FeedBurner
3. FeedBurner flow locations on the blog
About FeedBurner
According to Wikipedia , FeedBurner is a web service that feeds RSS feeds through itself, fixes minor bugs in them and can add additional functionality to the stream, for example, the Play button for podcasts. It also provides statistics for RSS feed subscriptions.
I read somewhere a selection of tips and recommendations for bloggers on how to design and run a blog. In the near future I will try to search for this article and post it at my place. So, one of the points was the organization of the RSS feed and the installation of the corresponding icon as high as possible and more noticeable on the blog.
The fact is that the Blogger engine already has a subscription to blog posts using the Atom format. But many bloggers set up a subscription through FeedBurner, because in addition to the usual export of records, you can also see detailed statistics on your RSS feed.
This article is based on information from the instructions on the site FeedBurner .
Create FeedBurner Feed
1. Go to the site FeedBurner . There in the center of the page in the "Start FeedBurning Now" form enter the address of your blog. If you plan to publish podcasts using Blogger, check the box “I am a podcaster” (I am a podcaster). After we press the “Next” button (Next).
')

The Identify Feed Source page should appear, where I was offered to choose a feed (feed, feed, feed, feed) via Atom or RSS. I chose the latter.
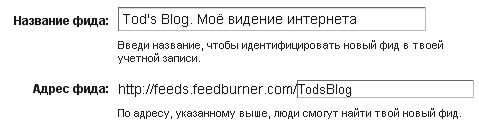
2. Next, a welcome page will open. Here you can set the title of the stream and the address at which it will be available. In principle, by default FeedBurner inserts some information there based on your blog, but note that the Russian text in the title will be perceived incorrectly.
Here should appear a form with an invitation to register or log in under the previously created account.
3. Also on this page you can create an account. Enter the user name, password, e-mail address and press the "Activate Feed" button. After that, a page should be displayed with congratulations on the successful registration.
4. Read the information on this page and click “Next” (Next) to continue the installation process. in the second stage, you can consider connecting TotalStats PRO for more detailed information about the readership of your feed.
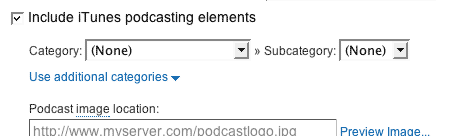
5. If you selected “I am a podcaster” at the very beginning (I am a podcaster), the settings for configuring your SmartCast ™ will appear. (I didn’t activate this item, so I’ll just provide a translation from FeedBurner). Here you can define categories and other information for iTunes, a copyright notice and add your podcast to Yahoo! Search.
After you are done, click “Next” (Next). The settings for the statistics service from FeedBurner should appear.
6. On the statistics configuration page, you select the level of detailed statistics that suits you best.
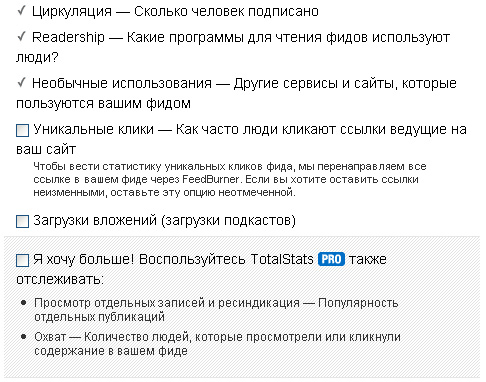
I added the ability to track “Unique clicks” (although I didn’t quite understand what it meant exactly), and also connected to TotalStats PRO.
To finish, finally, the installation, click "Next" (Next), while getting into the control interface feed.
You are now ready to create a FeedBurner feed on your Blogger blog.
Redirect Feed from Blogger to FeedBurner.
Blogger can take care that all your streaming traffic from your blog goes to FeedBurner feed. This helps to ensure that the statistics from FeedBurner is more comprehensive and accurate. Even the subscribers of the “original stream” will be redirected via FeedBurner.
So to redirect your stream:
1. In a new browser window, go to your Blogger account.
2. In the Blogger toolbar, click on the “Settings” link for the blog that we want to “burn”. The settings page for the selected blog appears.
3. Then select the menu item “Site Feed” (Site Feed) in the Settings tab (Settings).

4. Enter the full address of your FeedBurner stream into the Post Feed Redirect URL text box. Attention! Make sure you enter the full address of the stream, including the prefix "http: //".

5. Click “Save Settings”, then you will see the message “Settings were Saved Successfully”.
6. After this, Blogger redirects all feed traffic from the blog to the FeedBurner feed.
Next is the note: If you use the Blogger redirection property to send all blog feed traffic to the FeedBurner stream, you may want to change the code that is provided by FeedBurner to keep your subscribers even if you stop using the service. Want to know why, read the “Tech Tip” message on the FeedBurner forum.
As I understand from this post on the forum, the developers of FeedBurner are worried that if you suddenly decide to refuse their services, then accordingly all links to the stream with FeedBurner will not work. Therefore, they recommend when adding a link to a stream instead of:
<a href = " fusion.google.com/add?feedurl=
feeds.feedburner.com/ Your Feed_address > Link link </a>
Use something like:
<a href = " fusion.google.com/add?feedurl=
Your_address.blogspot.com/ feeds / posts / default »> </a>
Since all the same, all blog feeds are redirected to FeedBurner, this link will work correctly, but you will be able to save links if you refuse FeedBurner services. (Here are the caring developers!)
FeedBurner flow arrangements on the blog
Now use the FeedBurner publishing tools (FeedBurner's Publicity Tools) to select the icon as a link to the feed in your blog.
1. Select the “Publish” tab in the menu (Publicize).

2. Find the item “Chicklet Chooser” on the page in the menu on the left. On the right, a form is loaded that contains several options for the buttons that link (“promote”) your FeedBurner feed.

3. Mark the button you want to display on the site.
4. From the drop-down menu at the bottom of the page, select Blogger to add the stream icon as a widget. Click GO.

5. Blogger will open in a new window. Follow the instructions on the screen to continue the installation and add a new widget.

FeedBurner also offers you an email subscription service that uses your feed to send updates every day when you post a new post to your blog. If you want to suggest a link to subscribe to these new messages to your readers, you should follow the steps for what you did in this section.
In the same tab "Publish" (Publicize) in the left menu, select the item "Subscriptions by email." Carefully read the information regarding this service FeedBurner - the benefit there is everything in Russian. To activate the service, simply click the "Activate" button. In the next window, select Russian as the language in which information will be displayed for the new subscriber on your blog when you subscribe. Again, select the widget from the Blogger drop down menu and follow the instructions.
If you are using Blogger for podcasts, then you should make sure that the “Full” option in the field “Allow Blog Feed” must be set in the “Site Channel” submenu.
According to the materials from the instructions on the site, FeedBurner wrote a small manul: a step-by-step installation with images and some explanations.
This information, I think, will be interesting for beginners or those who have not yet figured out exactly how to work with FeedBurner. Consists of 3 items:
1. Create FeedBurner Feed
2. Redirect Feed from Blogger to FeedBurner
3. FeedBurner flow locations on the blog
About FeedBurner
According to Wikipedia , FeedBurner is a web service that feeds RSS feeds through itself, fixes minor bugs in them and can add additional functionality to the stream, for example, the Play button for podcasts. It also provides statistics for RSS feed subscriptions.
I read somewhere a selection of tips and recommendations for bloggers on how to design and run a blog. In the near future I will try to search for this article and post it at my place. So, one of the points was the organization of the RSS feed and the installation of the corresponding icon as high as possible and more noticeable on the blog.
The fact is that the Blogger engine already has a subscription to blog posts using the Atom format. But many bloggers set up a subscription through FeedBurner, because in addition to the usual export of records, you can also see detailed statistics on your RSS feed.
This article is based on information from the instructions on the site FeedBurner .
Create FeedBurner Feed
1. Go to the site FeedBurner . There in the center of the page in the "Start FeedBurning Now" form enter the address of your blog. If you plan to publish podcasts using Blogger, check the box “I am a podcaster” (I am a podcaster). After we press the “Next” button (Next).
')
The Identify Feed Source page should appear, where I was offered to choose a feed (feed, feed, feed, feed) via Atom or RSS. I chose the latter.
2. Next, a welcome page will open. Here you can set the title of the stream and the address at which it will be available. In principle, by default FeedBurner inserts some information there based on your blog, but note that the Russian text in the title will be perceived incorrectly.
Here should appear a form with an invitation to register or log in under the previously created account.
3. Also on this page you can create an account. Enter the user name, password, e-mail address and press the "Activate Feed" button. After that, a page should be displayed with congratulations on the successful registration.
4. Read the information on this page and click “Next” (Next) to continue the installation process. in the second stage, you can consider connecting TotalStats PRO for more detailed information about the readership of your feed.
5. If you selected “I am a podcaster” at the very beginning (I am a podcaster), the settings for configuring your SmartCast ™ will appear. (I didn’t activate this item, so I’ll just provide a translation from FeedBurner). Here you can define categories and other information for iTunes, a copyright notice and add your podcast to Yahoo! Search.
After you are done, click “Next” (Next). The settings for the statistics service from FeedBurner should appear.
6. On the statistics configuration page, you select the level of detailed statistics that suits you best.
I added the ability to track “Unique clicks” (although I didn’t quite understand what it meant exactly), and also connected to TotalStats PRO.
To finish, finally, the installation, click "Next" (Next), while getting into the control interface feed.
You are now ready to create a FeedBurner feed on your Blogger blog.
Redirect Feed from Blogger to FeedBurner.
Blogger can take care that all your streaming traffic from your blog goes to FeedBurner feed. This helps to ensure that the statistics from FeedBurner is more comprehensive and accurate. Even the subscribers of the “original stream” will be redirected via FeedBurner.
So to redirect your stream:
1. In a new browser window, go to your Blogger account.
2. In the Blogger toolbar, click on the “Settings” link for the blog that we want to “burn”. The settings page for the selected blog appears.
3. Then select the menu item “Site Feed” (Site Feed) in the Settings tab (Settings).
4. Enter the full address of your FeedBurner stream into the Post Feed Redirect URL text box. Attention! Make sure you enter the full address of the stream, including the prefix "http: //".
5. Click “Save Settings”, then you will see the message “Settings were Saved Successfully”.
6. After this, Blogger redirects all feed traffic from the blog to the FeedBurner feed.
Next is the note: If you use the Blogger redirection property to send all blog feed traffic to the FeedBurner stream, you may want to change the code that is provided by FeedBurner to keep your subscribers even if you stop using the service. Want to know why, read the “Tech Tip” message on the FeedBurner forum.
As I understand from this post on the forum, the developers of FeedBurner are worried that if you suddenly decide to refuse their services, then accordingly all links to the stream with FeedBurner will not work. Therefore, they recommend when adding a link to a stream instead of:
<a href = " fusion.google.com/add?feedurl=
feeds.feedburner.com/ Your Feed_address > Link link </a>
Use something like:
<a href = " fusion.google.com/add?feedurl=
Your_address.blogspot.com/ feeds / posts / default »> </a>
Since all the same, all blog feeds are redirected to FeedBurner, this link will work correctly, but you will be able to save links if you refuse FeedBurner services. (Here are the caring developers!)
FeedBurner flow arrangements on the blog
Now use the FeedBurner publishing tools (FeedBurner's Publicity Tools) to select the icon as a link to the feed in your blog.
1. Select the “Publish” tab in the menu (Publicize).
2. Find the item “Chicklet Chooser” on the page in the menu on the left. On the right, a form is loaded that contains several options for the buttons that link (“promote”) your FeedBurner feed.
3. Mark the button you want to display on the site.
4. From the drop-down menu at the bottom of the page, select Blogger to add the stream icon as a widget. Click GO.
5. Blogger will open in a new window. Follow the instructions on the screen to continue the installation and add a new widget.
FeedBurner also offers you an email subscription service that uses your feed to send updates every day when you post a new post to your blog. If you want to suggest a link to subscribe to these new messages to your readers, you should follow the steps for what you did in this section.
In the same tab "Publish" (Publicize) in the left menu, select the item "Subscriptions by email." Carefully read the information regarding this service FeedBurner - the benefit there is everything in Russian. To activate the service, simply click the "Activate" button. In the next window, select Russian as the language in which information will be displayed for the new subscriber on your blog when you subscribe. Again, select the widget from the Blogger drop down menu and follow the instructions.
If you are using Blogger for podcasts, then you should make sure that the “Full” option in the field “Allow Blog Feed” must be set in the “Site Channel” submenu.
Source: https://habr.com/ru/post/14145/
All Articles