Unity3d Lessons from Unity 3D Student (B00-B03)
Good day. I offer my own version of the translation of Unity3d lessons from www.unity3dstudent.com
This article is the first set of basic (from the Beginner section) lessons. The lessons are mainly aimed at learning scripting and using components.
Therefore, it is assumed that the basics of working in the Unity GUI are slightly familiar. If not, check out the introductory section on the same site .
The lessons are quite clear and short, so there should be a minimum of difficulties in the process of studying them.
PS: Is it good or bad? The question is rather complicated.
')
In some places, the lessons have minimal cosmetic changes that do not affect the basic essence.
The lesson describes how to add gravity / mass to an object using the Rigidbody component (solid).
If you want to add mass or gravity to an object, you need to use the Rigidbody component, which is located in the component menu.
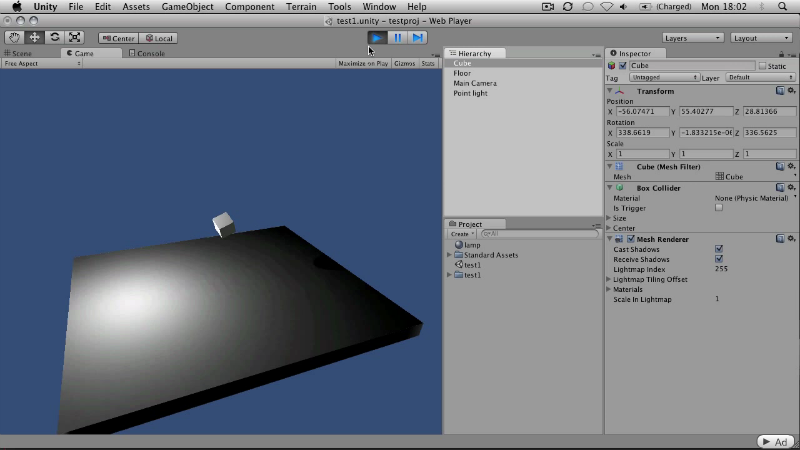
Create a project or a new scene in the finished project (by connecting Standard Assets packages ). Add a cube ( GameObject-> Create Other-> Cube ), a plane ( GameObject-> Create Other-> Plane ) and a point light source ( GameObject-> Create Other-> Point Light ). Arrange them as shown in the picture below.

Also position the camera so that it displays all our objects. If you click on the Play button, you will see a static scene where nothing happens.
Now add the component Rigidbody (solid). It is located in the Component-> Physics menu. Select our cube and add this component to it.

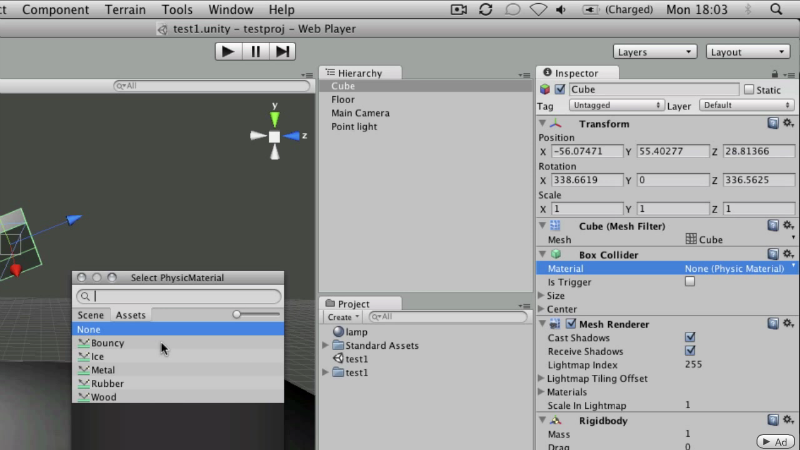
If you click on Play , you will see how the cube falls on the plane under the action of gravity. Let's change the physical properties of our cube a bit. Select cube again. In the Inspector View you can see the Box Collider component, one of the parameters of which is Material (the default value is None (Physics Material) ). Right-click on this value and pop up a window for selecting a physical material. If you created a project by connecting a standard set of resources ( Standard Assets ), you will see several standard physical materials. Select Bouncy .
Now pressing Play you will see how after falling the cube will begin to bounce off the surface.
Link to the original lesson
Section about Rigidbody component from the official reference book about Unity3d components
Rigidbody class reference from Unity3d official scripts reference
The tutorial describes how to detect collisions between objects using scripts.
Create a scene as in the previous lesson or load an existing one. Add another cube to it, stretch it horizontally 5-6 times and vertically 2a times. Arrange it as shown in the picture below.

In this lesson, the names of the objects are important. Name the Floor plane, and the cube representing the Wall (your KO)
In the Project View, click on Create and select C # Script . Call it boxdrop . Double-clicking on the script will open it in your script editor (as a rule, MonoDevelop is the default. The author of the article is Visual Studio 2010 under Windows or Textmate under MacOs).
Please note that the class name must always coincide with the script name (the case of letters also matters):
By default, Unity creates a framework for a C # script. Remove the entire contents of the boxdrop class and replace it with the following:
The OnCollisionEnter function determines the collision of an object with other objects. And the static Log method of the Debug class writes a message to the Unity console. After saving the script, add it as a component for the falling cube.
Now, if you hit Play , the moment the cube touches the floor, the console will display a corresponding message. You can open the console window by pressing ctrl + shift + c in Windows or cmd + shift + c in MacOs. The last console message is displayed in the status bar of the project (at the bottom of the window).
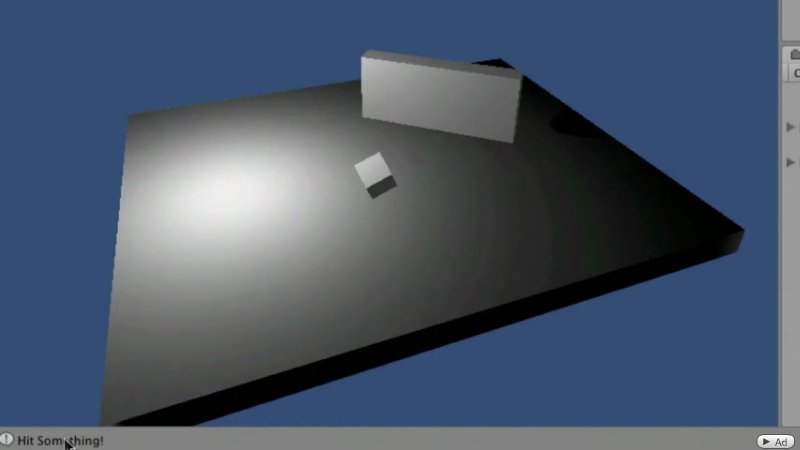
Moreover, the message will be issued at each collision.
In order to understand exactly which object our cube collided with, we will take the value of the parameter of the class Collision , which will accept the OnCollisionEnter method :
Click Play and after your cube touches the wall and floor several times, stop the game and open the console. Now, when colliding only with a wall or floor, a message corresponding to the name of the object will be issued.

Link to the original lesson
Help on the OnCollisionEnter () function from the official Unity3d scripts reference guide
The section on the Collider component from the official reference book on the Unity3d components:
The lesson tells the basics of input using scripts.
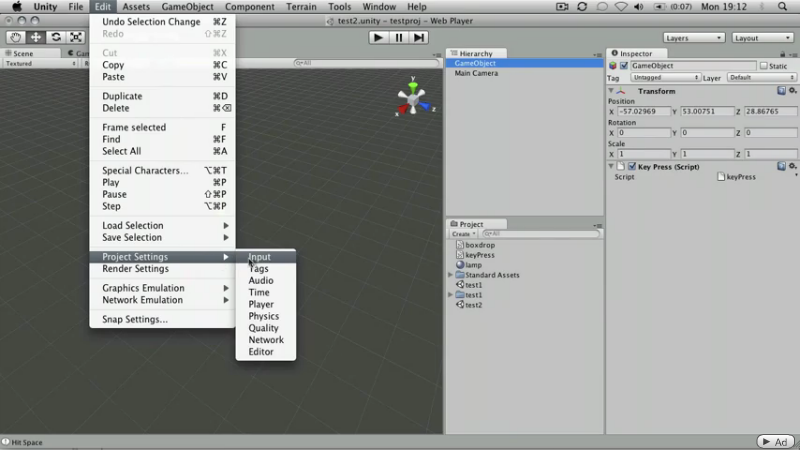
In Unity, there are many ways to enter text data. We will look at the simplest case in which pressing the space bar will invoke a message in the Unity console. Unlike previous lessons, in this scene there is only a camera and an empty game object ( GameObject-> Create Empty ).

Add a C # script and call it keyPress . Open the script. In the body of the keyPress class, you will see the empty Update () function. It is called every frame:
To understand whether the input from the keyboard or not, you want to check it every frame. Add the following code to our Update function:
Save the file and add this script to an empty object (by dragging the script to the object or by selecting the object and dragging the script in the Inspector View). Let's find out what Jump is . Go to Edit-> Project Settings-> Input .
In the Inspector'e opened Input Manager . Expand Axes . If you select Jump , you can see that its name represents the string “Jump” , and the value of the variable Positive Button is space. You can read about the remaining parameters in the Unity directory (link at the end of the lesson).

Run the scene, go to the Game View tab and press the spacebar, then in the console (and at the bottom of the project window) you will see the corresponding message.

Similar results can be obtained by replacing the line
on
Link to the original lesson
Input class reference from the official Unity3d scripts reference
Section about the Input component from the official reference book about the Unity3d components
The lesson tells how to create prefabs, and why they are needed.
A prefab (prefab) is an object contained in your project, you can clone it and create a lot of copies of it, and all copies will have the same components when copying. Create or load a scene from Basic Lesson 1. We have a cube on the scene that falls and displays a message in the console when it collides with objects. What if we want to create many of the same cubes (with components already added)?
Create a prefab using Create-> Prefab in the Project View .

As a result, we get a gray icon called New Prefab.

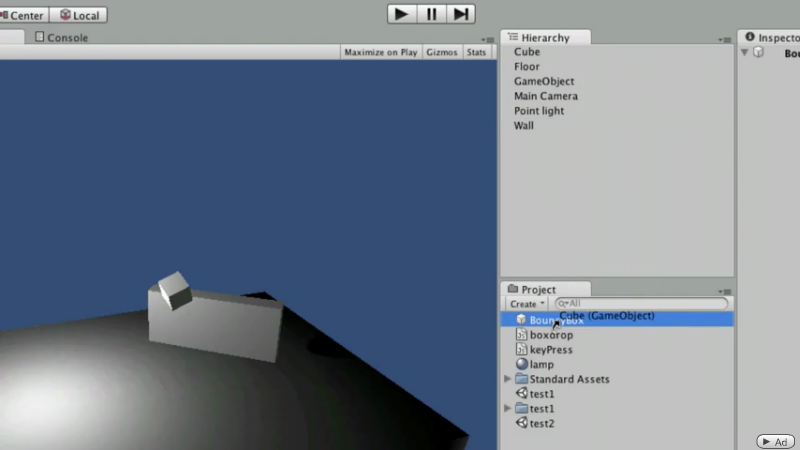
Rename it to "BouncyBox". Now we just have to drag all that is required into our prefab. That is Cube .
The color of the icon has changed to blue and now, if you select our prefab, in the Inspector View you will see that it has the same parameters as the Cube object.
If you want to create instances of a prefab, then you need to drag it into the scene.

Click Play and see that the added cube behaves exactly the same as the original one.
Prefabs are needed if you need to create many identical objects that contain many components. For example, if you are developing a game and you need to add a lot of enemies who have the same behavior, appearance, etc.

Link to the original lesson
The section on Prefabs from the Unity3d official manual
Introduction
This article is the first set of basic (from the Beginner section) lessons. The lessons are mainly aimed at learning scripting and using components.
Therefore, it is assumed that the basics of working in the Unity GUI are slightly familiar. If not, check out the introductory section on the same site .
The lessons are quite clear and short, so there should be a minimum of difficulties in the process of studying them.
PS: Is it good or bad? The question is rather complicated.
')
In some places, the lessons have minimal cosmetic changes that do not affect the basic essence.
Basic Lesson 00 - Adding mass / gravity to a solid body.
The lesson describes how to add gravity / mass to an object using the Rigidbody component (solid).
If you want to add mass or gravity to an object, you need to use the Rigidbody component, which is located in the component menu.
Create a project or a new scene in the finished project (by connecting Standard Assets packages ). Add a cube ( GameObject-> Create Other-> Cube ), a plane ( GameObject-> Create Other-> Plane ) and a point light source ( GameObject-> Create Other-> Point Light ). Arrange them as shown in the picture below.
Also position the camera so that it displays all our objects. If you click on the Play button, you will see a static scene where nothing happens.
Now add the component Rigidbody (solid). It is located in the Component-> Physics menu. Select our cube and add this component to it.
If you click on Play , you will see how the cube falls on the plane under the action of gravity. Let's change the physical properties of our cube a bit. Select cube again. In the Inspector View you can see the Box Collider component, one of the parameters of which is Material (the default value is None (Physics Material) ). Right-click on this value and pop up a window for selecting a physical material. If you created a project by connecting a standard set of resources ( Standard Assets ), you will see several standard physical materials. Select Bouncy .
Now pressing Play you will see how after falling the cube will begin to bounce off the surface.
Link to the original lesson
Additional materials:
Section about Rigidbody component from the official reference book about Unity3d components
Rigidbody class reference from Unity3d official scripts reference
Basic Lesson 01 - Basics of collision detection.
The tutorial describes how to detect collisions between objects using scripts.
Create a scene as in the previous lesson or load an existing one. Add another cube to it, stretch it horizontally 5-6 times and vertically 2a times. Arrange it as shown in the picture below.
In this lesson, the names of the objects are important. Name the Floor plane, and the cube representing the Wall (your KO)
In the Project View, click on Create and select C # Script . Call it boxdrop . Double-clicking on the script will open it in your script editor (as a rule, MonoDevelop is the default. The author of the article is Visual Studio 2010 under Windows or Textmate under MacOs).
Please note that the class name must always coincide with the script name (the case of letters also matters):
//! public class boxdrop : MonoBehaviour { By default, Unity creates a framework for a C # script. Remove the entire contents of the boxdrop class and replace it with the following:
// void OnCollisionEnter() { Debug.Log("Hit Something"); // Unity } The OnCollisionEnter function determines the collision of an object with other objects. And the static Log method of the Debug class writes a message to the Unity console. After saving the script, add it as a component for the falling cube.
Now, if you hit Play , the moment the cube touches the floor, the console will display a corresponding message. You can open the console window by pressing ctrl + shift + c in Windows or cmd + shift + c in MacOs. The last console message is displayed in the status bar of the project (at the bottom of the window).
Moreover, the message will be issued at each collision.
In order to understand exactly which object our cube collided with, we will take the value of the parameter of the class Collision , which will accept the OnCollisionEnter method :
// Collision, void OnCollisionEnter(Collision myCollision) { // if (myCollision.gameObject.name == "Floor") { // Debug.Log("Hit the floor"); } else if (myCollision.gameObject.name == "Wall") { Debug.Log("Hit the wall"); } } } Click Play and after your cube touches the wall and floor several times, stop the game and open the console. Now, when colliding only with a wall or floor, a message corresponding to the name of the object will be issued.
Link to the original lesson
Additional materials:
Help on the OnCollisionEnter () function from the official Unity3d scripts reference guide
The section on the Collider component from the official reference book on the Unity3d components:
Basic Lesson 02 - Input Basics
The lesson tells the basics of input using scripts.
In Unity, there are many ways to enter text data. We will look at the simplest case in which pressing the space bar will invoke a message in the Unity console. Unlike previous lessons, in this scene there is only a camera and an empty game object ( GameObject-> Create Empty ).
Add a C # script and call it keyPress . Open the script. In the body of the keyPress class, you will see the empty Update () function. It is called every frame:
// Update() void Update () { } To understand whether the input from the keyboard or not, you want to check it every frame. Add the following code to our Update function:
// , "Jump"( ) if (Input.GetButtonUp("Jump")) { Debug.Log("We Have Hit the Space Bar"); // } Save the file and add this script to an empty object (by dragging the script to the object or by selecting the object and dragging the script in the Inspector View). Let's find out what Jump is . Go to Edit-> Project Settings-> Input .
In the Inspector'e opened Input Manager . Expand Axes . If you select Jump , you can see that its name represents the string “Jump” , and the value of the variable Positive Button is space. You can read about the remaining parameters in the Unity directory (link at the end of the lesson).
Run the scene, go to the Game View tab and press the spacebar, then in the console (and at the bottom of the project window) you will see the corresponding message.
Similar results can be obtained by replacing the line
if (Input.GetButtonUp("Jump")) { on
if (Input.GetKeyUp(KeyCode.Space)) { Link to the original lesson
Additional materials:
Input class reference from the official Unity3d scripts reference
Section about the Input component from the official reference book about the Unity3d components
Basic Lesson 03 - Prefabs
The lesson tells how to create prefabs, and why they are needed.
A prefab (prefab) is an object contained in your project, you can clone it and create a lot of copies of it, and all copies will have the same components when copying. Create or load a scene from Basic Lesson 1. We have a cube on the scene that falls and displays a message in the console when it collides with objects. What if we want to create many of the same cubes (with components already added)?
Create a prefab using Create-> Prefab in the Project View .
As a result, we get a gray icon called New Prefab.
Rename it to "BouncyBox". Now we just have to drag all that is required into our prefab. That is Cube .
The color of the icon has changed to blue and now, if you select our prefab, in the Inspector View you will see that it has the same parameters as the Cube object.
If you want to create instances of a prefab, then you need to drag it into the scene.
Click Play and see that the added cube behaves exactly the same as the original one.
Prefabs are needed if you need to create many identical objects that contain many components. For example, if you are developing a game and you need to add a lot of enemies who have the same behavior, appearance, etc.
Link to the original lesson
Additional materials:
The section on Prefabs from the Unity3d official manual
Source: https://habr.com/ru/post/141362/
All Articles