Test Automation / Customize Cucumber, Capybara & Selenium-WebDriver
Everything has been done and now there is time to scribble a few lines about test automation ...
I think you should not talk about what testing or test automation. I also will not enter Cucumber, Capybara or Selenium-Webdriver into the initial course, as some information can be found on the Internet.
All the "work" will take place in real interaction with a web browser. Those. the web browser will launch, emulate the actions of the real user and close upon completion of the tests. Running a real browser allows you to automate ajax requests and various JS "chips". Although, if you do not need to work with JS, you can not launch a web browser, a work from the console, and thus save some time, speed up the work of tests. For these purposes, instead of Selenium-Webdriver, you can use the Capybara-mechanize driver.
For those who still could notget acquainted with Cucumber and Capybara, I will say this: “cucumber” will be used as a “parser” of the text, Capybara - as a layer between Cucumber and the driver, as well as for writing automation steps. In other words ... on cucumber we write our tests in simple language, and the steps themselves are implemented using Capybara. And Capybara already interacts with the webdriver, but that's another story;)
')
It is assumed that you have installed ruby with all the appropriate settings. Consider the example with an FF browser. And so ... Let's go!
Install gem's:
Gem files that are installed on my machine:
cucumber - 1.1.4
capybara - 1.1.2
capybara-mechanize - 0.3.0.rc3
selenium-webdriver - 2.17.0
Suppose we already have a feature written on Cucumber. Consider the folder structure necessary for correct operation.
A few words about the structure itself:
in the “features” folder are our “features” written according to the rules of Cucumber.
in the folder "step_definitions" steps for the implementation of the conceived functionality.
in the folder “support” any configuration files, libraries. As well as the file env.rb - which Cucmber refers to immediately after launch; where the driver is initialized; initial setup.
It seems everything is extremely simple. Let's go directly to the very setting of our env.rb file.
Open env.rb. And we include the necessary files:
Make Capybara ignore hidden items, set the timeout and default host:
Register the drivers themselves:
Cucumber, before executing a script, calls the Before do ... end section. And after the completion of the script - After do ... end. If you remember, Cucumber supports working with tags, that is, we can specify a tag name in front of the script and install the driver for Capybara in the “Before” section. You can also display the names of failed tests from the “After” section, or send emails, reports, and so on. For the sake of justice, I would like to note that Capybara supports some drivers, by default, but I advise you to redefine them yourself. :)
In new versions of Capybara, after each script, gem'ka resets the session. This threatens that if you have an authorization system, then in each new scenario you have to go through it again. This can be avoided by blocking this action. You must go to the gem file (ubuntu: ... / gems / capybara-VERSION / lib / capybara / cucumber.rb) and put a comment before "Capybara.reset_sessions!" In the very first section (After do ... end). This is not all the “innovations” of updates: just after every script, “Capybara” takes the browser to a blank page. It’s also not difficult to “get rid of” if you put a comment before the “@ browser.navigate.to ('about: blank')” in the “… / gems / capybara-VERSION / lib / capybara / selenium / driver.rb” file .
I would also like to note that on some test environments there is a so-called basic authority, this can be circumvented by passing the name and password directly in the URL:
After this action, the FF may issue another window, with a clarification (oh, this FF ...).
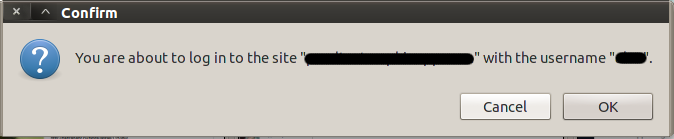
This “window” is eliminated by adding one parameter to the browser itself. Here's how to do it:
The original is here .
That's all. The mood is over ... Now it’s enough to write steps and make the application under test better :)
You can consider how steps are created, how scenarios are written (scenario), or hit another Cucumber / Capybara / WebDriver “region”. If it will be interesting - write!
Thank you for your attention and good luck to all!
PS Some links:
cucumber github
capybara github
selenium
I think you should not talk about what testing or test automation. I also will not enter Cucumber, Capybara or Selenium-Webdriver into the initial course, as some information can be found on the Internet.
All the "work" will take place in real interaction with a web browser. Those. the web browser will launch, emulate the actions of the real user and close upon completion of the tests. Running a real browser allows you to automate ajax requests and various JS "chips". Although, if you do not need to work with JS, you can not launch a web browser, a work from the console, and thus save some time, speed up the work of tests. For these purposes, instead of Selenium-Webdriver, you can use the Capybara-mechanize driver.
For those who still could not
')
It is assumed that you have installed ruby with all the appropriate settings. Consider the example with an FF browser. And so ... Let's go!
Install gem's:
(ubuntu) # sudo gem install cucumber capybara selenium-webdriver capybara-mechanize --pre Gem files that are installed on my machine:
cucumber - 1.1.4
capybara - 1.1.2
capybara-mechanize - 0.3.0.rc3
selenium-webdriver - 2.17.0
Suppose we already have a feature written on Cucumber. Consider the folder structure necessary for correct operation.
 MyProject \
     features \
     step_definitions /
         user_steps.rb
     support \
         env.rb
A few words about the structure itself:
in the “features” folder are our “features” written according to the rules of Cucumber.
in the folder "step_definitions" steps for the implementation of the conceived functionality.
in the folder “support” any configuration files, libraries. As well as the file env.rb - which Cucmber refers to immediately after launch; where the driver is initialized; initial setup.
It seems everything is extremely simple. Let's go directly to the very setting of our env.rb file.
Open env.rb. And we include the necessary files:
require 'cucumber/formatter/unicode' require 'capybara' require 'capybara/dsl' require 'capybara/session' require 'selenium-webdriver' require 'capybara/cucumber' require 'capybara/mechanize/cucumber' Make Capybara ignore hidden items, set the timeout and default host:
Capybara.ignore_hidden_elements = true Capybara.default_wait_time = 15 Capybara.app_host = «http://my_site.com» Register the drivers themselves:
Capybara.register_driver :selenium do |app| profile = Selenium::WebDriver::Firefox::Profile.new # FF. Selenium::WebDriver::Firefox.path = File.expand_path('~/path/to/firefox') # , FF . Capybara::Selenium::Driver.new(app, :browser => :firefox, :profile => profile) end # web- Capybara.register_driver :mechanize do |app| Capybara::Mechanize::Driver.new(app) end Cucumber, before executing a script, calls the Before do ... end section. And after the completion of the script - After do ... end. If you remember, Cucumber supports working with tags, that is, we can specify a tag name in front of the script and install the driver for Capybara in the “Before” section. You can also display the names of failed tests from the “After” section, or send emails, reports, and so on. For the sake of justice, I would like to note that Capybara supports some drivers, by default, but I advise you to redefine them yourself. :)
Before do |scenario| if scenario.source_tag_names.include?('@no_browser') and Capybara.default_driver != :mechanize Capybara.default_driver = :mechanize elsif !scenario.source_tag_names.include?('@no_browser') and Capybara.default_driver != :selenium Capybara.default_driver = :selenium end end After do |scenario| if scenario.failed? puts scenario.name puts scenario.exception.message end end In new versions of Capybara, after each script, gem'ka resets the session. This threatens that if you have an authorization system, then in each new scenario you have to go through it again. This can be avoided by blocking this action. You must go to the gem file (ubuntu: ... / gems / capybara-VERSION / lib / capybara / cucumber.rb) and put a comment before "Capybara.reset_sessions!" In the very first section (After do ... end). This is not all the “innovations” of updates: just after every script, “Capybara” takes the browser to a blank page. It’s also not difficult to “get rid of” if you put a comment before the “@ browser.navigate.to ('about: blank')” in the “… / gems / capybara-VERSION / lib / capybara / selenium / driver.rb” file .
I would also like to note that on some test environments there is a so-called basic authority, this can be circumvented by passing the name and password directly in the URL:
Capybara.visit("http://#{$name}:#{$pass}@#{url}") After this action, the FF may issue another window, with a clarification (oh, this FF ...).
This “window” is eliminated by adding one parameter to the browser itself. Here's how to do it:
	 Open the about: config page in FF.
	 Create a new integer key (right mouse click → new → integer):
	 network.http.phishy-userpass-length with a value of 255
The original is here .
That's all. The mood is over ... Now it’s enough to write steps and make the application under test better :)
You can consider how steps are created, how scenarios are written (scenario), or hit another Cucumber / Capybara / WebDriver “region”. If it will be interesting - write!
Thank you for your attention and good luck to all!
PS Some links:
cucumber github
capybara github
selenium
Source: https://habr.com/ru/post/141259/
All Articles