Facebook Welcome Page and Other Custom Tabs Guide
Facebook is the largest social network and one of the most visited sites in the world. It is possible not only to post funny statuses and like photos, but also
use as a powerful marketing tool. Everything is logical - a billion users, the ability to target a specific audience, instant announcements, and many others.
useful pieces that are not available for offline. Today it is difficult to find a company without its own business page or a popular person without a fan page. In this article I will try
analyze in detail the technical side of this issue from the front-end of development.
This post is not about creating the page itself, because this is a rather trivial procedure, but about custom tabs that you can add yourself and fill with the necessary content.
Anyone, even a novice web developer, can do about a dozen of these tabs in one evening, knowing some of the principles and nuances of their creation.
I mean the vast majority of all kinds of welcome-pages, pages-announcements and pages with all kinds of informational text-graphic content. The pages are more complicated with dynamic elements, forms and other functional time, of course, will take more.
The first thing that should be clarified - working with the product page, and not with a personal profile - you will not be able to add a tab with your content to your personal profile.
Thus, you can add your own tab only on the product page (brand, company, group, etc.). If such a page does not exist, it should be created by clicking on the following link:
www.facebook.com/pages/create.php
')
There is nothing difficult in creating such a page, so I’ll skip this step. Moreover, if the client asks to customize the page, then most often he already has it.
Actually, to the point.
There are two main ways to make a custom tab: either by creating your own application using the tools of a fb-developer, or by using a third-party application. The method should be selected on the basis of the TZ and the time allocated for the development. The pros and cons of each of the methods will be discussed below, the conclusions on this subject are at the end.
It is understood that the html-content is already folded and uploaded to a public ftp-server.
Working with Facebook development tools begins on the following page:
developers.facebook.com/apps
On it you can see the created applications that are tied to the current account.

Here we are primarily interested in the button " + Create New App "
However, if you are visiting developers.facebook.com for the first time, you will most likely need to take a few additional steps:
The developer should allow access to your basic information and confirm your password, and you will also need to verify your account .
This can be done either by sending a mobile sms with a confirmation code to your number, or by entering a bank card number. SMS usually comes within one minute.
Immediately after clicking “Create New App”, a window will appear in which you are invited to enter the name of your future application and agree with the policies of the FB platform:
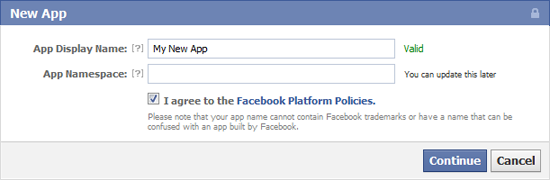
The App Namespace field can be left blank (needed for full-fledged facebook applications using Open Graph and canvas pages). After the continuation you will need to enter the captcha.
After the submission we see the main settings of our application. Here you can download an icon, set a name, select an application category and set other basic settings. However, all these manipulations can be postponed for the future and come back to them later. At the bottom of the page you should choose the method by which our application will be integrated into Facebook.
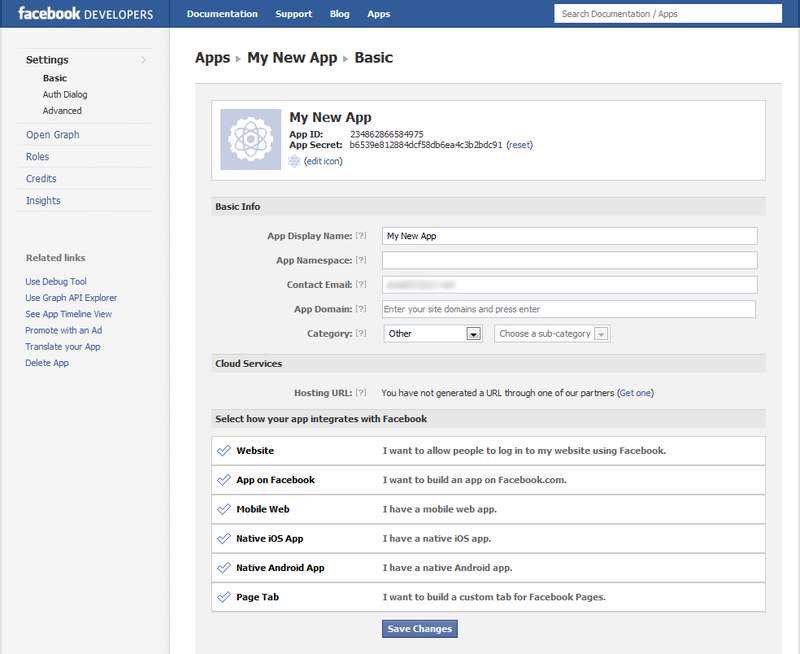
Our goal is our own custom tab, so accordingly we select “Page Tab” .
In the first field we indicate the name of the tab , in the next two - direct links to our layout or dynamic content, previously uploaded to the ftp of the public server.
However, here you will be waited by the first nuance - SSL protection is a mandatory requirement of Facebook since October 2011, so it is imperative that the url you need is accessible via https protocol
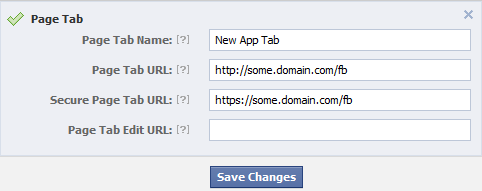
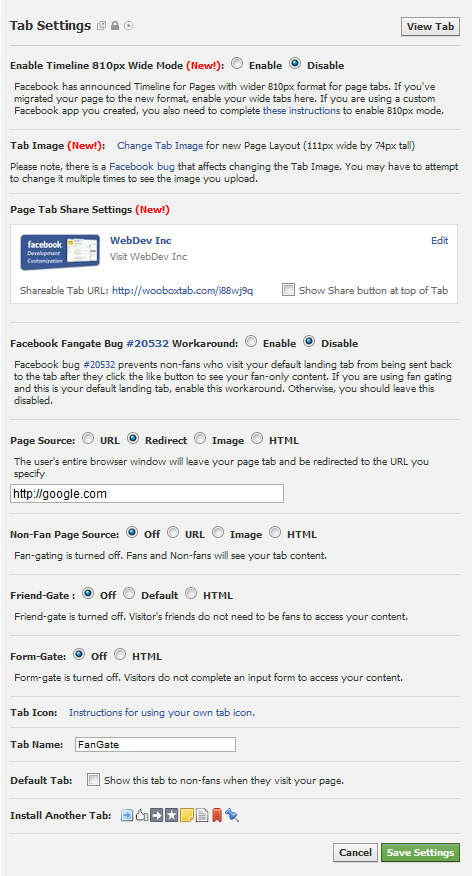
By clicking the "Save Changes" button we get a ready working tab. If you wish, you can open the advanced section and fine-tune the application.
Now let's proceed directly to adding the created application to the page we need.
The main advantage of own application - control of a set of its parameters . Going into the properties of the application, you can fine-tune them. Previously, its additional advantage over solutions from third-party applications was the ability to install its own tab icon, but with the arrival of the timeline the tabs design has changed, and now the installation of the personal image of the tab presents no problems.
The disadvantages include a longer creation time compared with the second method, as well as the complexity of creating the so-called fan-gate . You most likely have seen such a bunch of times on different pages - when you are prompted to click Like in order to see some hidden content.
At the moment there are a huge number of free applications that allow you to add a custom tab to your page and configure it. Just enter the query “static html” in the Facebook search bar and you can see the most popular applications in the results:

FBML applications can not be considered, since Facebook has abandoned fbml in favor of html iframes.
Consider the most popular Static HTML application : iframe tabs . The number of active users speaks for itself.
Clicking on the “Go to App” will get to the page of the application itself, which looks like this:
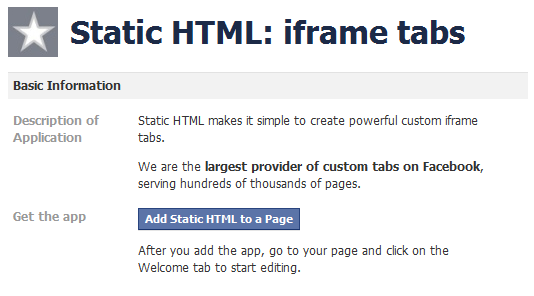
On it, click “Add Static HTML to a Page” and select the page to which you want to add a tab:

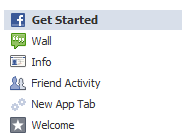
After the manipulations made, a new tab “Welcome” will appear among the other tabs on the left side of our page. A distinctive feature of the Static HTML application is the white star icon on a gray background.
Tabs in the old version:
Tabs in the Timeline:

Let's proceed to the direct setting of the tab. To begin, change its name. In the old version of Facebook pages for this you had to go to the list of all already installed applications. This was done by pressing "Edit Page" on the first three default tabs (Get Started, Wall, Info).
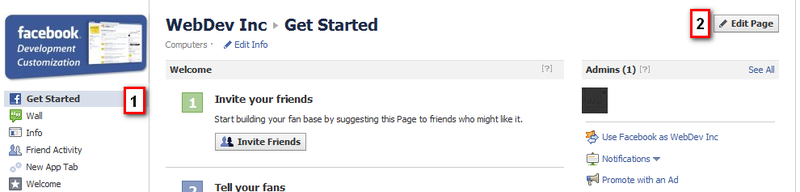
In Timeline, the owners of the page above the main content see the admin panel :

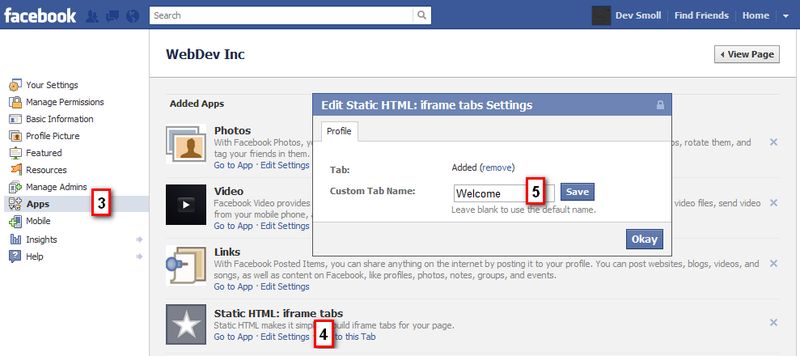
From there, go to the page properties editing mode :

Next, select the application we need and click "Edit Settings" . In the pop-up that appears, we can either change its name or delete this tab.
Changing the name of the tab we go to its content. To do this, simply select it in the general list of tabs. If the user is logged in under the administrator account, he will see a page with settings. All the others choosing this tab will see directly its content.
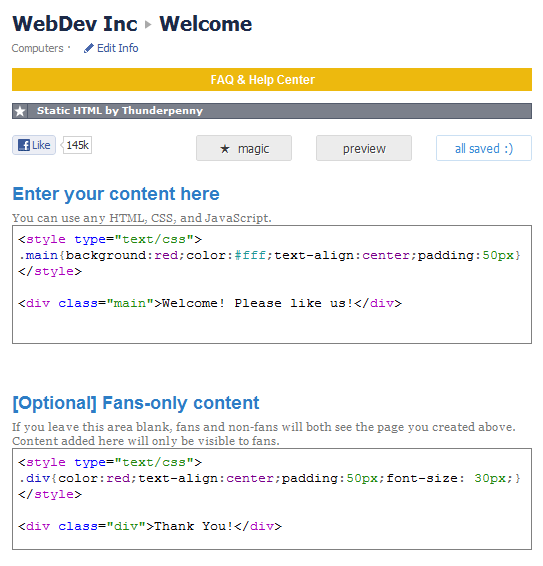
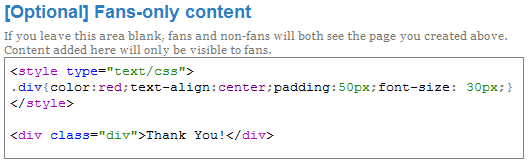
The Static HTML application has fan-gate support and this is one of its main advantages.
The content field can be filled with both html / css code, and you can specify a direct link using an iframe.
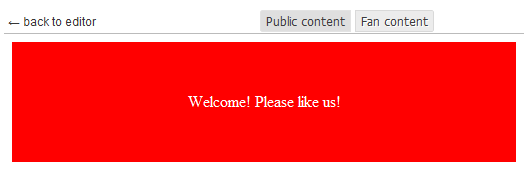
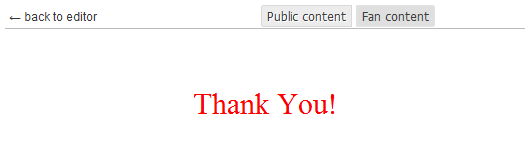
To view the result click on the preview. In the preview window, we can choose the content that we want to see - either public or available only to those who clicked the page.
Once the main disadvantage of this application was the impossibility of changing the icon. However, at the end of 2011, the developers added this possibility, and with the advent of the Timeline interface, this was no longer necessary - in the new mode, it is no longer a problem for users to set their own image.
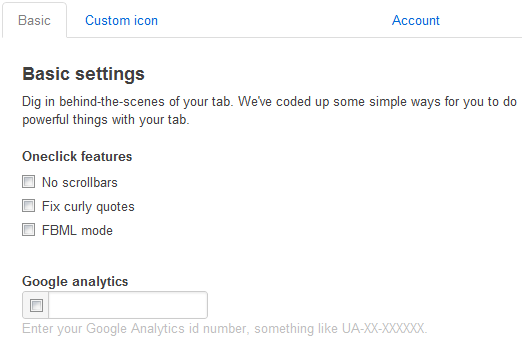
When you click on the "magic *" button, you can see some nice buns, in particular, the ability to customize google analytics and forcibly hide the scrollbar.
Also, one of the most popular applications is the Static Iframe Tab.

It is added to the page in the same way as the previous application. However, the static iframe tab has a wider set of tab content settings. Already when added to the page,
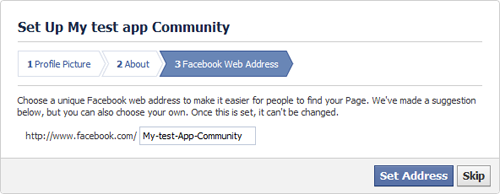
the user sees a small wizard where you can immediately add an image for the profile, fill in the "About" field and set a unique name for the link to your page
Advantages of this option:
Minuses:
Advantages of this option:
Minuses:
Summarizing, we can say that the option of connecting a third-party application is easier to configure and significantly gains the time of creation from its own application. An additional fat plus would be the simplicity of creating fan gates.
Of the minuses, we can note the difficulty of changing the standard application icon, links to the websites of the creators of this application in many of them, as well as dependence on these developers and their servers. Despite the fact that the same Static HTML iframe tabs has tens of millions of users, it happened that this application stopped working for some time due to problems on their servers. However, it confuses very few people, as a result of which Static HTML can be seen on pages that have a huge number of subscribers, and quite often they don’t even bother about changing the standard application icon to their own.
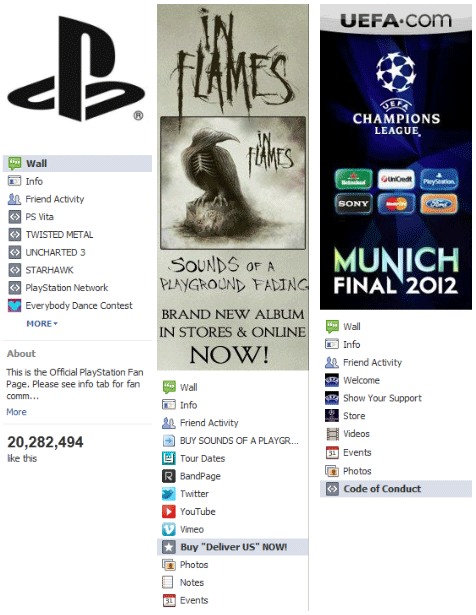
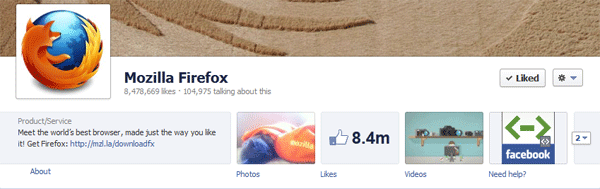
A few examples of popular pages where custom tabs are actively used:
Old version:
As you can see, these pages have not yet switched to the Chronicle interface (Timeline), which will be forcibly entered on March 30th.
New Timeline:
Material prepared with the participation of derSmoll
use as a powerful marketing tool. Everything is logical - a billion users, the ability to target a specific audience, instant announcements, and many others.
useful pieces that are not available for offline. Today it is difficult to find a company without its own business page or a popular person without a fan page. In this article I will try
analyze in detail the technical side of this issue from the front-end of development.
This post is not about creating the page itself, because this is a rather trivial procedure, but about custom tabs that you can add yourself and fill with the necessary content.
Anyone, even a novice web developer, can do about a dozen of these tabs in one evening, knowing some of the principles and nuances of their creation.
I mean the vast majority of all kinds of welcome-pages, pages-announcements and pages with all kinds of informational text-graphic content. The pages are more complicated with dynamic elements, forms and other functional time, of course, will take more.
The first thing that should be clarified - working with the product page, and not with a personal profile - you will not be able to add a tab with your content to your personal profile.
Thus, you can add your own tab only on the product page (brand, company, group, etc.). If such a page does not exist, it should be created by clicking on the following link:
www.facebook.com/pages/create.php
')
There is nothing difficult in creating such a page, so I’ll skip this step. Moreover, if the client asks to customize the page, then most often he already has it.
Actually, to the point.
Create custom tabs
Table of contents:
- 1. Preparing account
- 2. Method number one: create your application using development tools
- 3. Method number two: add tab using third-party applications
- 4. Install and configure the Static HTML application: iframe tabs
- 5. Installing and Configuring Static Iframe Tab
- 6. The main steps when creating a taba. Option 1 - create your own application
- 7. The main steps in creating. Option 2 - Third Party Applications
- 8. Useful sizes
There are two main ways to make a custom tab: either by creating your own application using the tools of a fb-developer, or by using a third-party application. The method should be selected on the basis of the TZ and the time allocated for the development. The pros and cons of each of the methods will be discussed below, the conclusions on this subject are at the end.
It is understood that the html-content is already folded and uploaded to a public ftp-server.
Account preparation
Working with Facebook development tools begins on the following page:
developers.facebook.com/apps
On it you can see the created applications that are tied to the current account.
Here we are primarily interested in the button " + Create New App "
However, if you are visiting developers.facebook.com for the first time, you will most likely need to take a few additional steps:
The developer should allow access to your basic information and confirm your password, and you will also need to verify your account .
This can be done either by sending a mobile sms with a confirmation code to your number, or by entering a bank card number. SMS usually comes within one minute.
Method number one: create your application using development tools
Immediately after clicking “Create New App”, a window will appear in which you are invited to enter the name of your future application and agree with the policies of the FB platform:
The App Namespace field can be left blank (needed for full-fledged facebook applications using Open Graph and canvas pages). After the continuation you will need to enter the captcha.
After the submission we see the main settings of our application. Here you can download an icon, set a name, select an application category and set other basic settings. However, all these manipulations can be postponed for the future and come back to them later. At the bottom of the page you should choose the method by which our application will be integrated into Facebook.
Our goal is our own custom tab, so accordingly we select “Page Tab” .
In the first field we indicate the name of the tab , in the next two - direct links to our layout or dynamic content, previously uploaded to the ftp of the public server.
However, here you will be waited by the first nuance - SSL protection is a mandatory requirement of Facebook since October 2011, so it is imperative that the url you need is accessible via https protocol
By clicking the "Save Changes" button we get a ready working tab. If you wish, you can open the advanced section and fine-tune the application.
Now let's proceed directly to adding the created application to the page we need.
How to add App / Custom Tab to Facebook page
- Go to developers.facebook.com/apps/ and select the application we need. Of interest is the App ID / API Key field:
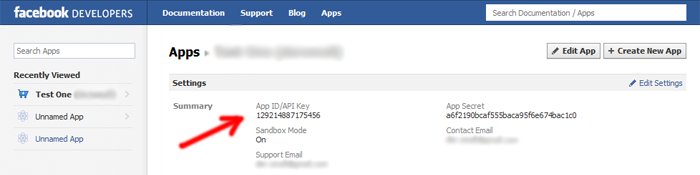
- In the browser we form the following URL:
www.facebook.com/dialog/pagetab?app_id=YOUR_APP_ID&next=YOUR_URL
where instead of YOUR_APP_ID we substitute our App ID , and instead of YOUR_URL we indicate the link to the page specified in the application settings in the field “Page Tab Url” - Click enter and in the window that appears, select the page to which you want to add the tab:
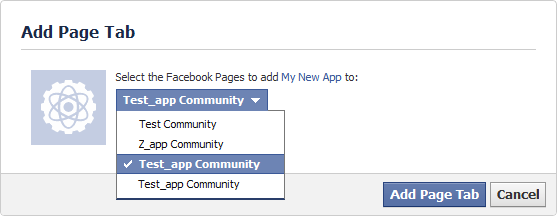
- We click on the “Add Page Tab” and if everything happened successfully, we appear on the page specified in YOUR_URL. Returning to the product page www.facebook.com/pages/your_url you can see the tab we have added at the bottom of the list of existing tabs. By clicking "EDIT" under them you can change the position of our tab. However, raising it above “Wall” and “Info” will not work (relevant before the introduction of the timeline) .
The main advantage of own application - control of a set of its parameters . Going into the properties of the application, you can fine-tune them. Previously, its additional advantage over solutions from third-party applications was the ability to install its own tab icon, but with the arrival of the timeline the tabs design has changed, and now the installation of the personal image of the tab presents no problems.
The disadvantages include a longer creation time compared with the second method, as well as the complexity of creating the so-called fan-gate . You most likely have seen such a bunch of times on different pages - when you are prompted to click Like in order to see some hidden content.
Method number two - add tab using third-party applications
At the moment there are a huge number of free applications that allow you to add a custom tab to your page and configure it. Just enter the query “static html” in the Facebook search bar and you can see the most popular applications in the results:
FBML applications can not be considered, since Facebook has abandoned fbml in favor of html iframes.
Consider the most popular Static HTML application : iframe tabs . The number of active users speaks for itself.
Clicking on the “Go to App” will get to the page of the application itself, which looks like this:
On it, click “Add Static HTML to a Page” and select the page to which you want to add a tab:
After the manipulations made, a new tab “Welcome” will appear among the other tabs on the left side of our page. A distinctive feature of the Static HTML application is the white star icon on a gray background.
Tabs in the old version:
Tabs in the Timeline:
Let's proceed to the direct setting of the tab. To begin, change its name. In the old version of Facebook pages for this you had to go to the list of all already installed applications. This was done by pressing "Edit Page" on the first three default tabs (Get Started, Wall, Info).
In Timeline, the owners of the page above the main content see the admin panel :
From there, go to the page properties editing mode :
Next, select the application we need and click "Edit Settings" . In the pop-up that appears, we can either change its name or delete this tab.
Changing the name of the tab we go to its content. To do this, simply select it in the general list of tabs. If the user is logged in under the administrator account, he will see a page with settings. All the others choosing this tab will see directly its content.
The Static HTML application has fan-gate support and this is one of its main advantages.
The content field can be filled with both html / css code, and you can specify a direct link using an iframe.
To view the result click on the preview. In the preview window, we can choose the content that we want to see - either public or available only to those who clicked the page.
Once the main disadvantage of this application was the impossibility of changing the icon. However, at the end of 2011, the developers added this possibility, and with the advent of the Timeline interface, this was no longer necessary - in the new mode, it is no longer a problem for users to set their own image.
When you click on the "magic *" button, you can see some nice buns, in particular, the ability to customize google analytics and forcibly hide the scrollbar.
Also, one of the most popular applications is the Static Iframe Tab.
It is added to the page in the same way as the previous application. However, the static iframe tab has a wider set of tab content settings. Already when added to the page,
the user sees a small wizard where you can immediately add an image for the profile, fill in the "About" field and set a unique name for the link to your page
Summing up the above. Brief squeeze
Basic steps when creating. Option 1 - create your own application
- Analysis of design for complexity, dynamic content, custom icons, forms, etc.
- Layout of static content.
- Upload files to an external server.
- Make sure that the files are accessible via https (SSL protection is a requirement of Facebook since October 2011).
- Creating a Facebook application, in the settings of which a link to the ready-made layout is indicated.
- Adding this application to the product page as a tab.
- Changing the name of the tab.
- Profit!
Advantages of this option:
- full control of the application and its personalization (privacy settings, changing icons, multilingual, etc.);
- lack of possible references to third-party applications, increased security;
- Stability depends only on the server on which the layout.
Minuses:
- difficulty with setting “Fan-Gate”;
- creating your application a little longer than connecting third-party;
- need to use SSL.
Basic steps when creating. Option 2 - Third Party Applications
- Steps 1-2 of the first option (analyze, impose).
- Select the most appropriate application.
- Installing the application on the product page.
- Setting up the application (specifying a link to the layout, the name of the tab, setting the “fan-gate” as necessary)
- Profit!
Advantages of this option:
- relatively high rate of obtaining the desired result;
- ease of setting up “fan-gate” and similar options for accessing content;
- usually easy setup and editing of content, even for the client;
- no https access required.
Minuses:
- links to the application developer's site and all sorts of “powered by ...” labels;
- There is no confidence in the stable operation of both the application and its server, and that with the next global update of Facebook it will not stop working. For example:
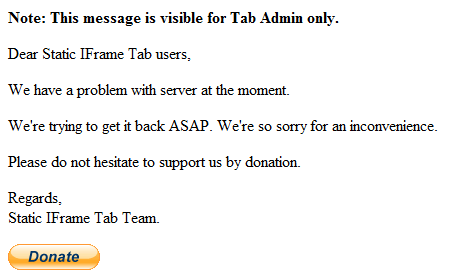
Summarizing, we can say that the option of connecting a third-party application is easier to configure and significantly gains the time of creation from its own application. An additional fat plus would be the simplicity of creating fan gates.
Of the minuses, we can note the difficulty of changing the standard application icon, links to the websites of the creators of this application in many of them, as well as dependence on these developers and their servers. Despite the fact that the same Static HTML iframe tabs has tens of millions of users, it happened that this application stopped working for some time due to problems on their servers. However, it confuses very few people, as a result of which Static HTML can be seen on pages that have a huge number of subscribers, and quite often they don’t even bother about changing the standard application icon to their own.
A few examples of popular pages where custom tabs are actively used:
Old version:
As you can see, these pages have not yet switched to the Chronicle interface (Timeline), which will be forcibly entered on March 30th.
New Timeline:
Useful sizes
- Profile picture for profile / brand : Width: 180px, Height: 540px
- Provided area for iframe with custom html content :
max-width: 520px (old version), 810px (timeline), height is unlimited - Avatar (picture next to links and posts when you click like or share):
Width: 90px, Height: 90px - Maximum image size for download : Width: 2048px, Height: 2048px
- Maximum visible image size for viewing in an album or slideshow : Width: 960px, Height: 720px
- Picture in the ad : Width: 110px, Height: 80px, Height: 5MB
- Ad text : Title: 25 characters, Body: 135 characters
- Status update : Length: 63 206 characters
- Cover for Timeline : Width: 851px, Height: 315px
- Comment:: no length restrictions
- Video : Size: 1024, Time: 20 minutes
Material prepared with the participation of derSmoll
Source: https://habr.com/ru/post/141078/
All Articles