Do-it-yourself water cooling: theory and practice
 In this article I will try to talk about my attempt to make a water cooling system for the processor at home. At the same time I will describe the main points and technical details on the example of my own experience. If you are interested in a detailed illustrated guide to the manufacture, assembly and installation of such a system, then welcome to the cat.
Traffic, lots of pictures! Video of the manufacturing process at the bottom.
The idea of creating a more efficient cooling of my home computer was born in the process of finding a way to improve the performance of my computer by overclocking the processor. An overclocked processor consumes one and a half times more power and accordingly heats up. The main limit on the purchase of finished - the price, buying in the store ready-made water cooling system is unlikely to cost less than a hundred dollars. Yes, and in the reviews budget liquid cooling systems are not particularly praised. So it was decided to make the simplest SVO independently and with minimal cost.
')
Theory and Assembly
Main details

- Waterblock (or heat exchanger)
- Centrifugal water pump (pump) with a capacity of 600 liters / h.
- Cooling radiator (automotive)
- Expansion tank for coolant (water)
- Hoses 10-12 mm;
- Fans with a diameter of 120mm (4 pieces)
- Fan power supply
- Consumables
Water block
The main task of the water block is to quickly take away the processor heat and transfer it to the coolant. Copper is most suitable for these purposes. It is possible to manufacture a heat exchanger made of aluminum, but its thermal conductivity (230W / (m * K)) is half the copper (395.4 W / (m * K)). Also important is the device water block (or heat exchanger). The heat exchanger device is one or more continuous channels passing through the entire internal volume of the water block. It is important to maximize the surface of contact with water and avoid stagnation of water. To increase the surface usually use frequent cuts on the walls of the water block or install small needle radiators.


I did not try to do something complicated, so I started making a simple water tank with two holes for the tubes. The brass connector for pipes was taken as a basis, and the base was a copper plate 2 millimeters thick. From the top, two copper tubes of hose diameter are inserted into the same plate. Everything is soldered with tin-lead solder. Doing a bigger water block, at first I didn’t think about its weight. When assembled with hoses and water, more than 300 grams will hang on the motherboard, and to facilitate it, we had to use additional brackets for the hoses.
- Material: copper, brass
- Diameter of unions: 10 mm
- Solder: Tin-Lead Solder
- Fastening method: with screws to the store cooler fastening, the hoses are fixed with hose clamps
- Price: about 100 rubles
Cutting and soldering


water pump
Pumps are external or submersible. The first only passes it through itself, and the second pushes it out, being immersed in it. Here is used submersible, placed in a container with water. It was not possible to find the exterior, I was looking for it in pet stores, and there only submersible aquarium pumps. Capacity from 200 to 1400 liters per hour price from 500 to 2000 rubles. It is powered from the outlet, power from 4 to 20 watts. On a hard surface, the pump is very noisy, and on foam rubber the noise is negligible. As a reservoir for water, a can was used to hold the pump. To attach the silicone hose were used steel clamps on the screws. For easy donning and removal of hoses, you can use an odorless lubricant.


- Maximum capacity - 650 l / h.
- Height of rising water - 80 cm
- Voltage - 220V
- Power - 6 W
- Price - 580 rubles
Radiator
The quality of the radiator will largely determine the efficiency of the entire water cooling system. It used the automotive radiatorsystem heating (stove) from nine, bought the old one at a flea market for 100 rubles. Unfortunately, the interval between the plates in it turned out to be less than a millimeter, so I had to manually push the plates apart and compress them so that weak Chinese fans could blow it through.
- Tube Material: Copper
- Rib Material: Aluminum
- Size: 35x20x5 cm
- Diameter of unions: 14 mm
- Price: 100 rubles
Blowing
The radiator is blown with two pairs of 12 cm fans in front and behind. It was not possible to power the 4 fans from the system unit during the test, so I had to assemble a simple 12 volt power supply. The fans were connected in parallel, and connected with polarity. This is important, otherwise with high probability the fan can be spoiled. The cooler has 3 wires: black (ground), red (+ 12V) and yellow (speed value).

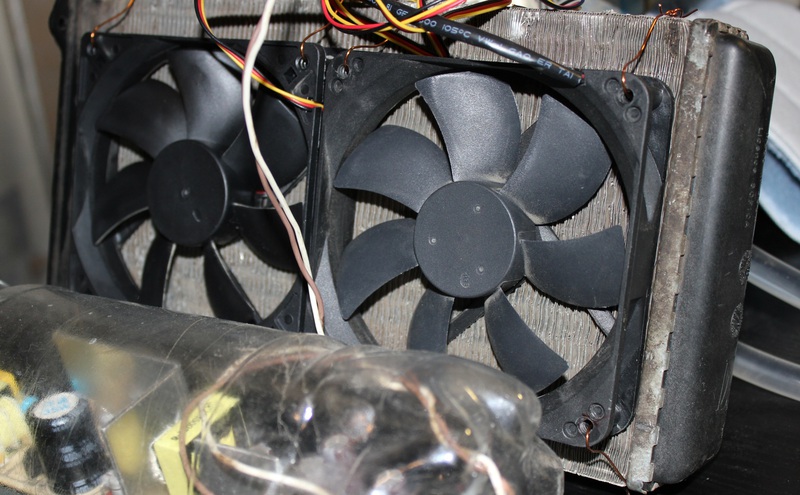

- Material: Chinese plastic
- Diameter: 12 cm
- Voltage: 12 V
- Current: 0.15 A
- Price: 80 * 4 rubles
Mistress note
The goal of noise reduction, I did not set because of the cost of the fans. So the fan for 100 rubles is made of black plastic and consumes 150 milliamperes of current. These are the ones I used to blow the radiator, blowing weakly, but cheap. Already for 200-300 rubles you can find much more powerful and beautiful models with a consumption of 300-600 milliamperes, but at maximum speed they are noisy. This is solved by silicone gaskets and anti-vibration mounts, but for me the minimum value played a decisive role.
Power Supply
If you don’t have anything ready at hand, you can assemble the simplest of scrap materials and a chip that costs less than 100 rubles. For 4 fans, a current of 0.6 A is needed and a bit to spare. The microcircuit gives approximately 1 ampere at a voltage of 9 to 15 volts, depending on the model. You can use any model by exposing a 12 volt variable resistor.


- Tools and soldering iron
- Radio components
- Chip
- Wires and insulation
- Price: 100 rubles
Installation and verification
Hardware
- Processor: Intel Core i7 960 3.2 GHz / 4.3 GHz
- Motherboard: ASUS Rampage 3 formula
- Power supply: OCZ ZX1250W
- Thermal grease: AL-SIL 3
Software
- Windows 7 x64 SP1
- Prime 95
- RealTemp 3.69
- Cpu-z 1.58


Especially for a long time did not have to test, because the results did not even come close to the capabilities of the air cooler. The CBO radiator has been blown so far with only two Chinese fans from the 4th possible and have not yet moved apart the plates for better blowing. So in the energy saving mode and zero load, the processor temperature in air is about 42 degrees, and on the homemade ITS 57 degrees. Running test prime95 on 4 streams (50% load) warms up to 65 degrees in air and up to 100 degrees in 30 seconds on ITS. Overclocking results are even worse.
An attempt was made to make a new water block with a thinner (0.5 mm) copper base plate and almost three times more roomy inside, though of the same materials (copper + brass). In the radiator, the plates are moved apart for better airflow and two more fans are added, now there are 4 of them. This time, in the energy saving mode and zero load, the processor temperature in air is about 42 degrees, and on self-made NWO it is about 55 degrees. Running test prime95 on 4 threads (50% load) warms up to 65 degrees in air and up to 83 degrees on ITS. But at the same time, the water in the circuit starts to heat up rather quickly and after 5-7 minutes the temperature of the processor reaches 96 degrees. This testimony without overclocking.


Of course, it was interesting to collect SWO, but it was not possible to apply it for cooling a modern processor. In old computers, the regular cooler works fine. Maybe I picked up poor-quality materials or incorrectly manufactured a water block, but it is not possible for me to assemble SWO for less than 1000 rubles at home. After reading the reviews of budget ready SVO available in stores, I did not hope that my homemade products would be better than a good air cooler. For myself, I concluded that it is not worth saving in the future on components for ITS. When I decide to buy ITS for overclocking, I will definitely assemble it myself from individual parts.
I hope it was interesting to read and watch. I would like to know the opinion of the experienced, what were the mistakes and what can be improved.
Video clip
Articles on the topic
Cooling systems - from radiator to liquid nitrogen! Part 1
Cooling systems - from radiator to liquid nitrogen! Part 2
Build a computer with water cooling
UPD: A small FAQ on water cooling Thanks to the user polym0rph
Source: https://habr.com/ru/post/140845/
All Articles