Apply Attributes in C #
 Most sources on the use of attributes [ 1 , 2 ] say that they exist, “provide an effective way of associating metadata or declarative information with code”, can be obtained using reflections [ 3 ] . Within this article, I will try to show an applied example of applying attributes: checking the required fields on the add / edit form of a new business object.
Before you click more, a few warnings:
1. If you have already worked with attributes, then you may not be interested.
2. When writing a demo, significant simplifications were made (for example, the rejection of MVVM), in order to facilitate the perception of the material about the attributes.
So, let's begin. As I already cited above: “Attributes provide an efficient way to associate metadata or declarative information with code.” What is this same metadata? In most cases, this is simply additional information about a class, property, or method that does not affect the operation of a class, property, or method. However, external, in relation to it, application objects can receive this information and how to process it. One of the clearest examples of the use of attributes is the NonSerializedAttribute attribute [ 4 ] . With this attribute you can mark the field of your class and it will work exactly the same as before the tagging. But if you decide to use the serializer already existing in the .Net infrastructure, then this field will not go into the output sequence.
Okay, I talked about attributes a bit, following the links I wanted to read, let's move on to the example itself.
As an example, consider the simple task of maintaining a list of people. To store information about a person, we use the following class:
public class Person { [DisplayAttribute(Name="")] [RequiredAttribute()] public string LastName { get; set; } [Display(Name = "")] [Required()] public string FirstName { get; set; } [Display(Name = "")] public string Patronym { get; set; } } In this example, please pay attention to two points:
1. When using the attributes "suffix": Attribute, you can not write.
2. The last and first name are marked with the RequiredAttribute attribute, but the middle name is not.
If you and I try to create an object of class Person, then no matter how insulting it sounds, we will be able to create it with empty fields LastName and FirstName, since This attribute doesn’t have any effect on the behavior of the class. Why then he? And we will use it in the add / edit person form so that the user cannot finish editing until these fields are filled out.
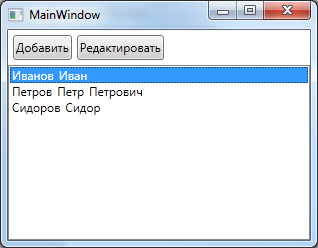
The general view of the application will be like this:
To edit the properties of a person, use UserControl (why not the form just below):
<UserControl x:Class="AttributeExample.PersonEditor" xmlns="http://schemas.microsoft.com/winfx/2006/xaml/presentation" xmlns:x="http://schemas.microsoft.com/winfx/2006/xaml"> <StackPanel> <TextBlock Text="" /> <TextBox Text="{Binding LastName,UpdateSourceTrigger=Explicit}" /> <TextBlock Text="" /> <TextBox Text="{Binding FirstName,UpdateSourceTrigger=Explicit}" /> <TextBlock Text="" /> <TextBox Text="{Binding Patronym,UpdateSourceTrigger=Explicit}" /> </StackPanel> </UserControl> In the cs file of this UserControl, we do not even climb. Notice that the Binding to the source is applied to an external event? [ 5 ]
At the moment, we already have a class describing a business object and a component for editing the properties of this object. It remains to make a universal window that will be able to show components for editing business objects and will check whether the required fields are full, and, if everything is filled in correctly, will apply Binding visual components to the fields of business objects.
Create a form:
<Window x:Class="AttributeExample.IngeniousWindow" xmlns="http://schemas.microsoft.com/winfx/2006/xaml/presentation" xmlns:x="http://schemas.microsoft.com/winfx/2006/xaml" Title="IngeniousWindow" MinWidth="300" SizeToContent="WidthAndHeight" > <Window.Resources> <Style TargetType="Button"> <Setter Property="Grid.Row" Value="2" /> <Setter Property="HorizontalAlignment" Value="Right" /> <Setter Property="Width" Value="100" /> </Style> </Window.Resources> <Grid> <Grid.RowDefinitions> <RowDefinition Height="auto" /> <RowDefinition Height="1*" /> <RowDefinition Height="35" /> </Grid.RowDefinitions> <!-- --> <StackPanel x:Name="spErrors" Visibility="Collapsed" Background="#FFCCCC"> <TextBlock Text=" :" /> <ListView x:Name="lvProperties" Background="#FFCCCC" /> </StackPanel> <!-- --> <ContentPresenter Grid.Row="1" x:Name="cpEditor" /> <!-- --> <Button Margin="5" x:Name="btCancel" Content="" Click="btCancel_Click" /> <Button Margin="5,5,110,5" x:Name="btApply" Content="" Click="btApply_Click" /> </Grid> </Window> Rule the constructor:
public partial class IngeniousWindow : Window { FrameworkElement _controlForShow = null; public IngeniousWindow(FrameworkElement p_controlForShow) { InitializeComponent(); _controlForShow = p_controlForShow; cpEditor.Content = p_controlForShow; } } Add a handler to the cancel button:
private void btCancel_Click(object sender, RoutedEventArgs e) { DialogResult = false; } ')
And the most interesting button handler in this example is accept:
private void btApply_Click(object sender, RoutedEventArgs e) { List<string> requiredPropertyNames = new List<string>(); // TextBox c List<TextBox> textBoxes = GetChildTextBoxes(_controlForShow); List<BindingExpression> expressions = new List<BindingExpression>(); // - Type buisnesObjectType = _controlForShow.DataContext.GetType(); // , foreach (var item in textBoxes) { // Binding BindingExpression expression = item.GetBindingExpression(TextBox.TextProperty); if (expression != null) { expressions.Add(expression); // PropertyInfo property = buisnesObjectType.GetProperty(expression.ParentBinding.Path.Path); // Attribute attr = property.GetCustomAttribute(typeof(RequiredAttribute)); if (attr != null && string.IsNullOrWhiteSpace(item.Text)) { // , TextBox , string propertyName = property.Name; Attribute description = property.GetCustomAttribute(typeof(DisplayAttribute)); if (description != null) { propertyName = (description as DisplayAttribute).Name; } requiredPropertyNames.Add(propertyName); } } } // , Binding if (requiredPropertyNames.Count == 0) { foreach (var exp in expressions) { exp.UpdateSource(); } DialogResult = true; } else { // , lvProperties.ItemsSource = requiredPropertyNames; spErrors.Visibility = Visibility.Visible; } } It seems in the comments I described everything in detail, the only method is: GetChildTextBoxes, I will not give it, it runs through the visual tree and selects all TextBoxes. Who cares, can see it by downloading the source .
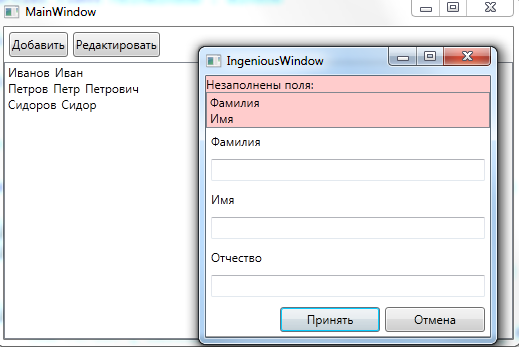
Everything. We add and edit handlers to the buttons on the main form:
private void btAdd_Click(object sender, RoutedEventArgs e) { Person person = new Person(); PersonEditor editor = new PersonEditor() { DataContext = person }; IngeniousWindow window = new IngeniousWindow(editor); if (window.ShowDialog().Value) { _people.Add(person); } } private void btEdit_Click(object sender, RoutedEventArgs e) { if (lvPeople.SelectedItem != null) { Person person = lvPeople.SelectedItem as Person; PersonEditor editor = new PersonEditor() { DataContext = person }; IngeniousWindow window = new IngeniousWindow(editor); window.ShowDialog(); } } Well, here it looks like this:


Sources, if someone did not see the links in the text, you can download it here (Project in VS 11, if that).
Ps A curious reader, may ask: "And where does the picture in the cap?". Well, I would like to think that this is a hint that attributes, like this sign, seem to be there, but seemingly not.
Sources:
1. MSDN - Attributes (C # and Visual Basic) to text
2. dotsite - Attributes and their use in C # to text
3. MSDN - Reflection (C # and Visual Basic) to text
4. MSDN - NonSerializedAttribute - class to text
5. MSDN - Binding.UpdateSourceTrigger - property to text
Source: https://habr.com/ru/post/140842/
All Articles