Creating a window interface using jQuery UI. Part 1
The article is intended for users only beginners to work with jQuery UI and who want to practice to get acquainted with this library.
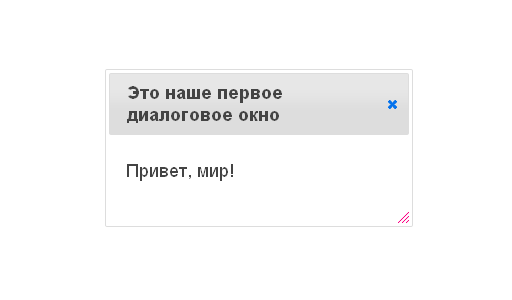
This window interface assumes such basic properties as - the presence of windows, the possibility of dragging them, the ability to resize windows, roll them up / down, etc. This is what should happen in the end .
So, we want to create an example of an interactive web-based window interface and the ability to use jQuery UI for this purpose - then, welcome to Cat.
Whoever does not know what jQuery UI is, can read more about it in Russian by clicking on the following link . The appearance of the Russian translation of the library in question has already been mentioned at Habré .
To get started, download the library from the official website http://jqueryui.com . The interface has many options for customization, for our example we will need all the components and the Flick theme.
After downloading and extracting downloaded components to a computer, the following file structure will be obtained:

With folders sss and js everything is clear, and the template for index.html will write this:
It's time to create the code for the first dialog box. According to the documentation, windows in jQuery UI are the usual “divs” (div), to which the corresponding class and initialization method is applied. Inside this block is placed the contents of the window.
In the body tag, add the following code:
To initialize the window, you need to execute the JavaScript code. It can be placed in a separate file and connected in the tag, and you can also specify the following structure there:
Now, if we open the index.html file in the browser, we get the following:
')
Please note that this window already has such drag-n-drop properties, resizing, and the ability to close.
Now we will create a simple form so that we can call up dialog boxes from another dialog box. Paste the code below into the contents of our first window, i.e. inward diva instead of the line “Hello world!”:
This template is useful to us in the next steps.
Replace the initialization code with this:
Let's write new new styles in the head tag:
Now the window with the form inside looks a little nicer:

In the properties of the dialog, by the width: 'auto' and height: 'auto' we have instructed the window to adjust its size to the size of the content.
Buttons (the Buttons component) in jQuery UI allow you to “hang” various functions on your events (for example, pressing), which is what you need to do now.
To begin, create a button by adding HTML code:
in body tag.
Then we initialize it by adding the line:
in the function $ (document) .ready ().
Since we started experimenting with buttons, we will redefine our checkboxes in the form of some kind of buttons, for a more presentable look.

Now, when everything looks more or less normal, we will make it so that by pressing the button for creating a window, the corresponding action is performed, and the next time you press the window, it will be removed. Rewrite the javascript code:
The only thing that would be worth adding for a more correct display of this part is the change of the inscription on the button also when the window is closed using the built-in method (pressing the cross).
Perhaps knowledgeable people will tell in the comments how to do it in an optimal way.
In the second part of the article will be considered more complex steps to add the remaining functionality of the interface.
The code with minor changes, the main motive of the article, the order of the steps of creating a window interface using jQuery UI are taken from here - an English-language source .
Demo .
Part 2 .
This window interface assumes such basic properties as - the presence of windows, the possibility of dragging them, the ability to resize windows, roll them up / down, etc. This is what should happen in the end .
So, we want to create an example of an interactive web-based window interface and the ability to use jQuery UI for this purpose - then, welcome to Cat.
Brief introduction
Whoever does not know what jQuery UI is, can read more about it in Russian by clicking on the following link . The appearance of the Russian translation of the library in question has already been mentioned at Habré .
Stage 1. - Preparatory.
To get started, download the library from the official website http://jqueryui.com . The interface has many options for customization, for our example we will need all the components and the Flick theme.
After downloading and extracting downloaded components to a computer, the following file structure will be obtained:
With folders sss and js everything is clear, and the template for index.html will write this:
<!DOCTYPE html> <html> <head> <meta http-equiv="Content-Type" content="text/html; charset="utf-8"> <title> Windows- jQuery UI </title> <!-- jQuery UI CSS --> <link rel="stylesheet" href="css/flick/jquery-ui-1.8.16.custom.css" type="text/css" /> <!-- jQuery jQuery UI! --> <script src="js/jquery-1.6.2.min.js"></script> <script src="js/jquery-ui-1.8.16.custom.min.js"></script> </head> <body> </body> </html> Stage 2. - HTML and JavaScript code to create a dialog box.
It's time to create the code for the first dialog box. According to the documentation, windows in jQuery UI are the usual “divs” (div), to which the corresponding class and initialization method is applied. Inside this block is placed the contents of the window.
In the body tag, add the following code:
<div id="dialog_window_1" class="dialog_window" title=" "> <p>, !</p> </div> To initialize the window, you need to execute the JavaScript code. It can be placed in a separate file and connected in the tag, and you can also specify the following structure there:
<script> $(document).ready(function() { $('#dialog_window_1').dialog(); }); </script> Now, if we open the index.html file in the browser, we get the following:
')
Please note that this window already has such drag-n-drop properties, resizing, and the ability to close.
Now we will create a simple form so that we can call up dialog boxes from another dialog box. Paste the code below into the contents of our first window, i.e. inward diva instead of the line “Hello world!”:
<h3> </h3> <table class="dialog_form"> <tr> <th> </th> </tr> <tr> <td><input type="text" id="new_window_title" /></td> </tr> <tr> <th> </th> </tr> <tr> <td> <textarea id="new_window_content"></textarea> </td> </tr> <tr> <th> </th> </tr> <tr> <td id="buttonlist"> <input type="checkbox" id="alertbutton" /><label for="alertbutton"> </label> <input type="checkbox" id="closebutton" /><label for="closebutton"> </label> </td> </tr> </table> This template is useful to us in the next steps.
Stage 3. - Customization of dialogue through styles and dialog options.
Replace the initialization code with this:
$(document).ready(function() { $('#dialog_window_1').dialog({ width: 'auto', height: 'auto' }); }); Let's write new new styles in the head tag:
<style> .dialog_form th { text-align: left; } .dialog_form textarea, .dialog_form input[type=text] { width: 320px; } </style> Now the window with the form inside looks a little nicer:
In the properties of the dialog, by the width: 'auto' and height: 'auto' we have instructed the window to adjust its size to the size of the content.
Stage 4 - Adding a button to open a dialog box.
Buttons (the Buttons component) in jQuery UI allow you to “hang” various functions on your events (for example, pressing), which is what you need to do now.
To begin, create a button by adding HTML code:
<button id="create_button"> </button> in body tag.
Then we initialize it by adding the line:
$('#create_button').button(); in the function $ (document) .ready ().
Since we started experimenting with buttons, we will redefine our checkboxes in the form of some kind of buttons, for a more presentable look.
$('#buttonlist').buttonset(); Now, when everything looks more or less normal, we will make it so that by pressing the button for creating a window, the corresponding action is performed, and the next time you press the window, it will be removed. Rewrite the javascript code:
$(document).ready(function() { // $("#create_button").button().click(function() { var create_dialog = $("#dialog_window_1"); var create_button = $(this); // , if( create_dialog.dialog("isOpen") ) { create_button.button("option", "label", " "); create_dialog.dialog("close"); } else { create_button.button("option", "label", " "); create_dialog.dialog("open"); } }); // autoOpen : false – , $("#dialog_window_1").dialog({ width: "auto", height: "auto", autoOpen : false }); $("#buttonlist").buttonset(); }); The only thing that would be worth adding for a more correct display of this part is the change of the inscription on the button also when the window is closed using the built-in method (pressing the cross).
Perhaps knowledgeable people will tell in the comments how to do it in an optimal way.
In the second part of the article will be considered more complex steps to add the remaining functionality of the interface.
The code with minor changes, the main motive of the article, the order of the steps of creating a window interface using jQuery UI are taken from here - an English-language source .
Demo .
Part 2 .
Source: https://habr.com/ru/post/140522/
All Articles