Where does the device start
When you look at various articles of radio amateurs about the manufacture of devices, then there usually the device performs various functions, does it beautifully and elegantly. But in 90% of cases, the device itself is an incomprehensible thing with a bunch of wires that is stuck on the knee. All this is usually connected with the fact that people do not even think about what their future device will look like.
In response to the post title, I’ll say that any device starts with the body. And you can easily and simply make a stylish high-quality body, having a head, some money and a desire.
')
At one time LJ-user, comrade Leoniv showed me that any more or less serious device starts with the case. Moreover, the better the case, the more presentable this device will look.
What does it mean that the device starts with the case? We must of course understand that the development of the device, as a rule, is divided into two stages: the design stage and the production of the final product. At the prototyping stage, it doesn’t matter what the device will look like; there can be any collective farm. But here we makmatirovali and in general terms, we present what the details and components will be our final product. At this stage it is worth thinking about choosing or even designing a case for your device.
Stage design
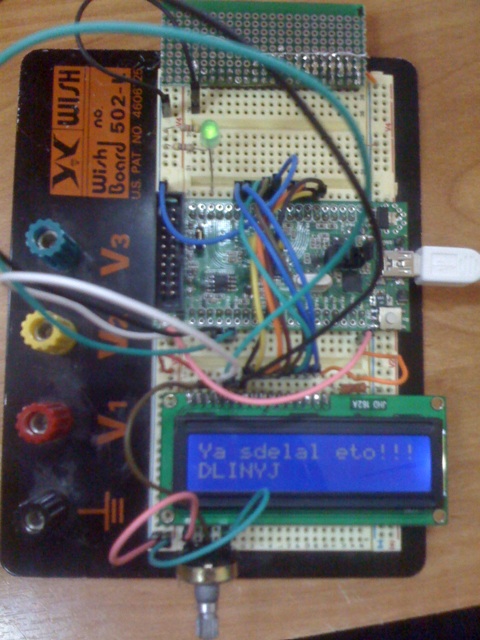
As a rule, many lower this stage and immediately make the boards, they say, then we shove it somewhere. And so many creators of their crafts are just a circuit board with parts and a bunch of wires. But what to say of creators, I met such end products quite often in production and industrial applications.
In fact, initially it is necessary to estimate which components will be installed on the board, the approximate size of the future software. Then, develop, buy a case, and already, based on the results of the seats in the case, start developing the final software, the contours of which must fit exactly into this body product.
I always have several purchased cases at home. As a rule, I buy them when I am in various RE stores. And here, just for my device, there was an excellent aluminum case, bought in Chip-dip www.chipdip.ru/product/k3-03-80mm.aspx . The case was all good - and an excellent seat for the board (it is inserted into it like a cartridge and held on both sides with front panels), and a beautiful presentable appearance, and a decent weight. And, if necessary, you can also use it as a radiator.
However, he had terrible faceplates. It seems that they were made by drunk uncle Vasya. There even the holes are drilled quite crookedly and obliquely. Yes, and apparently they looked very sad. I wanted a holiday and beauty!
It was necessary there to place the display, LEDs, connectors. I also wanted to foresee the possibility of adding one more technological hole, such as in the case housings, so that the area could be broken down if necessary. In general, it became clear that a file and a drill of such beauty could not be obtained from these side plates at home.
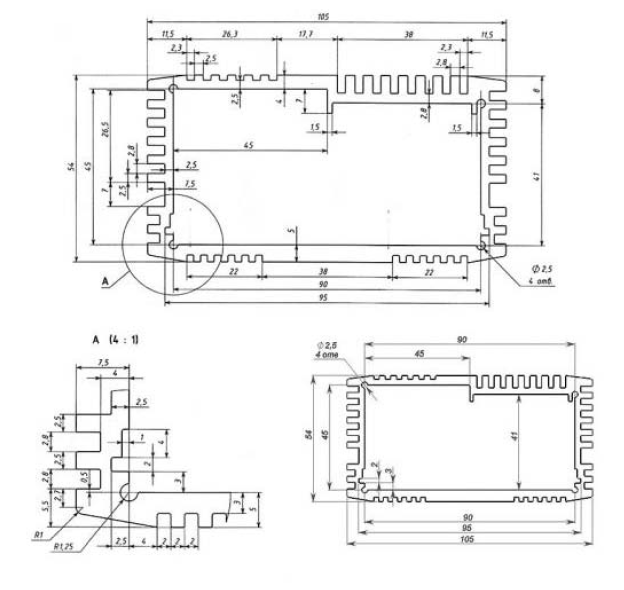
It became clear that the front panel must be made from scratch. It was not for nothing that I gave a reference to the Chip-dip site, there right on this page there are case sizes that allow you to make a drawing of a future front panel.
Case drawing
At the time of manufacture of the front panel, I already clearly imagined where I would have what components (connector, board, button) and had a rough sketch. And I turned to my colleague v-michurin asking me to draw these two front panels. What he quickly did in SolidWorks (it could be done in AutoCAD or other CAD-draftsman).

Front panel drawing

Rear panel drawing. The red arrow shows the broken out part, for an additional technological opening.
Of course, I gave him all the sizes of installed parts. In simple terms, I gave him these parts, they were measured with a caliper and transferred to a drawing.
After that, I ordered laser cutting of these blanks through my friends. For beauty, I also engraved the name of the device. As the material I took 2 mm stainless steel and did not lose. The result exceeded all my expectations.
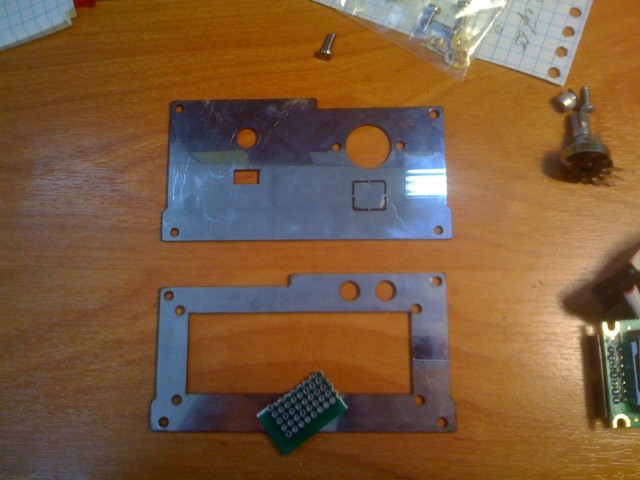
Freshly made panels
I apologize for the quality of the photo, I photographed it on the phone immediately after receipt. And to disassemble for the post ready device was already lazy. For money making these panels, I was about five hundred rubles (~ $ 17). I think if you order this product officially, it will not be much more expensive. But it turns out the device is of a completely different quality. Stainless steel was an excellent material for the manufacture of facial panels. The only noticeable flaw is that it is very easy to scratch it even with a screwdriver when tightening the screws. Broke down - and opa - scratch.
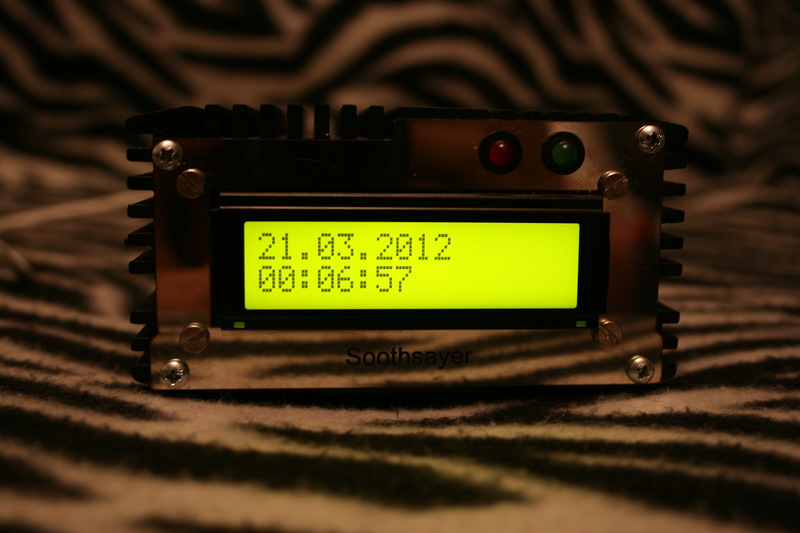
In general, after the joy of receiving, I proceeded to the assembly. For mounting the display and DIN type connector, I used stainless screws. Unfortunately, I don’t have stainless steel screws, so I had to use galvanized ones, and they, of course, spoil the look a bit. Perhaps, I will be confused and I will buy 8 pieces for myself. So, (drum roll) I present to your attention the end result:

General form
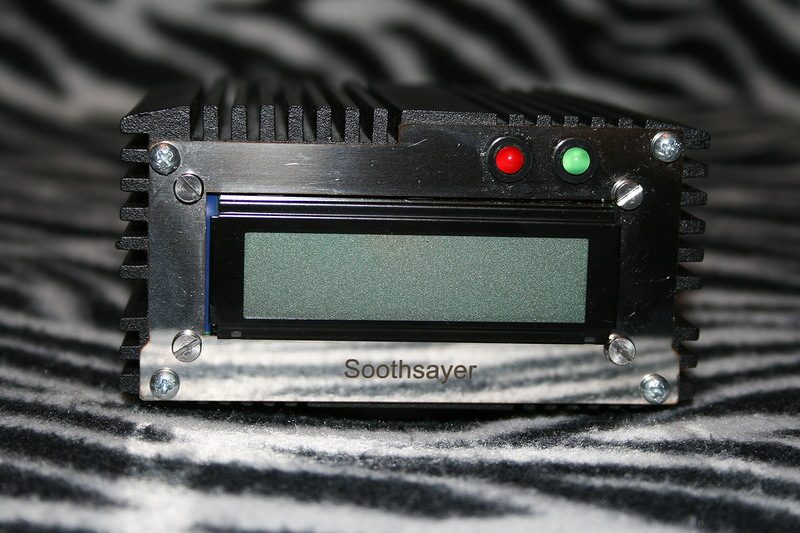
Front panel (note the minor scratches from the assembly)

Rear panel
The result is astounding. At home, getting such beauty is almost impossible. The only thing that the technological hole, which was supposed to be made with a breakable piece of metal, turned out to be completely impractical. The effort it takes to break it out will simply ruin the plate itself. As a result, it carries more decorative function, saying that this could be.
As a conclusion, I can say that I regret that I did not invent a thread of grassy drawing as a contour. This would greatly decorate the front panel. Plus, as I said, stainless steel is certainly not suitable for serial samples. Firstly, it is expensive, and secondly it is easily scratched. In this case, it is better to use painted black powder-coated aluminum (the material from which the body is made). Engraving produces very bright white letters on a black background.
I also want to say that Chip-Dip is not the best place to buy something. This is baryzhnichesky shop. It is better to buy cases in other organizations (http://www.efind.ru/ will help to find a case even in your city), or on ebee and others like him. Sometimes you can find a truly very successful case, as well as possible suitable for your device.
By the way, I must say that the case can be made from scratch according to the drawings. And even bend it or cast. True, there will be completely different amounts, but not as inaccessible as it may seem.
Just in case, if suddenly someone wants to make similar front panels for this type of enclosures, I post the drawings of these panels. chertezh.zip
Taking this opportunity, I want to express a separate thanks to my colleague v-michurin for all possible help in designing this building. Contact him, maybe he can help you too :).
I also want to show how you can make an industrial quality case with your own efforts. You can read about it with a friend leoniv in the comments on the link leoniv.livejournal.com/80594.html?thread=390866 # t390866 . Everything is well illustrated and described there.
ZY I will omit the appointment of the device for now, since this does not apply to this article. In the future, if the device is completed, Habr will find out about it one of the first.
ZZY I am not a very competent person, and always with great gratitude I accept comments on spelling and punctuation (and if I also refer to the rule ...;)). But do not spoil your karma, send remarks on spelling with a personal message.
In response to the post title, I’ll say that any device starts with the body. And you can easily and simply make a stylish high-quality body, having a head, some money and a desire.
')
At one time LJ-user, comrade
Leoniv showed me that any more or less serious device starts with the case. Moreover, the better the case, the more presentable this device will look.Why do you need it
What does it mean that the device starts with the case? We must of course understand that the development of the device, as a rule, is divided into two stages: the design stage and the production of the final product. At the prototyping stage, it doesn’t matter what the device will look like; there can be any collective farm. But here we makmatirovali and in general terms, we present what the details and components will be our final product. At this stage it is worth thinking about choosing or even designing a case for your device.
Stage design
As a rule, many lower this stage and immediately make the boards, they say, then we shove it somewhere. And so many creators of their crafts are just a circuit board with parts and a bunch of wires. But what to say of creators, I met such end products quite often in production and industrial applications.
In fact, initially it is necessary to estimate which components will be installed on the board, the approximate size of the future software. Then, develop, buy a case, and already, based on the results of the seats in the case, start developing the final software, the contours of which must fit exactly into this body product.
Stages of implementation
I always have several purchased cases at home. As a rule, I buy them when I am in various RE stores. And here, just for my device, there was an excellent aluminum case, bought in Chip-dip www.chipdip.ru/product/k3-03-80mm.aspx . The case was all good - and an excellent seat for the board (it is inserted into it like a cartridge and held on both sides with front panels), and a beautiful presentable appearance, and a decent weight. And, if necessary, you can also use it as a radiator.
However, he had terrible faceplates. It seems that they were made by drunk uncle Vasya. There even the holes are drilled quite crookedly and obliquely. Yes, and apparently they looked very sad. I wanted a holiday and beauty!
It was necessary there to place the display, LEDs, connectors. I also wanted to foresee the possibility of adding one more technological hole, such as in the case housings, so that the area could be broken down if necessary. In general, it became clear that a file and a drill of such beauty could not be obtained from these side plates at home.
It became clear that the front panel must be made from scratch. It was not for nothing that I gave a reference to the Chip-dip site, there right on this page there are case sizes that allow you to make a drawing of a future front panel.
Case drawing
At the time of manufacture of the front panel, I already clearly imagined where I would have what components (connector, board, button) and had a rough sketch. And I turned to my colleague
v-michurin asking me to draw these two front panels. What he quickly did in SolidWorks (it could be done in AutoCAD or other CAD-draftsman).Front panel drawing
Rear panel drawing. The red arrow shows the broken out part, for an additional technological opening.
Of course, I gave him all the sizes of installed parts. In simple terms, I gave him these parts, they were measured with a caliper and transferred to a drawing.
After that, I ordered laser cutting of these blanks through my friends. For beauty, I also engraved the name of the device. As the material I took 2 mm stainless steel and did not lose. The result exceeded all my expectations.
Freshly made panels
I apologize for the quality of the photo, I photographed it on the phone immediately after receipt. And to disassemble for the post ready device was already lazy. For money making these panels, I was about five hundred rubles (~ $ 17). I think if you order this product officially, it will not be much more expensive. But it turns out the device is of a completely different quality. Stainless steel was an excellent material for the manufacture of facial panels. The only noticeable flaw is that it is very easy to scratch it even with a screwdriver when tightening the screws. Broke down - and opa - scratch.
Final result
In general, after the joy of receiving, I proceeded to the assembly. For mounting the display and DIN type connector, I used stainless screws. Unfortunately, I don’t have stainless steel screws, so I had to use galvanized ones, and they, of course, spoil the look a bit. Perhaps, I will be confused and I will buy 8 pieces for myself. So, (drum roll) I present to your attention the end result:
General form
Front panel (note the minor scratches from the assembly)
Rear panel
The result is astounding. At home, getting such beauty is almost impossible. The only thing that the technological hole, which was supposed to be made with a breakable piece of metal, turned out to be completely impractical. The effort it takes to break it out will simply ruin the plate itself. As a result, it carries more decorative function, saying that this could be.
Conclusion
As a conclusion, I can say that I regret that I did not invent a thread of grassy drawing as a contour. This would greatly decorate the front panel. Plus, as I said, stainless steel is certainly not suitable for serial samples. Firstly, it is expensive, and secondly it is easily scratched. In this case, it is better to use painted black powder-coated aluminum (the material from which the body is made). Engraving produces very bright white letters on a black background.
I also want to say that Chip-Dip is not the best place to buy something. This is baryzhnichesky shop. It is better to buy cases in other organizations (http://www.efind.ru/ will help to find a case even in your city), or on ebee and others like him. Sometimes you can find a truly very successful case, as well as possible suitable for your device.
By the way, I must say that the case can be made from scratch according to the drawings. And even bend it or cast. True, there will be completely different amounts, but not as inaccessible as it may seem.
Just in case, if suddenly someone wants to make similar front panels for this type of enclosures, I post the drawings of these panels. chertezh.zip
Taking this opportunity, I want to express a separate thanks to my colleague
v-michurin for all possible help in designing this building. Contact him, maybe he can help you too :).I also want to show how you can make an industrial quality case with your own efforts. You can read about it with a friend
leoniv in the comments on the link leoniv.livejournal.com/80594.html?thread=390866 # t390866 . Everything is well illustrated and described there.ZY I will omit the appointment of the device for now, since this does not apply to this article. In the future, if the device is completed, Habr will find out about it one of the first.
ZZY I am not a very competent person, and always with great gratitude I accept comments on spelling and punctuation (and if I also refer to the rule ...;)). But do not spoil your karma, send remarks on spelling with a personal message.
Source: https://habr.com/ru/post/140426/
All Articles