Setting up a Cherokee web service under Ubuntu 11.04 to work with WordPress
Recently, I wanted to try some alternative for a home web service.
Not that the “stanart” Apache did not suit me with something — I just wanted to broaden my horizons and, perhaps, find a better alternative.
The candidate had to meet the simple requirements - low resource consumption and high speed.
Since Nginx , lighthttpd and LiteSpeed I already touched at one time, and knew about what to expect from them - the choice fell on the Spanish development of Cherokee .
Initially, the article was planned as a comparison of two "Indians" - but in the process of installing and configuring Cherokee, I ran into a pair of pitfalls. So this article is introductory, so to speak.
Performance comparison will also be - but a little later.
So, Cherokee.
As written on the official website, this is an innovative, easily configurable web server with a large number of features. Let's start the installation and take a closer look at it.
And immediately waiting for us
')
It consists in choosing a source for installation. Options, as usual, 3:
I dismissed the third option right away - tea, not Gentoo , and decided to install from the standard repository:
As it turned out later, in the standard Ubuntu repository there is a rather old version that does not really work with PHP-fpm (the old 2010 bug - the Cherokee configurator cannot find the PHP-fpm config in the system).
Therefore - you need to install from PPA:
After installation, we start the Cherokee admin panel (a separate Python-based web service, you need to start it only while configuring Cherokee - it doesn’t need it all the time) and go to the URL that the command will give (by default - http://127.0.0.1) : 9090 ):
On my home server, my WordPress stand-blog is spinning — so we need to configure Cherokee to work with PHP-fpm, and to serve WordPress.
There are a lot of manuals online on how to do this, but I didn’t find detailed step-by-step instructions and spent a couple of hours trying to get everything in working order.
Behavior to handle php files should always be on top (a real man, what).
This is how the Behavior for WordPress settings should look like:
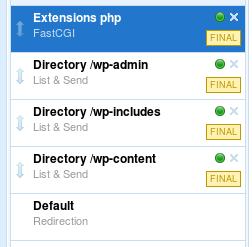
Note that directory processing rules contain relative paths.
That is, in Apache terms, if you have a DocumentRoot for VirtualHost WordPress showing in / var / www / html / blog / - you do not need to specify the full path, it will not work. Specify as in the screenshot: / wp-content, / wp-includes, / wp-admin.
To set up Cherokee for WordPress maintenance, you need to install Cherokee itself, PHP-fpm, and configure the web service via cherokee-admin:
- add a new Source for PHP-fpm (if Cherokee did not pick it up itself), for this, go to the Sources menu at the top, on the left click on the “+” sign and fill in the fields:
The way we rule according to your surroundings.
- we add Virtual Server, for this we go to the top of the vServers menu, click on the “+” sign on the left and fill in the fields:
Click on Add, go to the Basics tab, register index.php in the Directory Indexes field
Go to the Behavior tab, click on Rule Management, add a rule for PHP:
Handler tab:
In the same way, we add Directory type rules for wp-admin , wp-includes and wp-content , and choose List & Send as Handler.
Everything, we press SAVE and we check in the browser that the site works.
In the next article, I will look at the performance differences between Apache and Cherokee based on the same WordPress, do not switch.
Not that the “stanart” Apache did not suit me with something — I just wanted to broaden my horizons and, perhaps, find a better alternative.
The candidate had to meet the simple requirements - low resource consumption and high speed.
Since Nginx , lighthttpd and LiteSpeed I already touched at one time, and knew about what to expect from them - the choice fell on the Spanish development of Cherokee .
Initially, the article was planned as a comparison of two "Indians" - but in the process of installing and configuring Cherokee, I ran into a pair of pitfalls. So this article is introductory, so to speak.
Performance comparison will also be - but a little later.
So, Cherokee.
As written on the official website, this is an innovative, easily configurable web server with a large number of features. Let's start the installation and take a closer look at it.
And immediately waiting for us
Underwater stone №1.
')
It consists in choosing a source for installation. Options, as usual, 3:
- use standard system repositories;
- use ppa;
- compile from source codes;
I dismissed the third option right away - tea, not Gentoo , and decided to install from the standard repository:
sudo apt-get install cherokee php5-fpmAs it turned out later, in the standard Ubuntu repository there is a rather old version that does not really work with PHP-fpm (the old 2010 bug - the Cherokee configurator cannot find the PHP-fpm config in the system).
Therefore - you need to install from PPA:
sudo add-apt-repository ppa:cherokee-webserver/ppa
sudo apt-get update
sudo apt-get install cherokee cherokee-admin
After installation, we start the Cherokee admin panel (a separate Python-based web service, you need to start it only while configuring Cherokee - it doesn’t need it all the time) and go to the URL that the command will give (by default - http://127.0.0.1) : 9090 ):
sudo cherokee-adminOn my home server, my WordPress stand-blog is spinning — so we need to configure Cherokee to work with PHP-fpm, and to serve WordPress.
There are a lot of manuals online on how to do this, but I didn’t find detailed step-by-step instructions and spent a couple of hours trying to get everything in working order.
Underwater stone №2.
Behavior to handle php files should always be on top (a real man, what).
This is how the Behavior for WordPress settings should look like:
Note that directory processing rules contain relative paths.
That is, in Apache terms, if you have a DocumentRoot for VirtualHost WordPress showing in / var / www / html / blog / - you do not need to specify the full path, it will not work. Specify as in the screenshot: / wp-content, / wp-includes, / wp-admin.
Summarize.
To set up Cherokee for WordPress maintenance, you need to install Cherokee itself, PHP-fpm, and configure the web service via cherokee-admin:
- add a new Source for PHP-fpm (if Cherokee did not pick it up itself), for this, go to the Sources menu at the top, on the left click on the “+” sign and fill in the fields:
- Nick: PHP Interpreter
- Connection: 127.0.0.1:9000
- Type: Local Interpreter
- Interpreter: / usr / sbin / php5-fpm --fpm-config /etc/php5/fpm/main.conf
The way we rule according to your surroundings.
- we add Virtual Server, for this we go to the top of the vServers menu, click on the “+” sign on the left and fill in the fields:
- Nick: yoursite.com (ServerName equivalent in Apache)
- Document root: / absolute / path / to / files
Click on Add, go to the Basics tab, register index.php in the Directory Indexes field
Go to the Behavior tab, click on Rule Management, add a rule for PHP:
- Rule type: Extensions
- Extensions: php
Handler tab:
- Handler: FastCGI
- Balancer: Round Robin (when selecting an item below, our Source should be loaded)
In the same way, we add Directory type rules for wp-admin , wp-includes and wp-content , and choose List & Send as Handler.
Everything, we press SAVE and we check in the browser that the site works.
In the next article, I will look at the performance differences between Apache and Cherokee based on the same WordPress, do not switch.
Source: https://habr.com/ru/post/140337/
All Articles