Introduction to JMeter
The article was prepared by employees of the testing department in the company where I work.
On Habré is not the first time they write about JMeter, but the articles have a rather narrow focus, or difficult to understand. Therefore, this article will be interesting for beginners.
Somehow I began to learn a new tool - Jeter - and could not find some kind of full-fledged guide as a guide to action. Gradually, having understood some fairly useful articles and blogs, user documentation, I began to understand something. And I decided that maybe I’m not the only one looking for something to start working with. To master some of the principles of construction and the logic of the tool itself. So here is an article on how to get started.
So in this article we will look at an example of creating a script for 3 users who want:
1. login;
2. add a new photo to an album;
3. change the avatar.
As such, this is a normal business process for a social network.
And for these purposes such built-in components will be used:
The article is large because detailed. The result should be something like this:

The bottom line is that when we create a script for a site that we test using the black box method, we do not know all the subtleties and features of its work. So, for example, that site, on the basis of which my script will end up, is written with the help of some Symphony2 package. Because of it, sending login-password data is not directly from the form on the / login page, but from some non-existent / login_check page. And to all this, another empty field is sent, which is hidden for the user.
HTTP Proxy Server will help to find similar pitfalls (this, like all the others, is an embedded element). Emulating the work of a proxy server, it will record all received \ sent requests.
')
We will not add HTTP Proxy Server to the test tree. We will discuss where we will record the resulting “steps”. Later, when we add an element to the tree, we will see that there are several possibilities where to write the results. They can be recorded directly in the "coil" ( Thread ), on the "workbench" ( Workbanch ), or in the element "Recording Controller". I advise you to use the latter method. First, it will allow, if necessary, disable (ctrl + t) the entire log at once; secondly, the test structure is better traced and formed.
All actions for adding and editing occur by clicking the right mouse button in the context menu. Created elements can be simply dragged and dropped.
So: Test Plan -> Add -> Threads -> Thread Group ; Thread Group -> Add -> Logic Controller -> Recording Controller .
I strongly recommend giving clear names to all elements at once. In my case these will be “Pictures” and “Log in”, respectively.

When the preparatory steps are completed, add the necessary element to the “workbench”: WorkBench -> Add -> Non-Test Elements -> HTTP Proxy Server .
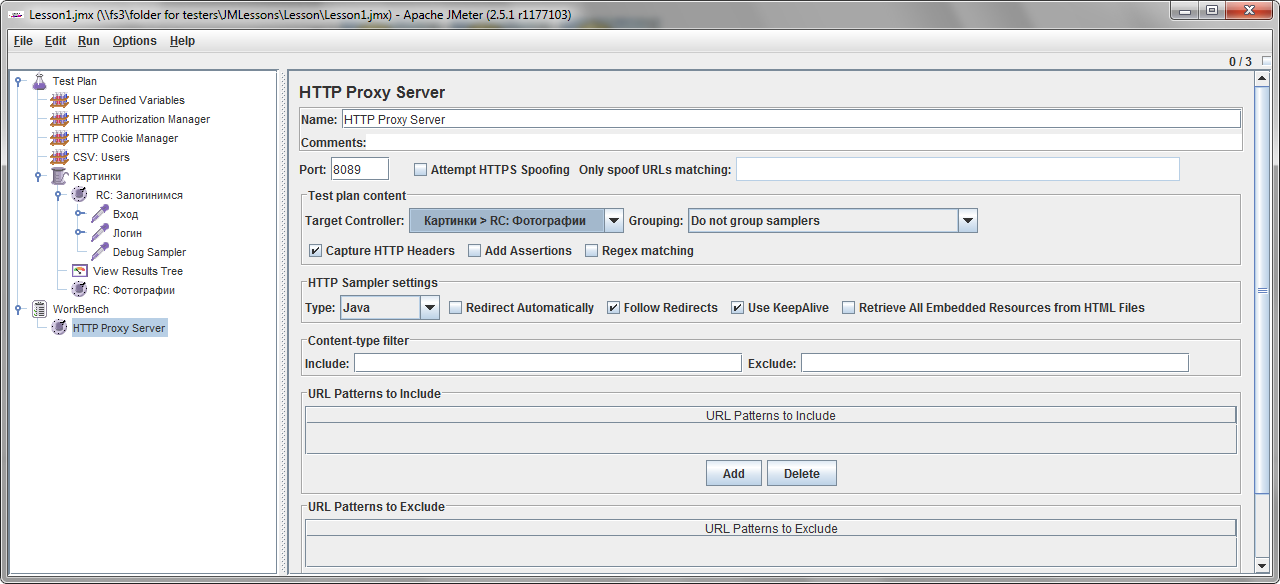
It has a lot of settings, but we are only interested in the port. If port 8080 is busy, you can set, for example, 8089. I use this one (8089) on my machine. We also see that the default in the Target Controller field is “use recording controller”. Those. log will be written there.
We will not touch the rest of the fields, but we will need some of them when we get a little more information about our site.
Once set the port, go to the browser settings. I am trite using IE. Tools - Internet Options - Connections - Network Settings button . We put the checkboxes "Use a proxy server ..." , remove the second checkbox. I recommend to look in the "Advanced" and see what is written in the "Exceptions". In my practice, during the testing process, the site was transferred to a new domain, which turned out to be in exceptions. It took about half an hour to figure out why the actions of my virtual user on the test site are not recorded, and any links to Yandex, Twitter and Facebook are logged perfectly. In general, if there suddenly appeared the domain of your site, erase it.
In the Address field, we write “Localhost”, and specify the port as from JMether: “8089”. Without quotes everything, of course.
Now everything is ready for recording. We return to JMeter on the proxy and at the bottom we can click the Start button. After clicking all the user's actions in the browser will begin to be recorded in the “Logging in” created by us Recording Controller. We will record actions in a few steps, because the script may be overly large and difficult to edit. So the first thing we will do, and after debugging, is the authorization of the user on the site.
So, click Start and go through the authorization procedure on the server (you may not have it, but I have it) and the authorization procedure on the site. Go back to JMeter and click Stop. We look at the Recording Controller: he has a bunch of children. This is what we sent to the server, and the server responded. We study and clean.

Script debugging is the removal of various .jpg, .png and links to third-party resources. I have in the script more than half of such third-party resources - these are links with various social networks and the Yandex card. All this can be cleaned (by pressing delete). In general, you can also clean out .js. The main thing to find a request that transmits in your body the credentials of your user. Well, for beauty find the request that leads you to the page where the user logs in. Thus, together they model a bundle in the actions of the user “went to the page - logged in”.
Suppose we were lucky to isolate the necessary requests. Well, or it seems to us that we have isolated them. Give them readable names! To check whether we have isolated, the script must be run. In my case, if you run the script, it will be executed with errors. The fact is that for testing I need to log in to the server. To do this, add an HTTP Autorization Manager ( Thread Group - Add - Config Elements - HTTP Autorization Manager ) to the top of the tree. It is intuitive. We write down the address of our resource there with the http: //, username and password.

If the Authorization Manager is needed for authorization on the server, then absolutely exactly when authorizing on the site, cookies are used. Add Cookie Manager after Authorization Manager ( TestPlan - Add - Config Elements - HTTP Cookie Manager ). This element must be added, perhaps, always, if it is a question that the user needs to login.
Before you run and test the script, add a View Results Tree ( Coil - Add - Listener - View Results Tree ) element in which you can watch the execution. This element is conveniently located always below. Oh yeah, you also need to remove the checkbox "use proxy" in the browser settings - we will not need it yet.

So you can run. Run (ctrl + r)!
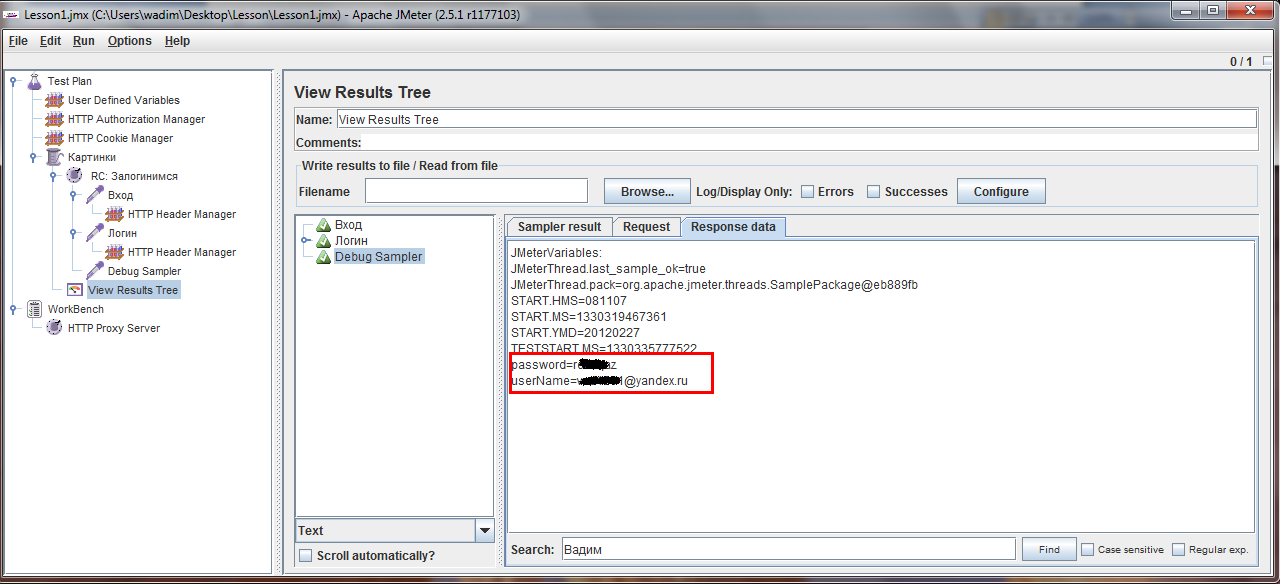
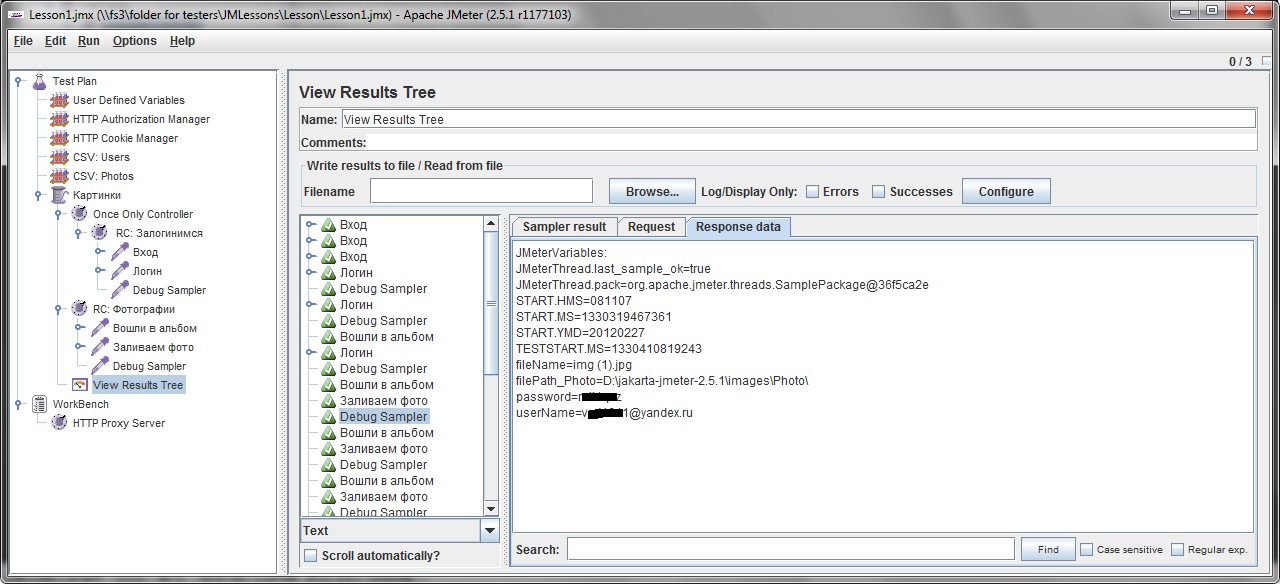
In View Results Tree we see the following:
It seems we are lucky. And even if we did not log in, then at least the requests reached the server. To make sure that the user was successfully logged in, look at the answer in the tree. Click on Response Data . In the server response, we are looking for information that indicates the successful authorization of the user. In my case it will be the username, because after authorization it is displayed on the page.

The script may still need to be cleaned. For example, I removed HTTP Header Manageres from it. And without them, everything works fine. To make sure that each element is necessary, it is not necessary to delete it immediately; it is enough to disable this element (ctrl + t) .
Next, we want to involve 3 users in this case. To do this, first perform a small training example on parameterizing queries. We parametrize one specific user.
To parameterize queries, add User Define Variables to the top. Thread -> Config Controllers -> User Define Variables . Below there is an Add button. We press it, we drive in two variables, because we will have only two parameters to change: login and password. Give them good names: userName and password. And as values, we enter the specific values of the current user for now.
To use them, go to the Login query, and instead of specific values, we write the variable names in the $ {variable name} format. In our case, we write $ {userName} to the Value fields for the login, $ {password} for the password.

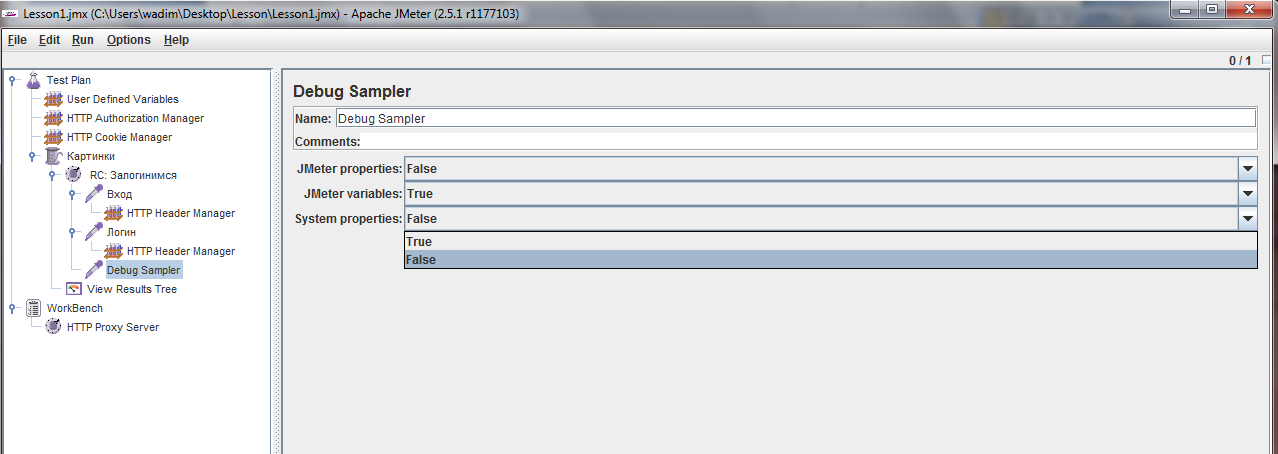
To debug the transfer of parameters, add another item - Debug Sampler. Thread -> Add -> Samplers -> Debug Sampler . We will put it after the request Login. In the settings of the element, leave only JMeter variables, the rest set to false. These are cases in order to catch only our variables. Yes, and still no other.
Run and look at the Results Results Tree results. You should see that it was our values that were passed as variables, and the queries as a whole returned what was needed (see above).
Now you can transfer the data of 3 users. To do this, use the CSV Data Set Config.
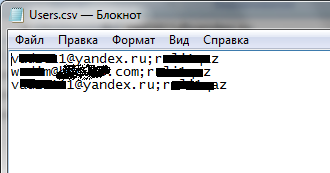
I suggest creating a .csv file in Notepad. For users, the file should be a set of 3 lines of the form “UserName; Password”. My file is presented in the screenshot below:
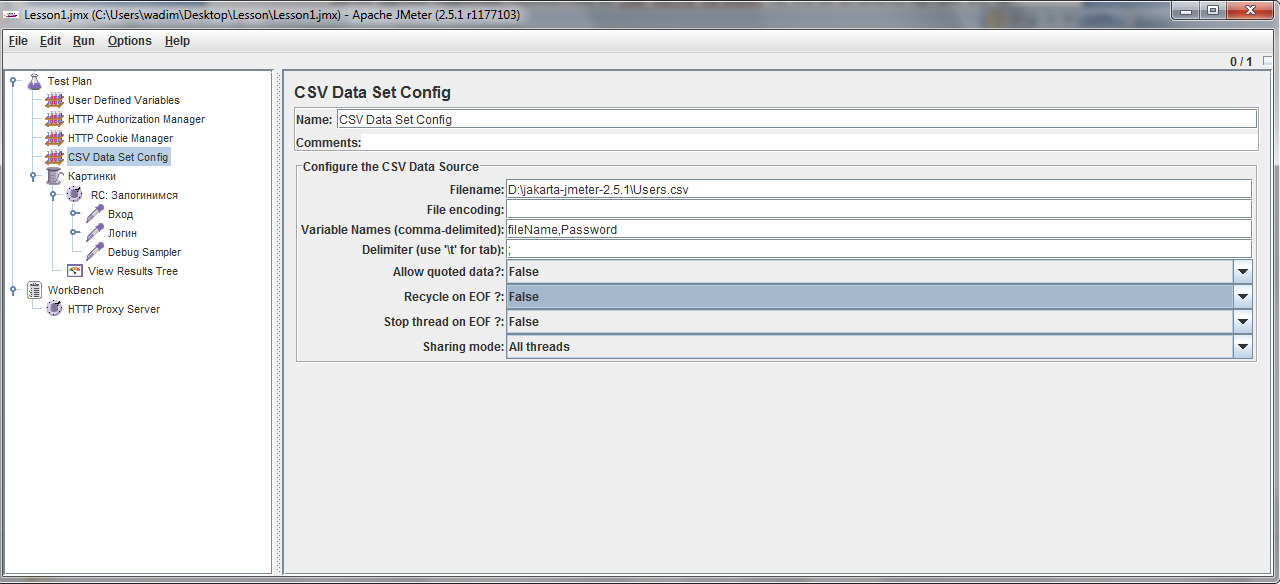
Next, add the element CSV Data Set Config ( Add - Config Elements - CSV Data Set Config ) to the tree. Let's add it not to the coil, but to the test plan, below the user variables. As a filename for a file, you need to specify the full path to the file and its name. Below to specify the encoding (your choice). If all data is in English, then the field can be left blank. Below write variables that are counted from a file. For us it will be UserName and Password. As a separator, you need to specify a semicolon, since it is used in the file. Below, for someone who speaks at least a little English, it is not difficult to translate the names of logical variables. It is necessary to set to false the repetition of the file upon reaching the end, as well as the coil stop.
Next, remove such variables from the User Define Variables. The fact that it remains empty is not a big deal. After that, in the coil itself, the number of threads ( Number of Threrads ) is set to 3.
Now you can run the script and see the results in the Debug Sampler and View Results Tree. Do not forget to check whether the data returned the server, whether there is in them the names of your users.

Now that our users have learned to log in, let's proceed to the next part of our script. We will teach them to upload to any specific album of our photo site. To do this, again add to the coil Recording Controller, calling it "Photos".
In order to shorten the received script, we will first authorize the user on the site and go to the page where the photo upload will start directly. After that, turn on the proxy again in the browser settings and use the Proxy Server element on the workbench ( indicating a different Recording Controller ). Also in the URL Patterns to Exclude we will specify extensions that we do not need in the format "*. \. Xxx".
Start, fill in the photo album, End. We start cleaning the script. Similarly, you can leave for beauty only those requests that form a bunch of "went into the album - added a photo." I did this:

In fact, the request “entered the album” was recorded manually. It is nothing complicated: it is a GET request with the address of the page.
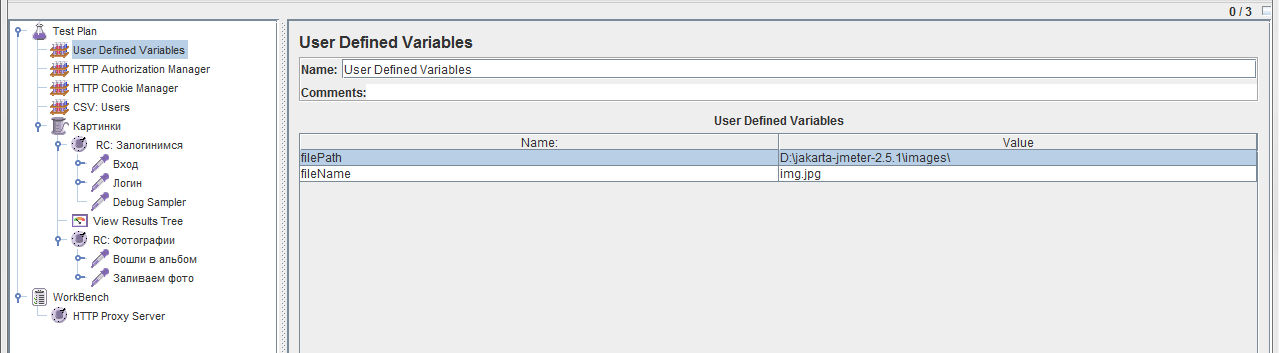
Pay attention to the request body that sends the file to the server. The only thing that is valuable to us is the path and the name of the file. Here we also parameterize them, so that each user uploads his own photo. Let's start with the file path. As such for testing it is not of interest. It is likely that all your photos will be in the same folder. But in the test, it can occur many times. So according to the rules of good tone, we write it into a variable. Let's go back to the User Define Variables and add the filePath variable with the path to the folder containing the photos, for example, "** D: \ jakarta-jmeter-2.5.1 \ images \ **". It is with a slash at the end, later it will be clear for what.
As always, first test the script on one file. Therefore, we will create another fileName variable, the value of which will be a specific file name, for example, " img.jpg ".
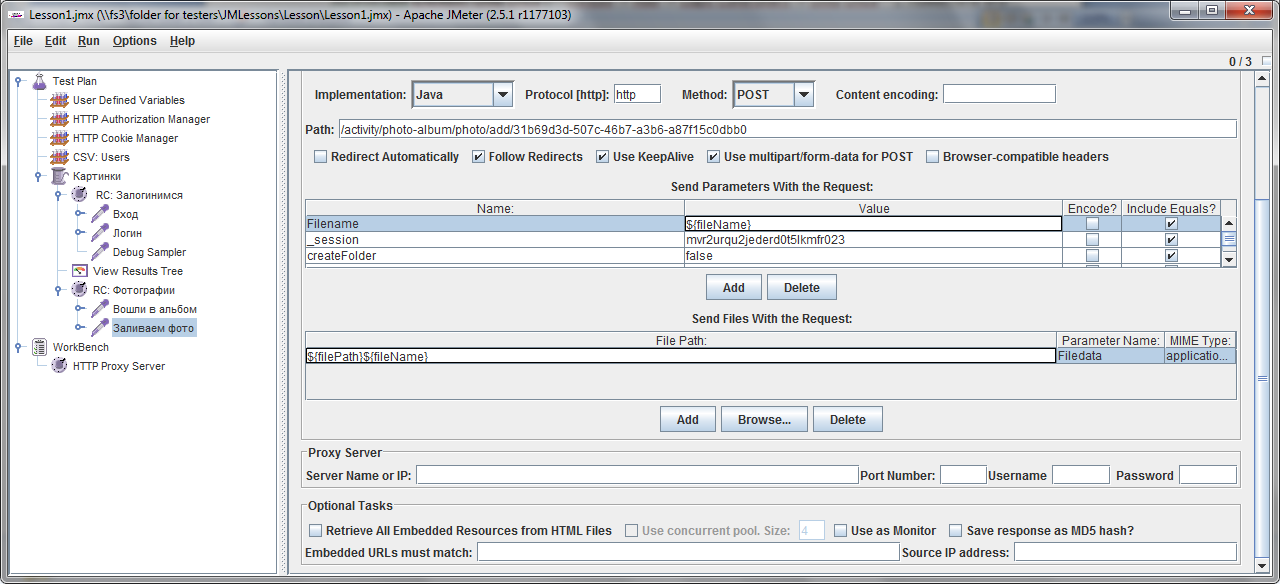
Return to the request body. In the section Send Files With the Request write the path already this way: $ {filePath} $ {fileName}. If you substitute the specified values into the variables (value from user define variables), it is easy to make sure that you get the correct path. Let's look at the parameters that the request transmits. There is also a file name. Enter $ {fileName} instead.
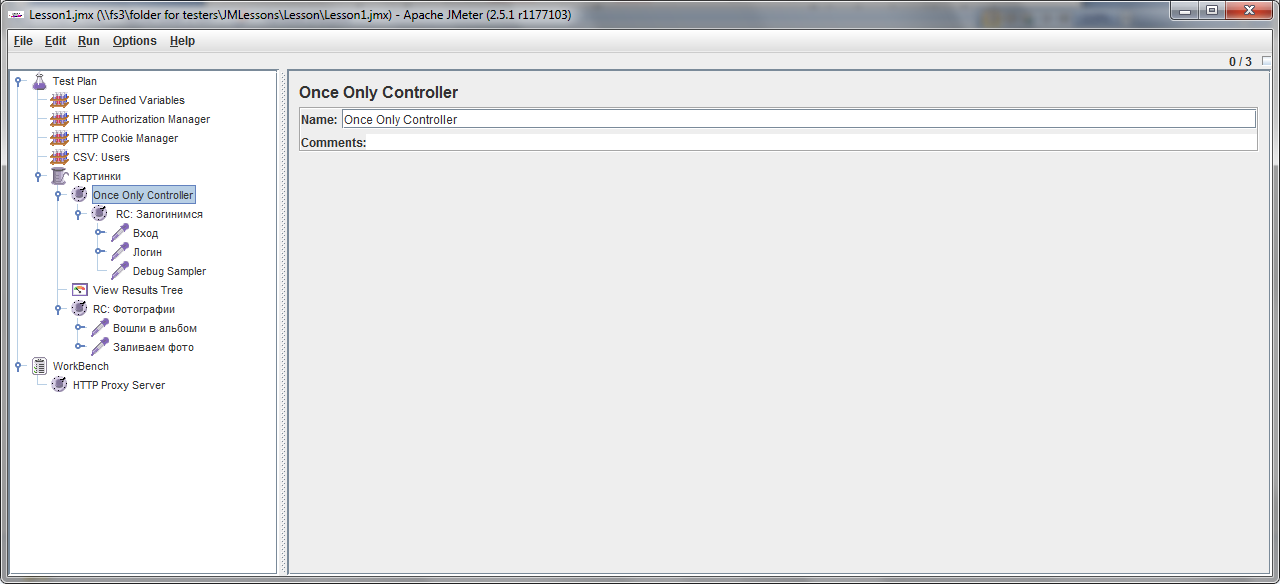
Now that the user is imitated in this part, we will add a new Debug Sampler. Let's think one step further: if we make the coil spin forever (for now, do not install!), Then each user will log in many, many times, right? To avoid this, add the Only Once logic element to the coil ( Thread -> Add -> Logic Controllers -> Only Once Controller ). Place it in the appropriate place above the Recording Controller, which is responsible for authorizing the user on the site, and drag the controller itself into it as a child.
Disable the proxy in the browser. Run the script. If everything is done correctly, a new photo will be added to the selected album. If something is wrong, see the Debug Sampler in View Results Tree.
Now you can make users add different photos. To do this, create a csv file, which will contain only the names of the photos:
Img.jpg
Img1.jpg
Img2.jpg
...
Create a CSV Data Set Config by dragging it under another CSV Data Set Config, specify the path to this file. We specify fileName as a variable ( variable Names ), and remove it from user variables ( User Defined Variables ). The field for the separator will be left blank. This time, repeat the file when reaching the end ( Recycle on EOF ) is left on True, and stop the coil when reaching the end ( Stop thread on EOF ) - on False. For the beautiful logic of our test, move the photos to a separate folder: "D: \ jakarta-jmeter-2.5.1 \ images \ Photo \" and change the value of the filePath variable to filePath_Photo accordingly. We will do it in those places where the variable is used.
Run the test! Then we look, if 3 photos were added to the album (yes, all users should have enough rights to add photos to the album). If everything is OK, continue on. If not, read Debug Sampler and server responses.
In fact, this is no different from the previous paragraph. Similarly, you need to upload a photo to the server. Therefore, we do everything also:
As avatar names, I used the same csv file, but uploaded the pictures to another folder and created a new variable for it: filePath_Avatars.
If everything works, then it is good. If not, look in Debug Sampler.
To make the script look more like a living person, you need to add delays. For example, after uploading a photo to the server, you can set the Constant Timer for 3 seconds (3000ms), as if the user is waiting for the picture to upload to the server. And to change the avatar Gaussian Random Timer from 2 to 6 seconds, the user will search and select the avatar. Also, for greater likelihood in each HTTP Request, you can put a Retrieve All Embedded Resourced From HTML Files checkbox, meaning that everything possible will be downloaded from the page, as in a regular browser.
So suppose everything works and everything is fine. Everything. The task is fully completed. Now it remains to load our site all night. Let's go back to the Thread and set the forever checkbox . This means that the script will be executed until the “stop thread” event occurs. In CSV Data Set Config, we set the possibility of such an event in False. This means that the test will be executed until it is stopped by the tester by hands (menu Run -> Stop) . The final screen is laid out at the beginning of the article.
The test simulates a banal business process for some social networks: the user went to the network, uploaded a photo to the album, which he really liked very much from yesterday’s party and changed his avatar to this (or other) photo. Putting such a process on forever, we received 3 users who upload photos and change avatars for them. The process can be changed by adding various other elements. For example, you can upload only one photo by setting Only Once, but changing avatars is infinite. If you replenish the database with up to 1000 users, run the script directly from the server, as well as from local machines in the office - this will be quite a heavy load on the application server.
Perhaps the next article will be devoted to testing the search and regular expressions, or evaluation and interpretation of the collected data.
We will be glad to any exchange of experience.
On Habré is not the first time they write about JMeter, but the articles have a rather narrow focus, or difficult to understand. Therefore, this article will be interesting for beginners.
Introduction
Somehow I began to learn a new tool - Jeter - and could not find some kind of full-fledged guide as a guide to action. Gradually, having understood some fairly useful articles and blogs, user documentation, I began to understand something. And I decided that maybe I’m not the only one looking for something to start working with. To master some of the principles of construction and the logic of the tool itself. So here is an article on how to get started.
So in this article we will look at an example of creating a script for 3 users who want:
1. login;
2. add a new photo to an album;
3. change the avatar.
As such, this is a normal business process for a social network.
And for these purposes such built-in components will be used:
- HTTP Proxy Server
- Recording Controller x3
- User Define Variables
- CSV Data Set Config x3
- Constant timer
- Uniform Random Timer
- HTTP Autorization Manager
- HTTP Request x6
- Debug Sampler x3
- HTTP Cookie Manager
- Once only controller
- Perhaps some others.
The article is large because detailed. The result should be something like this:
Automatic script recording
The bottom line is that when we create a script for a site that we test using the black box method, we do not know all the subtleties and features of its work. So, for example, that site, on the basis of which my script will end up, is written with the help of some Symphony2 package. Because of it, sending login-password data is not directly from the form on the / login page, but from some non-existent / login_check page. And to all this, another empty field is sent, which is hidden for the user.
HTTP Proxy Server will help to find similar pitfalls (this, like all the others, is an embedded element). Emulating the work of a proxy server, it will record all received \ sent requests.
')
Preparatory actions
We will not add HTTP Proxy Server to the test tree. We will discuss where we will record the resulting “steps”. Later, when we add an element to the tree, we will see that there are several possibilities where to write the results. They can be recorded directly in the "coil" ( Thread ), on the "workbench" ( Workbanch ), or in the element "Recording Controller". I advise you to use the latter method. First, it will allow, if necessary, disable (ctrl + t) the entire log at once; secondly, the test structure is better traced and formed.
All actions for adding and editing occur by clicking the right mouse button in the context menu. Created elements can be simply dragged and dropped.
So: Test Plan -> Add -> Threads -> Thread Group ; Thread Group -> Add -> Logic Controller -> Recording Controller .
I strongly recommend giving clear names to all elements at once. In my case these will be “Pictures” and “Log in”, respectively.
Write the script using HTTP Proxy Server
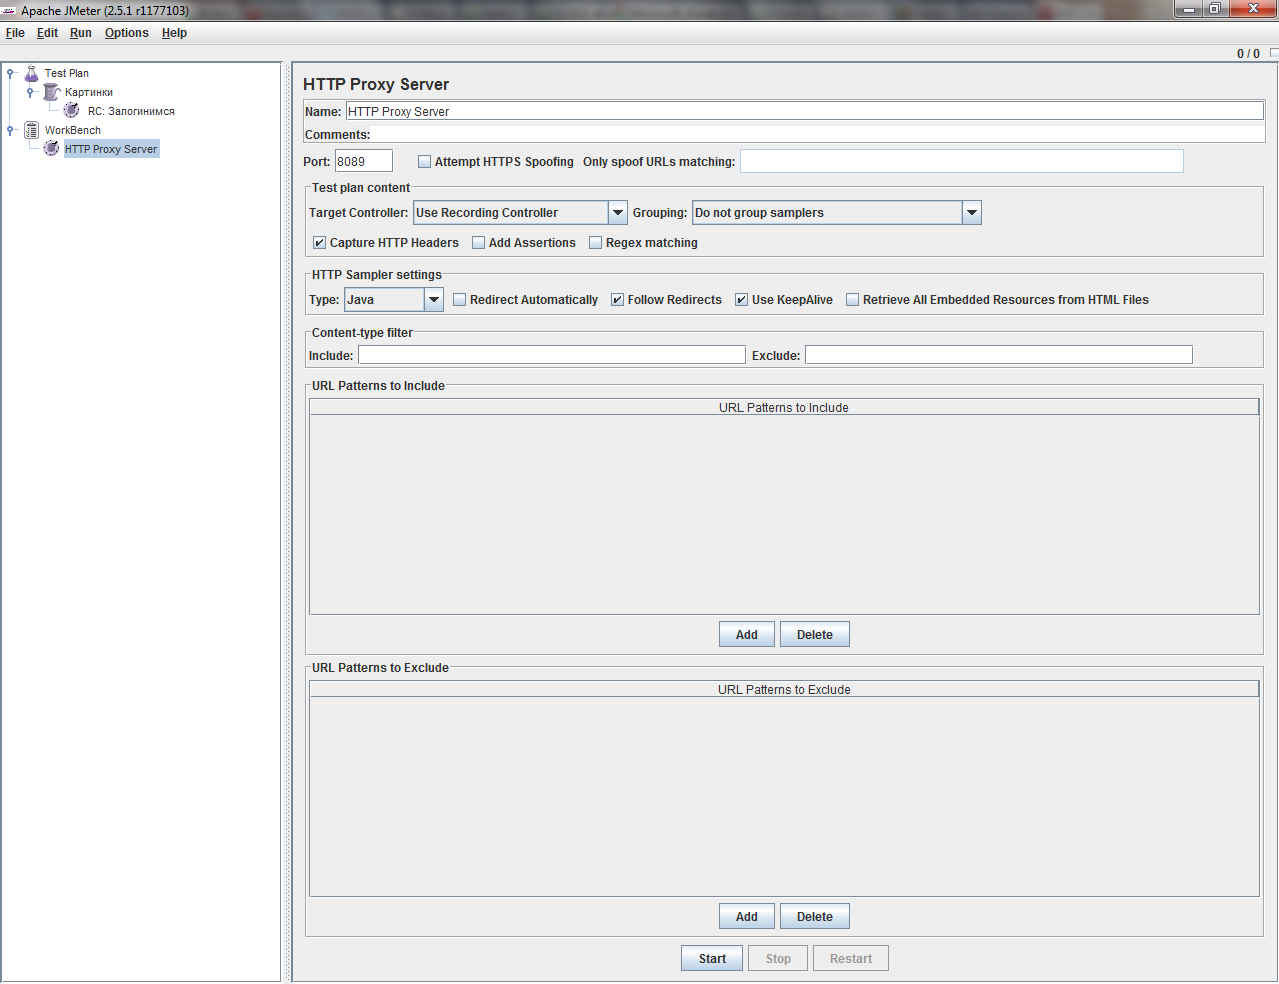
When the preparatory steps are completed, add the necessary element to the “workbench”: WorkBench -> Add -> Non-Test Elements -> HTTP Proxy Server .
It has a lot of settings, but we are only interested in the port. If port 8080 is busy, you can set, for example, 8089. I use this one (8089) on my machine. We also see that the default in the Target Controller field is “use recording controller”. Those. log will be written there.
We will not touch the rest of the fields, but we will need some of them when we get a little more information about our site.
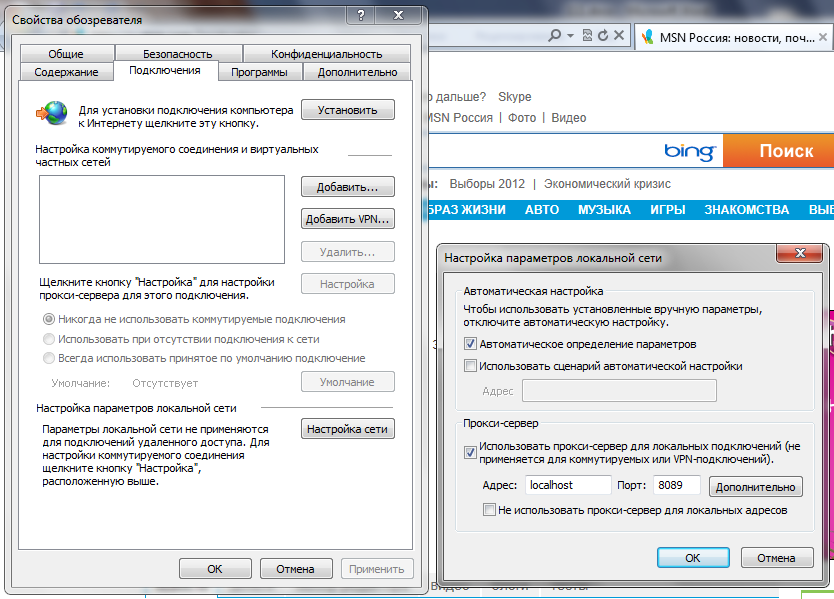
Once set the port, go to the browser settings. I am trite using IE. Tools - Internet Options - Connections - Network Settings button . We put the checkboxes "Use a proxy server ..." , remove the second checkbox. I recommend to look in the "Advanced" and see what is written in the "Exceptions". In my practice, during the testing process, the site was transferred to a new domain, which turned out to be in exceptions. It took about half an hour to figure out why the actions of my virtual user on the test site are not recorded, and any links to Yandex, Twitter and Facebook are logged perfectly. In general, if there suddenly appeared the domain of your site, erase it.
In the Address field, we write “Localhost”, and specify the port as from JMether: “8089”. Without quotes everything, of course.
Now everything is ready for recording. We return to JMeter on the proxy and at the bottom we can click the Start button. After clicking all the user's actions in the browser will begin to be recorded in the “Logging in” created by us Recording Controller. We will record actions in a few steps, because the script may be overly large and difficult to edit. So the first thing we will do, and after debugging, is the authorization of the user on the site.
So, click Start and go through the authorization procedure on the server (you may not have it, but I have it) and the authorization procedure on the site. Go back to JMeter and click Stop. We look at the Recording Controller: he has a bunch of children. This is what we sent to the server, and the server responded. We study and clean.
Script debugging
Script debugging is the removal of various .jpg, .png and links to third-party resources. I have in the script more than half of such third-party resources - these are links with various social networks and the Yandex card. All this can be cleaned (by pressing delete). In general, you can also clean out .js. The main thing to find a request that transmits in your body the credentials of your user. Well, for beauty find the request that leads you to the page where the user logs in. Thus, together they model a bundle in the actions of the user “went to the page - logged in”.
Suppose we were lucky to isolate the necessary requests. Well, or it seems to us that we have isolated them. Give them readable names! To check whether we have isolated, the script must be run. In my case, if you run the script, it will be executed with errors. The fact is that for testing I need to log in to the server. To do this, add an HTTP Autorization Manager ( Thread Group - Add - Config Elements - HTTP Autorization Manager ) to the top of the tree. It is intuitive. We write down the address of our resource there with the http: //, username and password.
If the Authorization Manager is needed for authorization on the server, then absolutely exactly when authorizing on the site, cookies are used. Add Cookie Manager after Authorization Manager ( TestPlan - Add - Config Elements - HTTP Cookie Manager ). This element must be added, perhaps, always, if it is a question that the user needs to login.
Before you run and test the script, add a View Results Tree ( Coil - Add - Listener - View Results Tree ) element in which you can watch the execution. This element is conveniently located always below. Oh yeah, you also need to remove the checkbox "use proxy" in the browser settings - we will not need it yet.
So you can run. Run (ctrl + r)!
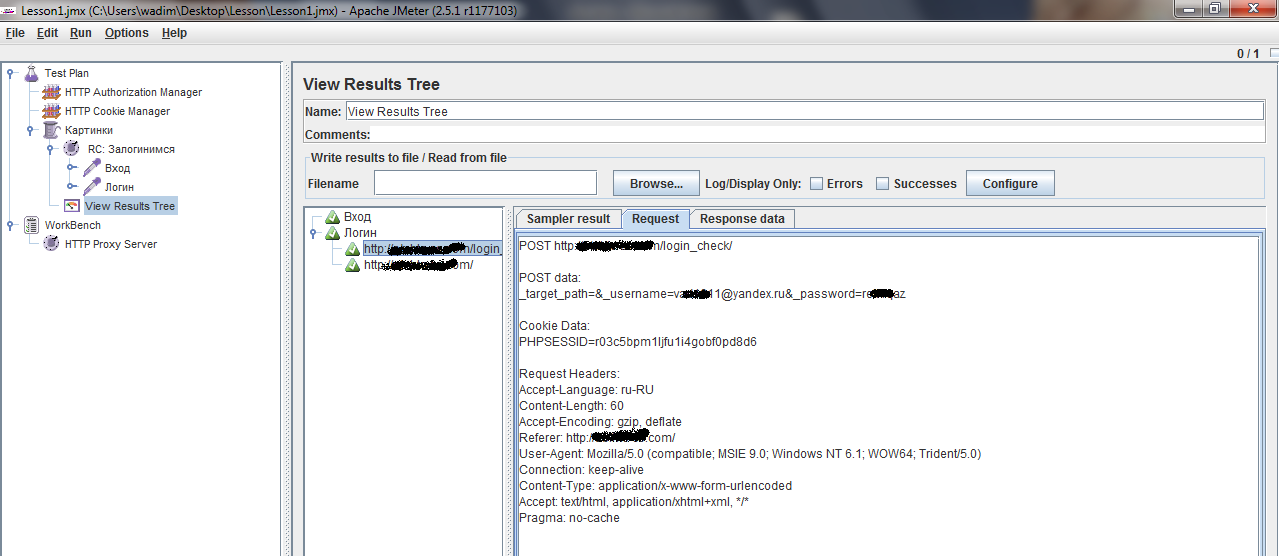
In View Results Tree we see the following:
It seems we are lucky. And even if we did not log in, then at least the requests reached the server. To make sure that the user was successfully logged in, look at the answer in the tree. Click on Response Data . In the server response, we are looking for information that indicates the successful authorization of the user. In my case it will be the username, because after authorization it is displayed on the page.
The script may still need to be cleaned. For example, I removed HTTP Header Manageres from it. And without them, everything works fine. To make sure that each element is necessary, it is not necessary to delete it immediately; it is enough to disable this element (ctrl + t) .
Next, we want to involve 3 users in this case. To do this, first perform a small training example on parameterizing queries. We parametrize one specific user.
Parameterization
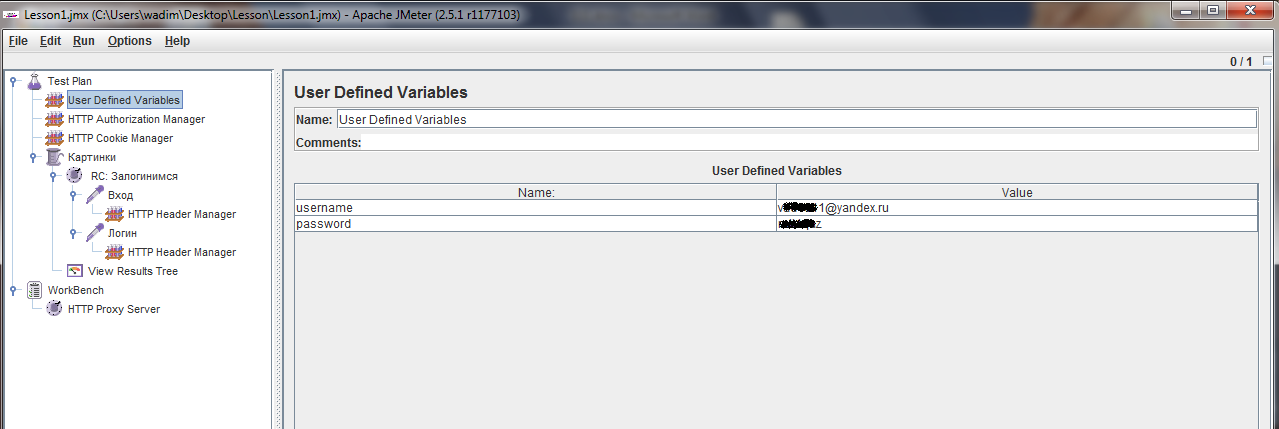
To parameterize queries, add User Define Variables to the top. Thread -> Config Controllers -> User Define Variables . Below there is an Add button. We press it, we drive in two variables, because we will have only two parameters to change: login and password. Give them good names: userName and password. And as values, we enter the specific values of the current user for now.
To use them, go to the Login query, and instead of specific values, we write the variable names in the $ {variable name} format. In our case, we write $ {userName} to the Value fields for the login, $ {password} for the password.
To debug the transfer of parameters, add another item - Debug Sampler. Thread -> Add -> Samplers -> Debug Sampler . We will put it after the request Login. In the settings of the element, leave only JMeter variables, the rest set to false. These are cases in order to catch only our variables. Yes, and still no other.
Run and look at the Results Results Tree results. You should see that it was our values that were passed as variables, and the queries as a whole returned what was needed (see above).
Now you can transfer the data of 3 users. To do this, use the CSV Data Set Config.
CSV Data Set Config
I suggest creating a .csv file in Notepad. For users, the file should be a set of 3 lines of the form “UserName; Password”. My file is presented in the screenshot below:
Next, add the element CSV Data Set Config ( Add - Config Elements - CSV Data Set Config ) to the tree. Let's add it not to the coil, but to the test plan, below the user variables. As a filename for a file, you need to specify the full path to the file and its name. Below to specify the encoding (your choice). If all data is in English, then the field can be left blank. Below write variables that are counted from a file. For us it will be UserName and Password. As a separator, you need to specify a semicolon, since it is used in the file. Below, for someone who speaks at least a little English, it is not difficult to translate the names of logical variables. It is necessary to set to false the repetition of the file upon reaching the end, as well as the coil stop.
Next, remove such variables from the User Define Variables. The fact that it remains empty is not a big deal. After that, in the coil itself, the number of threads ( Number of Threrads ) is set to 3.
Now you can run the script and see the results in the Debug Sampler and View Results Tree. Do not forget to check whether the data returned the server, whether there is in them the names of your users.
Add a photo to the album
Now that our users have learned to log in, let's proceed to the next part of our script. We will teach them to upload to any specific album of our photo site. To do this, again add to the coil Recording Controller, calling it "Photos".
In order to shorten the received script, we will first authorize the user on the site and go to the page where the photo upload will start directly. After that, turn on the proxy again in the browser settings and use the Proxy Server element on the workbench ( indicating a different Recording Controller ). Also in the URL Patterns to Exclude we will specify extensions that we do not need in the format "*. \. Xxx".
Start, fill in the photo album, End. We start cleaning the script. Similarly, you can leave for beauty only those requests that form a bunch of "went into the album - added a photo." I did this:
In fact, the request “entered the album” was recorded manually. It is nothing complicated: it is a GET request with the address of the page.
Pay attention to the request body that sends the file to the server. The only thing that is valuable to us is the path and the name of the file. Here we also parameterize them, so that each user uploads his own photo. Let's start with the file path. As such for testing it is not of interest. It is likely that all your photos will be in the same folder. But in the test, it can occur many times. So according to the rules of good tone, we write it into a variable. Let's go back to the User Define Variables and add the filePath variable with the path to the folder containing the photos, for example, "** D: \ jakarta-jmeter-2.5.1 \ images \ **". It is with a slash at the end, later it will be clear for what.
As always, first test the script on one file. Therefore, we will create another fileName variable, the value of which will be a specific file name, for example, " img.jpg ".
Return to the request body. In the section Send Files With the Request write the path already this way: $ {filePath} $ {fileName}. If you substitute the specified values into the variables (value from user define variables), it is easy to make sure that you get the correct path. Let's look at the parameters that the request transmits. There is also a file name. Enter $ {fileName} instead.
Now that the user is imitated in this part, we will add a new Debug Sampler. Let's think one step further: if we make the coil spin forever (for now, do not install!), Then each user will log in many, many times, right? To avoid this, add the Only Once logic element to the coil ( Thread -> Add -> Logic Controllers -> Only Once Controller ). Place it in the appropriate place above the Recording Controller, which is responsible for authorizing the user on the site, and drag the controller itself into it as a child.
Disable the proxy in the browser. Run the script. If everything is done correctly, a new photo will be added to the selected album. If something is wrong, see the Debug Sampler in View Results Tree.
Parameterize
Now you can make users add different photos. To do this, create a csv file, which will contain only the names of the photos:
Img.jpg
Img1.jpg
Img2.jpg
...
Create a CSV Data Set Config by dragging it under another CSV Data Set Config, specify the path to this file. We specify fileName as a variable ( variable Names ), and remove it from user variables ( User Defined Variables ). The field for the separator will be left blank. This time, repeat the file when reaching the end ( Recycle on EOF ) is left on True, and stop the coil when reaching the end ( Stop thread on EOF ) - on False. For the beautiful logic of our test, move the photos to a separate folder: "D: \ jakarta-jmeter-2.5.1 \ images \ Photo \" and change the value of the filePath variable to filePath_Photo accordingly. We will do it in those places where the variable is used.
Run the test! Then we look, if 3 photos were added to the album (yes, all users should have enough rights to add photos to the album). If everything is OK, continue on. If not, read Debug Sampler and server responses.
Change the avatar
In fact, this is no different from the previous paragraph. Similarly, you need to upload a photo to the server. Therefore, we do everything also:
- we create the next recording controller
- set up a proxy
- doing actions on the site (write the script)
- clean the script
- parameterize for one avatar
- debugging
- we parameterize for many avatars
As avatar names, I used the same csv file, but uploaded the pictures to another folder and created a new variable for it: filePath_Avatars.
If everything works, then it is good. If not, look in Debug Sampler.
To make the script look more like a living person, you need to add delays. For example, after uploading a photo to the server, you can set the Constant Timer for 3 seconds (3000ms), as if the user is waiting for the picture to upload to the server. And to change the avatar Gaussian Random Timer from 2 to 6 seconds, the user will search and select the avatar. Also, for greater likelihood in each HTTP Request, you can put a Retrieve All Embedded Resourced From HTML Files checkbox, meaning that everything possible will be downloaded from the page, as in a regular browser.
So suppose everything works and everything is fine. Everything. The task is fully completed. Now it remains to load our site all night. Let's go back to the Thread and set the forever checkbox . This means that the script will be executed until the “stop thread” event occurs. In CSV Data Set Config, we set the possibility of such an event in False. This means that the test will be executed until it is stopped by the tester by hands (menu Run -> Stop) . The final screen is laid out at the beginning of the article.
The test simulates a banal business process for some social networks: the user went to the network, uploaded a photo to the album, which he really liked very much from yesterday’s party and changed his avatar to this (or other) photo. Putting such a process on forever, we received 3 users who upload photos and change avatars for them. The process can be changed by adding various other elements. For example, you can upload only one photo by setting Only Once, but changing avatars is infinite. If you replenish the database with up to 1000 users, run the script directly from the server, as well as from local machines in the office - this will be quite a heavy load on the application server.
Perhaps the next article will be devoted to testing the search and regular expressions, or evaluation and interpretation of the collected data.
We will be glad to any exchange of experience.
Source: https://habr.com/ru/post/140310/
All Articles