"Resurrect" HDD
I want to share the experience of recovering the hard drive Seagate Barracuda 7200.11 ST3500320AS after a crash. A short background: a friend of mine decided to do a full formatting of his hard drive, after which he was no longer defined in the BIOS. It was a pity to throw out a 500-gigabyte hard drive, and he gave the hard drive to me to be torn apart. Looking ahead, I’ll say that the advanced skills of googling and crazy hands made it possible to achieve excellent results.
So, this method is suitable for Seagate and Maxtor hard drives (for Samsung there is a similar way, but it is not covered in this article). Information about the hard drives of other manufacturers was not found. At the end of the article discusses possible problems. I highly recommend reading the article in full before repeating the steps described here.

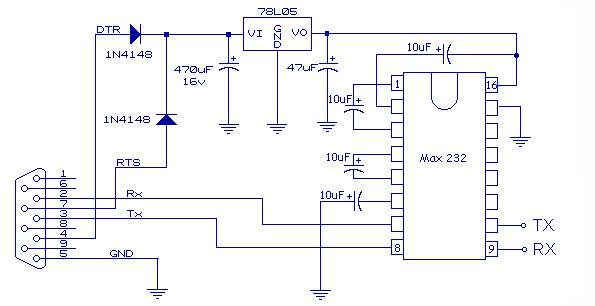
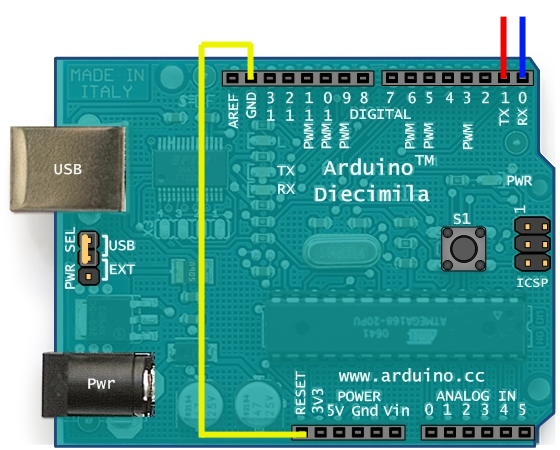
For those who have an Arduino: connect GND and RESET , use the contacts RX and TX .
')
 To test the circuit, you can close the RX and TX , - as a result, everything that we introduce must return.

I used PuTTY to work with the COM port, your favorite program will also do an excellent job with the task. So, open PuTTY, select the type of Serial connection, enter the port and other settings:
Open the terminal window, press Ctrl + Z and see the prompt:
To see a list of commands and a description of them for your hard disk, you must enter / C , and then Q.
 Important : observe the register when entering commands!
Now I have described a situation where everything works as it should, but this is rarely the case. In the process of recovery, several difficulties arose, which I am sure you will also have to face. Therefore, all who have failed something, look for a solution in the last section of this article.
Thank you for your attention, let your hard drives last for a long time.
UPD : Related Links.
So, this method is suitable for Seagate and Maxtor hard drives (for Samsung there is a similar way, but it is not covered in this article). Information about the hard drives of other manufacturers was not found. At the end of the article discusses possible problems. I highly recommend reading the article in full before repeating the steps described here.
Converter
You can buy the converter (USB-TTL and COM-TTL are on sale) or you can do it yourself (I’m giving you several schemes below).For those who have an Arduino: connect GND and RESET , use the contacts RX and TX .
')
To test the circuit, you can close the RX and TX , - as a result, everything that we introduce must return.Connection
We connect the RX and TX , as in the figure below, disconnect the SATA cable, connect the power.I used PuTTY to work with the COM port, your favorite program will also do an excellent job with the task. So, open PuTTY, select the type of Serial connection, enter the port and other settings:
| Speed | 38400 |
| Data bits | eight |
| Stop bits | one |
| Parity | None |
| Flow control | None |
F3 T>
To see a list of commands and a description of them for your hard disk, you must enter / C , and then Q.Recovery
It's time to start recovery. Important : observe the register when entering commands!- Go to level 1 by entering / 1
- Clear SMART with the command N1
- Turn off the power and wait for the engine to stop (~ 10 sec)
- Turn on the power and press Ctrl + Z again
- Clear the list of bad blocks: enter i4,1,22
- Repeat steps 3-4
- Enter into the console: m0,2,2,0,0,0,0,22 (for hard drives "Made in China" - m0,2,2 ,,,, 22 )
- Moving to level 2: / 2
- Stop the engine: enter Z
- Turn off the power
Now I have described a situation where everything works as it should, but this is rarely the case. In the process of recovery, several difficulties arose, which I am sure you will also have to face. Therefore, all who have failed something, look for a solution in the last section of this article.
About what is left overs
Since this article is the result of our own experiments based on various materials on HDD recovery, I will describe further the problems I encountered myself.| Problem | Decision |
| Noise in the console | Connect the GND pin to ground on the power supply. I used the wire from the power key. Also pull the SATA I jumper out of the hard drive. |
| Nothing appears on the screen after pressing Ctrl + Z | Most likely, RX and TX are incorrectly connected. |
When you first turn on the errorLED: 000000CC FAddr: 0025BF67or LED: 000000CC FAddr: 0024A7E5 | First, try to turn off the head. To do this, unscrew the board (at the same time you can clean the contacts with an eraser: I had a lot of dirt there), put an insulator (paper, electrical tape, etc.) on the contacts leading to the heads, and screw the board back (not with all the screws, but so that was powered by a motor). Turn on the power, press Ctrl + Z , enter / 2 , then Z. We are waiting for a message about a successful stop.Spin down complete Elapsed Time 0.138 msecsWithout disconnecting the power supply, we unscrew the board, pull out our insulator and fasten the board back, enter the engine start command: U. If the method of turning off the heads did not help, you need to close the contacts on the board with sharp tweezers or thin wires. The photo (available on the links below) shows the circuit points on different hard drives. Close the contacts after powering up the hard drive. Head knocks will be heard, and then the engine will stop.After these manipulations give a command to stop the engine, open the contacts and start the engine again. |
The engine does not start with an errorError 1009 DETSEC 00006008 Spin error Elapsed Time 53.959 secs R / W Status 2 R / W Error 84150180 | You probably forgot to remove the insulator or badly screwed the board. Also cause may be mechanical damage. |
The engine does not stop. Accompanied by an errorLED: 000000CE FAddr: 00280569 | Turn off the power for a minute. If the error does not go away, first try to start the engine by typing U. |
Thank you for your attention, let your hard drives last for a long time.
UPD : Related Links.
Source: https://habr.com/ru/post/140289/
All Articles