AVRDudeR - embed avrdude in IDE
Arduino is a good platform for do-it-yourself like me.
Comfortable, everything is already there.
What is the problem?
I don’t like the software part. Especially awful is the Arduino IDE. Each file opens in a new window, leaving an empty running IDE window. And other minor nonsense, which are accustomed to the convenience of Visual Studio, Borland / Embarcadero RAD IDE upset and cause displeasure.
Fortunately, we can use any IDE which one we like. For ready-made projects that only compile and flash or your own trial crafts, that Wiring stub, compiled by the Arduino IDE, is quite suitable.
For convenience, I use Visual Micro Arduino - the convenience of Visual Studio, quick compilation, flashing using standard tools.
Arduino without Arduino IDE
The step above is direct work with a microcontroller, here you are free to do what you want. Often it is more convenient than to understand the stuffing libraries Arduino. But you have to use either AVR Studio or a third-party IDE and Atmel compiler (good, it's completely free and is included with AVR Tools).
Everything is good, but they know nothing about Arduino and cannot flash it. And here begins the inconvenience.
Who are not interested in the details, go straight to the point, download and customize .
')
AVR Studio is a good environment, although version 4 is quite primitive, and 5th is heavy. Neither one nor the other except through the firm programmer can not flash. Ambush.
I took a bootloader project that is compatible with AVR Studio, pretending to be an AVRISP programmer. The interface with it in AVR Studio was far from the most successful.
What to do?
There is AVRDUDE - a free flasher that works with almost all programmers for ATMEL microcontrollers. But he console. It seems to be no problem, I wrote a cmd or bat file and everything, run it after compilation and the whole business. But I, like many, probably, do not have one pay. And each Arduino board is seen in the system as a separate COM port. Every programmer too. The boards have different microcontrollers (Atmega168P, Atmega328P). Apart from self-made Arduino-compatible boards or even with a bare microcontroller and strapping.
Each time I climb into the bat file and edit the settings for different boards or switch to another application to run it for firmware, to check if I changed a couple of bytes in the code, I personally get bored, and there are a lot of errors, and the controller does not kill for long. Worse, with FTBB the programmer works only a separate version of avrdude, patched under it and knowing nothing about arduino. So, if we flash through it, then you need to keep one more bat file.
In Code :: Blocks IDE, which I liked more about the formatting options and the convenience of working with the code, the situation is not much better, except that you can pass parameters to an external utility.
Automate the launch of avrdude with the necessary parameters
I got tired of this situation and I wrote a small program that receives 2 parameters on the command line:
- name of the configuration file
- firmware file name
The utility launches avrdude itself with the parameters specified in the configuration file (just a file with ready-made settings for flashing), waits for the firmware and closes. This allows you to flash the project into any existing microcontroller during the debugging process in 2 clicks directly from Code :: Blocks.
If you run with one parameter, it will read the corresponding configuration file, if with two, it will try to automatically fill in the firmware from the second parameter.
If interested, download AVRDudeR
Integrating into an IDE is very simple (longer to tell than to do):
Add two menu items to the Tools menu - to change the settings and for the firmware
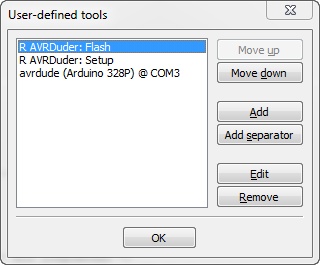
To change the settings, we register:
For firmware:

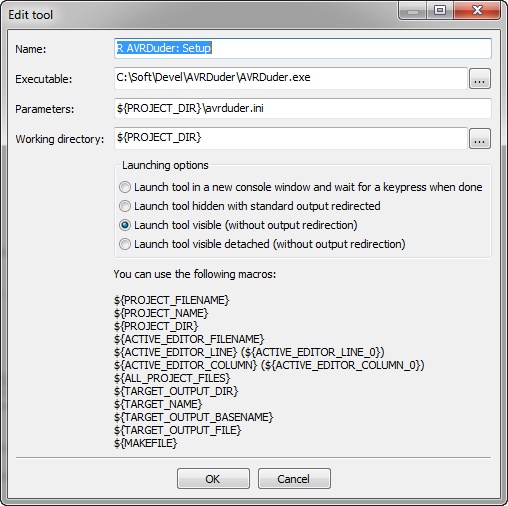
In fact, the settings are written in: the first parameter is the avrdude.ini file, which we save when setting up in the project folder, the second parameter is the name of the firmware file.
The setup process looks like this:
- We connect the programmer or Arduino board with which we will work so that the necessary COM port appears in the system.
- Run Tools-> R AVRduder: Setup, select the settings and save the file with the settings in the project directory under the name avrduder.ini (or the one specified in the settings). We close the utility
Now, after compiling the project, select Tools-> R AVRDudeR: Flash and ready.
Both versions of avrdude are already in the archive, you do not need to configure anything and register it in AVRDudeR.
A little bit about the settings:
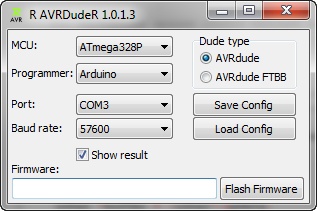
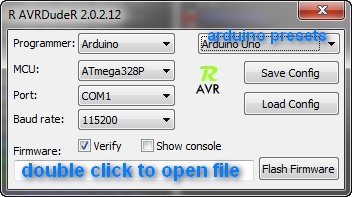
MCU - microcontroller (the friendly name and code for the command line avrdude program takes from mcu.lst)
Programmer - the programmer. FTBB, Arduino with corresponding firmware as an ISP programmer (ArduinoISP), or directly connected Arduino. (The text of the menu items and codes for the programmer line in the file programmers.lst)
Port : well, actually the COM port of the programmer or Arduino (therefore, it is necessary that the board be connected during configuration).
Baud rate : port speed. For Arduino to UNO - 57600, UNO - 115200. In your bootloader you know which one you configured, and for FTBB mode this parameter is ignored.
Dude type : just here and choose which avrdude - normal or for FTBB programmer to use.
Galka Show Result - open the firmware window when the firmware is visible, if you are not interested and you are sure that everything is working correctly, do not install it, the program will simply display a message when avrdude finishes and closes itself.

The program itself can be used to fill the firmware directly, without embedding.
simply double-click in the Firmware field, select the firmware file (or simply paste the path to the file with your hands) and click Flash Firmware. The configuration file also works in this case.
If the controller was changed or connected to another port, through another programmer, simply select Tools-> R AVRDuder: Setup and the file with the settings of this project opens (or the default settings if there is no avrduder.ini in the project folder). We change the port or programmer, controller or whatever we have changed and save avrduder.ini back to the project folder. Everything.
Yes, avrdude.ini can be simply dragged from project to project, if you work with the same boards / programmers. Just copy it to the new project folder and you can not customize anything at all.
Oh yeah, I almost forgot, in Code: Blocks I chose the GNU AVR GCC Compiler and indicated only the folder to AVR Tools. And the project is set up like this:

Then the compiler creates a .elf.hex file, which we flash. If yours is different, change the second parameter passed to AVRDudeR to transfer the name of the firmware file.
I hope it will save someone’s nerves, increase productivity and allow you to focus on the actual work on the idea, rather than messing around with a bunch of pribluds every time you compile and upload a project.
If the utility is useful, use on health.
UPD The utility still came in handy .
The new version is available on google code
Source: https://habr.com/ru/post/140276/
All Articles