Tilt-Shift DIY Photos
 What are Tilt-Shift lenses and what can be done with their help many people know. Recently on Habré there was an article about the Tilt-Shift generator , which creates this effect by processing ordinary photos. But this program is written only for Windows, and you also have to pay for it. All plug-ins for graphic editors for some reason also demanded money and licenses. Therefore, it was decided to deal with this issue independently and make the tool a little easier than professional software, and not ideally simulating lens optics, but free, open and accessible to everyone! What came out of it, and what not, you can see for yourself.
Let's start with the fact that we make our first thumbnail.
Getting started, first of all you need to select a photo. It makes no sense to try to process images that are not suitable initially. For the most part, landscape, city pictures taken from an elevation are used for this - this is the first thing that helps create the illusion of a small world. It is also good if there are small objects in the frame, such as transport and people.

The main effect in such photos is achieved due to the rotation of the lens, which leads to the fact that the focus plane becomes non-perpendicular to the optical axis. This, in turn, leads to the formation of a wedge-shaped depth of field. On how to create this effect with the help of graphic editors, you can get acquainted with the photoshop lessons on any website, so let's get straight to the point.
')
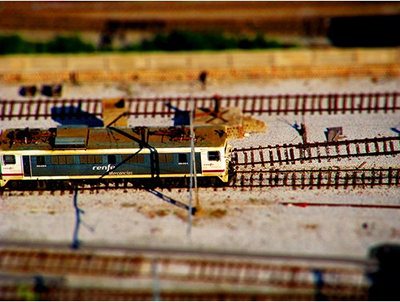
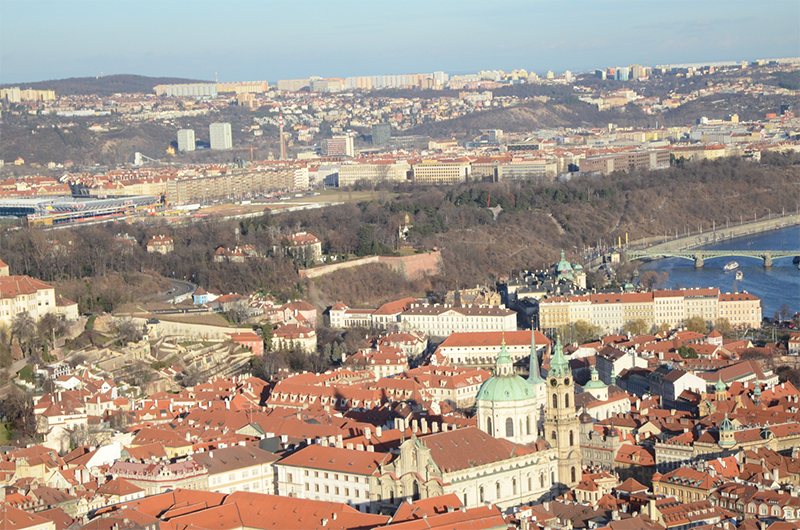
For work, I chose this photo:
After adding saturation and applying filters in Photoshop, we get the following result:
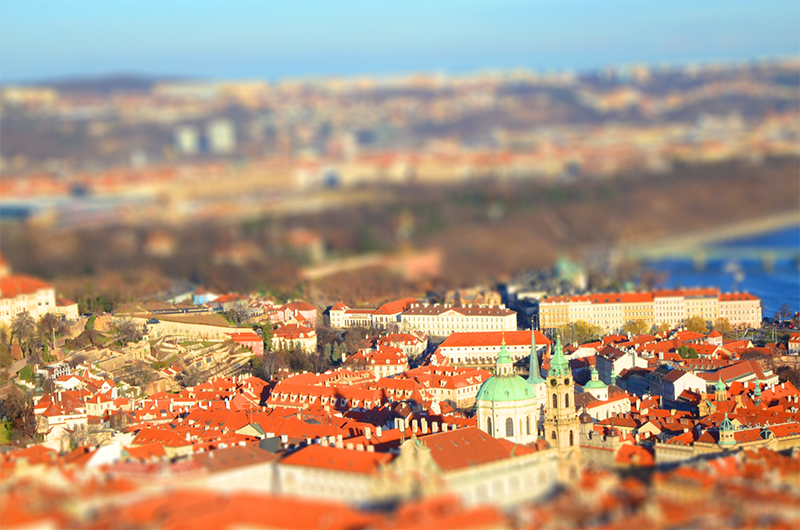
Of course, a sophisticated reader will not be fooled, and a real optical effect is quite easy to distinguish from filters, but still with fairly competent setting of the frame with improvised means you can achieve good results.
In fact, all that had to be done with the image was to impose an artificial bokeh in the right places and adjust the color saturation, which helps to give the effect of plastic models to objects in the frame.
Let's move on to programming.
Let's start with the simple. First you need to prepare a mask for the image. In order not to load yourself immediately with extra work, let's do it in Photoshop. In dark places, the value of the alpha layer will be equal to the maximum value, in white - zero, that is, the image in these places will be transparent.
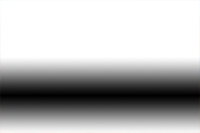
In a place with black pixels, the overlapping bokeh will not occur and the scene will remain in focus. The mask was made using the “roughly roll” method; this is just a demonstration of the approach.
Having a little picked in python, it turned out such a small and neat script:
- import Image
- import sys
- import numpy as np
- from scipy import ndimage
- import ImageEnhance
- # INIT
- blur_size = 6
- image_base = "/Users/Mango/Desktop/tiltshift_alpha.png"
- image_mask = "/Users/Mango/Desktop/mask_tiltshift.png"
- image_output = "/Users/Mango/Desktop/tiltshift_preview.png"
- # LOAD
- im_base = Image. open ( image_base )
- im_mask = Image. open ( image_mask )
- im_mask = im_mask. resize ( im_base. size )
- # PROCESS
- enh = ImageEnhance. Color ( im_base )
- im_base = enh. enhance ( 1.7 )
- enh = ImageEnhance. Contrast ( im_base )
- im_base = enh. enhance ( 1.2 )
- im_blurred = np. array ( im_base, dtype = float )
- im_blurred = ndimage. gaussian_filter ( im_blurred, sigma = [ blur_size, blur_size, 0 ] )
- im_blurred = Image. fromarray ( np. uint8 ( im_blurred ) )
- im_mask = im_mask. convert ( "L" )
- im_base = im_base. convert ( "RGBA" )
- # MERGE AND SAVE
- im_base. paste ( im_blurred, mask = im_mask )
- im_base. save ( image_output )
First we get the original image and mask, then the mask size is adjusted to the image size and processing begins. With the help of the ImageEnhance module you can adjust such indicators as color, brightness and contrast. After that, im_blurred saves a copy of the image as an array. To create the bokeh, I used the good old figure of Gauss blur. His result differs from the same Lens Blur in professional editors, but for a start it is a quite good result.
At the final stage, a blurred image is superimposed on our original using an alpha mask. It is also worth considering that each layer must have the correct palette. The mask is used in monochrome L mode, and the alpha layer is added to the original image using convert (“RGBA”), which we allow using the mask to overlay the second layer.
Here's what happened in the end:

Now let's finish the received code a bit and get rid of the ugly external addition in the form of a hand-drawn mask. There is nothing complicated about it, it is a so-called reflected gradient and is given by two collinear vectors.
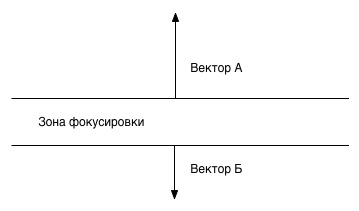
In a more simplified form, this model can be represented as follows:

The whole system is defined by several parameters: the direction, the length of the vector A, the focus area and the vector B. All distances for simplicity are set along the y axis.
The construction of the gradient is as follows. At first, an image with a width of one pixel is built for the given distances; it will act as a pattern. After which, by various manipulations, you can give it any shape and turn it to the desired angle.
Having a little experimented, I got this function:
- import Image
- import ImageDraw
- import ImageOps
- import math
- def draw_mask ( angle, width, height, offset_init, offset_A, offset_focus, offset_B ) :
- offset = height * offset_init / 100
- vectorA = offset + offset_A * height / 100
- focus = vectorA + offset_focus * height / 100
- vectorB = focus + offset_B * height / 100
- mask = Image. new ( 'L' , ( width, height ) )
- mask_1px = Image. new ( 'L' , ( 1 , height ) )
- draw_1px = ImageDraw. Draw ( mask_1px )
- for y in range ( 0 , offset ) : # draw white zone
- draw_1px. point ( ( 0 , y ) , 255 )
- for y in range ( offset, vectorA ) : # draw vectorA
- draw_1px. point ( ( 0 , y ) , ( vectorA-y ) * ( 255 / ( vectorA-offset ) ) )
- for y in range ( vectorA, focus ) : # draw white zone
- draw_1px. point ( ( 0 , y ) , 0 )
- for y in range ( focus, vectorB ) : # draw vectorB
- draw_1px. point ( ( 0 , y ) , 255 - ( vectorB-y ) * ( 255 / ( vectorB-focus ) ) )
- for y in range ( vectorB, height ) : # draw white zone
- draw_1px. point ( ( 0 , y ) , 255 )
- m_width, m_height = mask. size
- mask_1px = mask_1px. resize ( ( int ( m_width * 3 ) , m_height ) , Image. ANTIALIAS )
- mask_1px = ImageOps. invert ( mask_1px )
- mask_top = mask_1px. rotate ( angle, Image. NEAREST , 1 )
- mask_top = ImageOps. invert ( mask_top )
- mask. convert ( "RGBA" )
- n_width, n_height = mask_top. size
- mask. paste ( mask_top, ( -n_width / 2 , - ( n_height / 2 -height / 2 ) ) )
- mask. convert ( "L" )
- return mask

This code takes into account the angle of rotation in case you want to make the tool more versatile or screw it to the web interface, which I intend to do in the near future.
If anyone needs the source code, the final version is on github .
Source: https://habr.com/ru/post/140135/
All Articles