Screencasts in Linux, personal experience
A little more than a year ago I published screencasts here in Habré. Recently the last one came out and I wanted to share the experience of creating screencasts under Linux.
To begin with, I didn’t have any experience with video and audio, which means absolutely nothing. I have never in my life edited video not in windows, not in macos, not even in linux. My knowledge was limited to several formats, i.e. I knew that in mpeg2 it was necessary to keep the source of the video, and compress the final result using mpeg4. What exist editors I did not even guess. But let's get down to business.
01. Material for screencasts
There were no problems, I knew what and how I wanted to record. I have already seen various “video lessons” in very low quality runet, and I have seen css-tricks and railscasts . The latter for me were the ideal for which I was striving, quickly, clearly, nothing superfluous. For myself, I singled out two main things, so that the video was on average 10 minutes, a maximum of 30, I did not want to waste time on people who would watch it. And a good audio voice, so a beautiful girl Elena was chosen, who agreed to participate in the voice acting. I didn’t want to sit in the microphone myself. The layouts were pre-packaged, everything was checked and printed, so that in the process you would not dwell on any trifles and see all the code before your eyes. Completing in 30 minutes was very difficult. Go ahead.
02. Video recording
Here begins the most interesting thing than to write video from the screen. There are a lot of options, everyones recordMyDesktop, istanbul, vncrec, etc., it is impossible to use all of them, they are not stable and there is no possibility to get mpeg2 at the output. Kazam and Eidete appeared from the last one , but they came out already after that, I won’t say anything about them. Initially, I stopped at xvidcap , a bunch of settings that are necessary, can give mpeg2. But in the process it turned out not pleasant problems, the video output was shorter than the sounds of the keyboard with a mouse. Those. I write 10 minutes, I get 10 minutes of audio and 7 minutes of video, for example. Absolutely by chance I came across a miracle bash script, with which I recorded all the screencasts, not once did not fall, did not spoil. Unfortunately I don’t know the author, the blog where I found him for a long time doesn’t work, there is no mention in Google. You can see on the githaba . There are a couple of screencasts where the original video is about 6 hours long, I had to leave and there was no pause, I left it, then I just cut out this piece and that's it.
The recording process was quite simple. First, a new user for screencasts was created. It's easier, you can then come back after a while and finish something, plus you do not need to remove the files from the current from the desktop. The clock was removed in the tray, because videos are edited and something is cut out; it’s not necessary that people get distracted in the process by jumping hours. To run the write script, I used the tilda terminal. I used the same terminal as a signal for further processing that something needs to be removed here. For example, in the process, something was mixed up, the terminal was called, removed, then during editing, when you see an open terminal, you know that something needs to be cut out here. The picture below shows this moment.

Recording keyboard sounds and mouse clicks, you could not write, but there are times when there is no voice in the video for a long time, and complete silence looks weird. It was written simultaneously with the video, plus the script at the end does the synchronization.
03. Voice recording
Tried a lot of options, stopped at the following. After recording the video, I write the subtitles, where what phrases should be. A piece of .srt file.
18 00:08:08,000 --> 00:08:28,000 placeholder longtitle " " 19 00:08:21,000 --> 00:08:41,000 placeholder pagetitle "" 20 00:08:44,000 --> 00:09:04,000 , . html 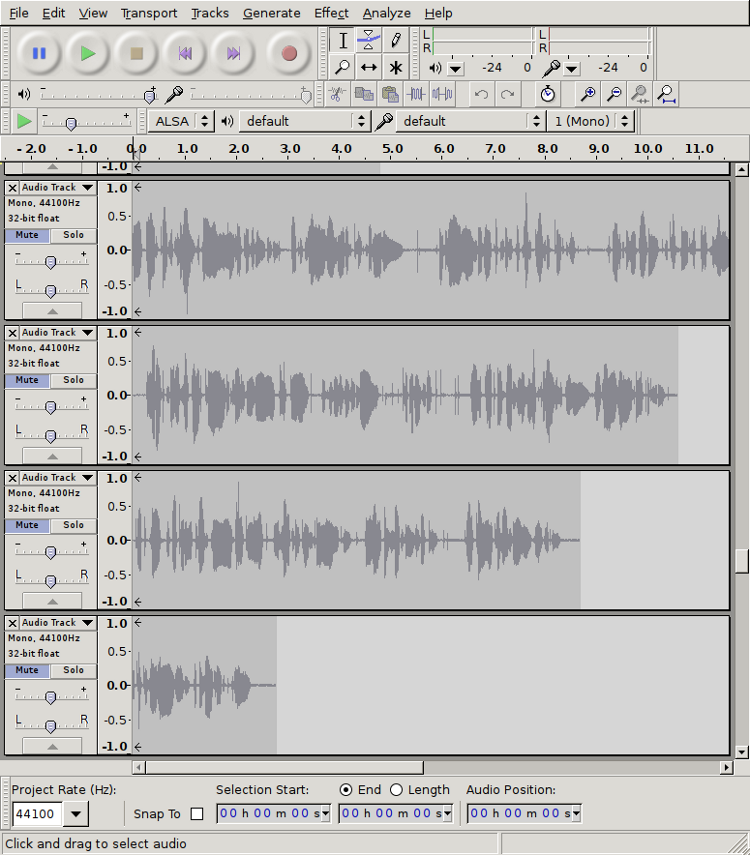
Then I drove each track through the filters Normalize and Noise removal, and saved a separate file. A Samson GoMic microphone was purchased and all podcasts in the TIP were heard .
04. Processing and joining everything together
Especially nothing was done, just cut the extra pieces, which were not very much. Cut the principle described above. Open terminals were located, a piece was viewed and the excess was cut out.
In the screenshot, Avidemux , an excellent program, did not deliver any problems, it fell a couple of times, but was restored from where it fell. After cutting out the excess in the left column, the “Copy” of Video and Audio was exhibited, the MPEG-TS format was saved in a separate file.
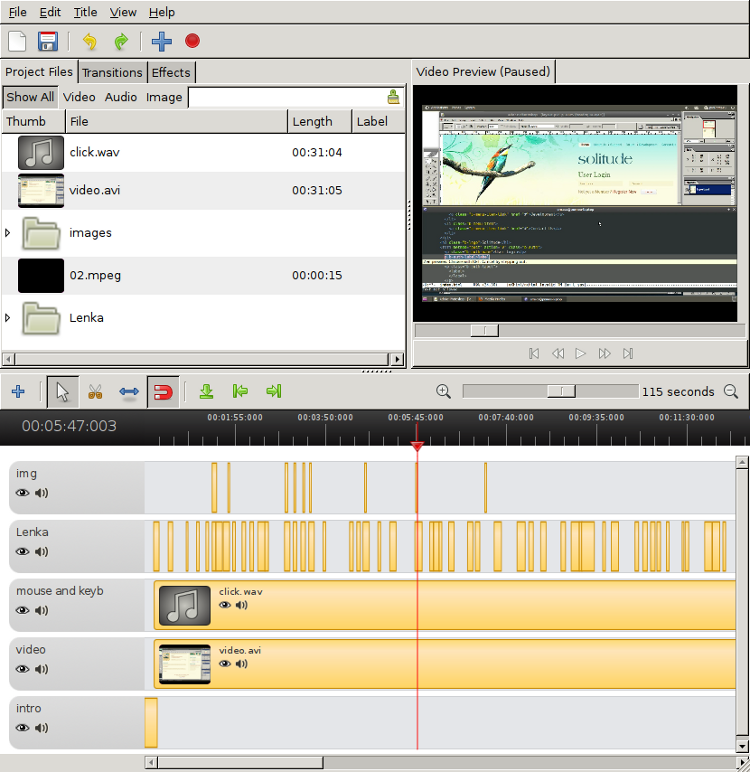
In this place we already have everything ready, the video and files with the voice have been edited. To connect it all together, I tried PiTiVi , but it is impossible to use it, for me it was terribly slow. I also tried Kino and found something else, it didn’t work. OpenShot came up, is also far from ideal, but much better than others.
We throw everything on the track, the voice is set looking in the file with subtitles.
Various selections or insertion of labels, as in the picture below, I did with the help of a translucent png image with a cut out piece.

We put on the top track, set how many seconds to show and that's it.
06. Encode
Already at this stage, you can make an export from OpenShot and get the video of the desired format, but I was not satisfied with the size and quality of the resulting file. Therefore, we create a profile in OpenShot with the parameters of our original video.

And we export to mpeg2 using the created profile and maximum quality in order not to lose what we have.

I tried to encode the resulting file using ffmpeg in the console, but due to the lack of knowledge I could not find the necessary keys, and the file size was very large with terrible quality. For the last transcoding I used Avidemux. Open what came out of OpenShot. We expose to the left mpeg-4, audio faac and mp4 format.

I used the current settings to get low quality output, from a 2-gigabyte source I got ~ 70 megabyte file. For high quality, I opened the configure button on the left in the video and reduced the quantizer to 10.
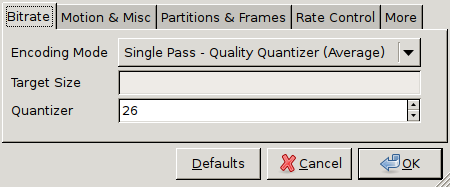
The output was obtained again from a 2 GB source ~ 500 megabyte file. I used it to upload to youtube. I tried various html5 players, but youtube turned out to be simpler, plus at the moment it became quite easy to fill videos of any length.
To summarize, the only current problem is the lack of a normal multi-track video editor, everything that is terrible.
PS
The screensaver with which the screencasts began in Ease , is a program for regular presentations. I threw the slides, set the desired effects, turned on the recording from the screen and launched the slides on the whole screen. Put music and done.
')
Source: https://habr.com/ru/post/140006/
All Articles