Proper hosting for MODx do it yourself

The topic tells about setting up a fast and inexpensive hosting for MODx Revolution. In principle, the things described here are general, so that the information is suitable for any CMS. Later the video version of this manual was also installed.
Just in case, I will attach a video of how the MODx Revo admin panel should work.
For fast and comfortable work it is desirable:
- Fast browser - Google Chrome. Admin Revo works in it lightning
- Good online feed. There are no options, you need everything and always.
- High-quality hosting - about him and writing.
')
At the end of the post there are links to scripts for the automatic installation of MODx with the creation of the user, the nginx host, the php5-fpm process and the melon database.
I worked with different hosting. He started on Peterhost , then moved to Clodo , then Selectel and parallel to Scalaxy . Also worked a bit with Hetzner .
All good, but on the aggregate of subjective things I like the Selectel cloud more.
It turned out "mnogabukov", so here is the table of contents:
1. Install the OS and configure ssh
2. Installation of services
3. Setting up the environment
4. Setting up services
5. Conclusion
Install OS and configure ssh
We register on selectel.ru, go to the panel, there is a “Cloud” and create a car.
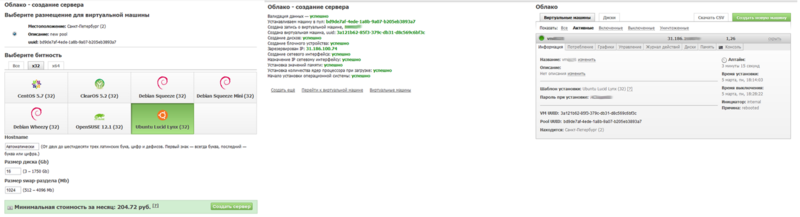
To install, I take Ubuntu x32 (eats less memory than x64). The OS installation takes about 15 minutes, after it we look for the “Password during installation” in the properties of the machine. This is the root password.
Go to the server via Putty. In the Translation settings set UTF-8.
User: root
Password: from the panel
First of all, create a new user and add it to the sudo group:
adduser user adduser user sudo Then we chop off the entrance to the server under the root.
nano /etc/ssh/sshd_config We set PermitRootLogin no , here you can also hang ssh to another port, but I do not do that.
Restart ssh:
service ssh restart Now you can relogin how to user and work through sudo .
First thing
sudo apt-get install mc , after installation sudo mc - this will work on the server through sudo until you exit Midnight Commander .At this point, most non-Linux users are pretty much prettier at the sight of blue windows, instead of a black console. And the console can still be quickly seen by pressing Ctrl + O.
From this point on, you can enter commands without sudo - you are already working in it from mc.
Configure the firewall a bit.
Create an iptables file ( touch / root / iptables ), add the following lines to it:
iptables -A INPUT -p tcp -m state --state NEW --dport 22 -m recent --update --seconds 30 -j DROP iptables -A INPUT -p tcp -m state --state NEW --dport 22 -m recent --set -j ACCEPT This is the protection of port 22 from password pererabotchiki. With each unsuccessful attempt to re-try, they can only after 30 seconds (can be increased) - at such speeds nothing can be picked up. In addition, you need to guess another username (root, we turned off).
Making it executable - sudo chmod + x / root / iptables
And we make a call to this file in /etc/rc.local - and the script will be called at startup. In general, everything that you want to run at startup is written here.
Repositories
We put python-software-properties to easily add repositories
apt-get install python-software-properties We add the Nginx and php5-fpm repositories :
add-apt-repository ppa:nginx/stable add-apt-repository ppa:fabianarias/php5 apt-get update apt-get install nginx php5-fpm mysql-server php5-mcrypt php5-mysql php5-curl php-db php5-gd unzip When installing, you will need to enter the administrative password for Mysql - we invent more complicated, memorize and enter.
You can also install sendmail to send mail from the site, but Revo allows you to work directly with the smtp server to send mail - which I advise you to configure. It is better to immediately connect mail for a domain from Yandex or Google .
Half done.
Environment preparation
As you might have guessed, our server will run php through php5-fpm , without Apache2 participation.
This gives us 2 advantages: less memory consumption and the launch of different sites from different users. That is, if one site is hacked, the rest will not be affected.
We didn’t install FTP to the server at all, because we’ll upload files via SFTP (use WinCSP for this), and edit via Notepad ++ (there is a plugin for sftp).
Create an sftp group (addgroup sftp) and configure ssh access for it.
Add to the end / etc / ssh / sshd_config
Subsystem sftp internal-sftp Match Group sftp ChrootDirectory %h AllowTCPForwarding no ForceCommand internal-sftp And comment in the same place
#Subsystem sftp /usr/lib/openssh/sftp-server Create a new directory for the future site (and a directory for temporary files), create a user for it, add it to the sftp group and assign the home directory:
mkdir /var/www mkdir /var/www/site1 mkdir /var/www/site1/www mkdir /var/www/site1/tmp adduser site1 adduser site1 sftp usermod -d /var/www/site1 site1 There is a directory, there is a user, there is access for it through sftp .
Setting up services
To configure php you need to edit /etc/php5/fpm/php.ini .
post_max_size = 100M upload_max_filesize = 100M disable_functions = exec,passthru,shell_exec,system,proc_open,popen,curl_multi_exec,parse_ini_file,show_source cgi.fix_pathinfo = 0 open_basedir = /var/www/ The main Nginx configuration file (/etc/nginx/nginx.conf) is converted to this form (old backup):
user www-data; worker_processes 8; error_log /var/log/nginx/error.log; pid /var/run/nginx.pid; events { worker_connections 1024; } http { include /etc/nginx/mime.types; client_max_body_size 100m; access_log /var/log/nginx/access.log; sendfile on; keepalive_timeout 65; tcp_nodelay on; gzip on; gzip_min_length 1000; gzip_proxied any; gzip_types text/plain ext/html text/xml application/xml application/x-javascript text/javascript text/css text/json; gzip_disable "msie6"; gzip_comp_level 8; charset utf-8; include /etc/nginx/conf.d/*.conf; include /etc/nginx/sites-enabled/*; } Next to / etc / nginx / fastcgi_params, we comment on the https line, and then it will not swear later:
#fastcgi_param HTTPS $server_https; Nota Bene! Create a virtual host.
Our config loads sites from the / etc / nginx / sites-enabled / directory, and next to / etc / nginx / sites-available / (there is now a link to the default site - nail it).
In the first directory are the symlinks of active sites to the config files from the second directory. This approach allows you to quickly enable \ disable virtual hosts without editing - but simply by deleting \ creating symlink.
Standard site configuration /etc/nginx/sites-available/site1.conf
upstream backend-site1 {server unix:/var/run/php5-site1.sock;} server { listen 80; server_name site1.domain.ru; root /var/www/site1/www; access_log /var/log/nginx/site1-access.log; error_log /var/log/nginx/site1-error.log; index index.php; rewrite_log on; location /core/ { deny all; } location / { try_files $uri $uri/ @rewrite; } location @rewrite { rewrite ^/(.*)$ /index.php?q=$1; } location ~ \.php$ { include fastcgi_params; fastcgi_param SCRIPT_FILENAME $document_root$fastcgi_script_name; fastcgi_pass backend-site1; } location ~* ^.+\.(jpg|jpeg|gif|css|png|js|ico|bmp)$ { access_log off; expires 10d; break; } location ~ /\.ht { deny all; } } Here, immediately included are friendly urls, static rendering and php processing via php5-fpm, for which the backend is declared (1 config line).
The next site can be created simply by copying the config of this and changing site1 to site2.
After creating the config, do not forget to create a symbolic link to the config:
ln -s /etc/nginx/sites-available/site1.conf /etc/nginx/sites-enabled/site1.conf Nota Bene! Create a php5-fpm process for the site.
We will not touch the main configuration of /etc/php5/fpm/main.conf , just make sure that there is a line at the bottom of the file
include=/etc/php5/fpm/pool.d/*.conf This connects from the php5-fpm process configuration directory. In the site configuration, we have already indicated that it will send * .php for processing at /var/run/php5-site1.sock, and now we create the config /etc/php5/fpm/pool.d/site1.conf :
[site1] listen = /var/run/php5-site1.sock listen.mode = 0666 user = site1 group = site1 chdir = /var/www/site1 php_admin_value[upload_tmp_dir] = /var/www/site1/tmp php_admin_value[soap.wsdl_cache_dir] = /var/www/site1/tmp php_admin_value[date.timezone] = Europe/Moscow # , pm = dynamic pm.max_children = 10 pm.start_servers = 2 pm.min_spare_servers = 2 pm.max_spare_servers = 4 Carefully check the correct paths everywhere and restart the services:
service nginx restart service php5-fpm restart Conclusion
The footcloth of the text turned out to be notable, so read about installing the site right here , and I'll tell you a little about what happened with us.
We set up a fast, low-cost server on the cloud, with a pay for consumption that eats up resources very economically. To add sites you need:
1. Create directories and users of the site, add the user to the sftp group.
2. Create 2 config files for Nginx and php5-fpm in the image of the previous ones.
3. Install the site and assign the user to the host files.
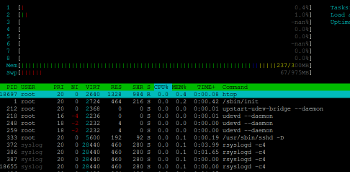
I have 7 small sites on this server. It consumes 250-300mb of RAM (this is configured in the selectel panel) and costs about 8-10 rubles per day. When I worried a small habraeffekt I paid only 20 rubles a day.
Sites are isolated from each other, each works from its user, with limited rights. The same user goes through sftp - there is no problem with editing files uploaded through ftp in the admin panel.
For simplified management of sites and their configs via a web interface, Ajenti is great . Well, in general, it can do a lot of things.
In general, I tried to write a handy, how can I get hosting for 300 rubles per month for pleasant work with MODx Revolution.
If something is wrong - correct me in the comments.
PS Script for assigning permissions for directories \ files. I recommend to store in / var / www / site1 / chmod
#!/bin/bash user=site1 dir=/var/www/$user/www chown -R $user:$user "$dir"; find "$dir" -type d -exec chmod 0755 '{}' \; find "$dir" -type f -exec chmod 0644 '{}' \; Pps
In the kammentah hell began again. People who have not seen Revo tell me what a brake she is.
Sorry, but the holivars got out and the topic was cruelly edited.
Quotes from the old version will be skipped in the comments.
I wrote an article about setting up a hosting and I don’t want to hide it at all in drafts due to individual commentators who have never worked with MODx, but judge it authoritatively by video .
Warning!
In comments the experienced troll dmitriid frolics , which never worked with MODx. I beg you, do not feed him!
Updated. Redid the auto-install / uninstall scripts from jkenters
When using these scripts, you only need to install packages on the server, configure ssh, php and the main nginx config for this article. The script will do the rest automatically.
Script Video
- Install At the beginning, you need to specify the root password Mysql. At startup, it asks the username, password, and domain of the site. When finished, displays the passwords from Mysql and SFTP.
- Update You also need to specify Mysql root password. Asks the username of the site to update.
- Remove Asks the name of the site user. Deletes all files and databases, as well as the user from the server.
To properly install MODx, you need to specify date.timezone in /etc/php5/cli/php.ini
date.timezone = Europe/Moscow Source: https://habr.com/ru/post/139461/
All Articles