Mutation testing on the example of Pitest
 Many of you may have heard about Mutation Testing in the wonderful debriefing podcast, called “Debriefing”, or read it on wikipedia . For those who are still not familiar with the concept, I will explain in two words.
Mutation testing is an alternative approach to measuring the quality of your tests. Instead of considering banal code coverage, a more reasonable mechanism is used. Random changes, otherwise called mutations , are embedded in the bytecode of your classes. If, after such a mutation, not a single test has fallen that covers the changes made, then it is highly likely that you are not very good with the tests. An example of a possible mutation:
| It was: |
|
| It became: |
|
Simple project
Let's start with a simple [ github ] project containing a single class: | |
| |
')
To connect pitest, it is enough to add its plug-in to maven:
| |
inScopeClasses defines those classes in which you inScopeClasses to look for tests and classes that should be mutated. targetClasses defines those classes that should only be mutated. In addition, there are some other options, a complete list of which can be found here .If for some reason you are not using maven, then not everything is lost: you can use it from the command line, the manual is available here .
And to find happiness using maven, just run the command:
|
Understanding of reports
As a result of the check, we will get a rather large sheet of logs. It is not particularly convenient to read it, but in thetarget/pit-reports/%TIMESTAMP% folder, an html report similar to code coverage is also generated. In our case, the interesting part of it will look something like this: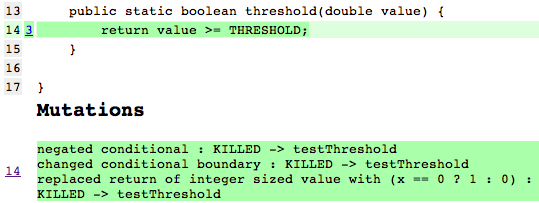
The number three near line 14 here means how many mutations have been applied to this line. Further in the section mutations for each line it is described which mutations were applied, and what was the result.
The result of the mutation
- KILLED - as a result of a mutation, all the tests checking this line fell. It can be noted that in our country all mutations have such a status, which is pretty good.
- SURVIVED - the mutation went unnoticed. This means that the change in functionality is not covered by tests.
- TIMED_OUT - the test has been running for too long (for example, as a result of an infinite loop)
- NON_VIABLE - for some reason, the bat code resulting from a mutation was not valid (it happens quite rarely)
- MEMORY_ERROR - as a result of the mutation, the code began to consume too much memory and fell from the OOM
- RUN_ERROR - as a result of the mutation, the code that generated the exception was obtained
Types of mutations
At the moment there are only 11 mutations. The green ones are those that are enabled by default.
- CONDITIONALS_BOUNDARY - in checks it changes strict inequalities to weak ones and vice versa. For example,
<will turn into<= - NEGATE_CONDITIONALS - inverts conditions in checks. For example,
==will turn into!= - MATH - replaces the used mathematical operators. For example, changes a minus on plus.
- INCREMENTS - replaces increments by decrements and vice versa
- INVERT_NEGS - inverts the sign of integers and real numbers
- INLINE_CONSTS - changes literals, replacing in their place a different value. For example, instead of
42will be substituted43, and instead oftruefalsewill be substituted - RETURN_VALS - replaces the value returned by the method with some other. For example, instead of the full object, null will be returned.
- VOID_METHOD_CALLS - removes calls to void methods
- NON_VOID_METHOD_CALLS - instead of calling non-void methods, returns the default value for the type of this method (
false,0,null) - CONSTRUCTOR_CALLS - uses null instead of calling a constructor
- EXPERIMENTAL_INLINE_CONSTS - similar to INLINE_CONSTS , but somewhat smarter
Let's complicate the example
It turns out that in our sample project mutations were in the condition (2 pieces) and in the return value. Now let's try to achieve more mutations. We rewrite the class itself as follows:
| |
| |
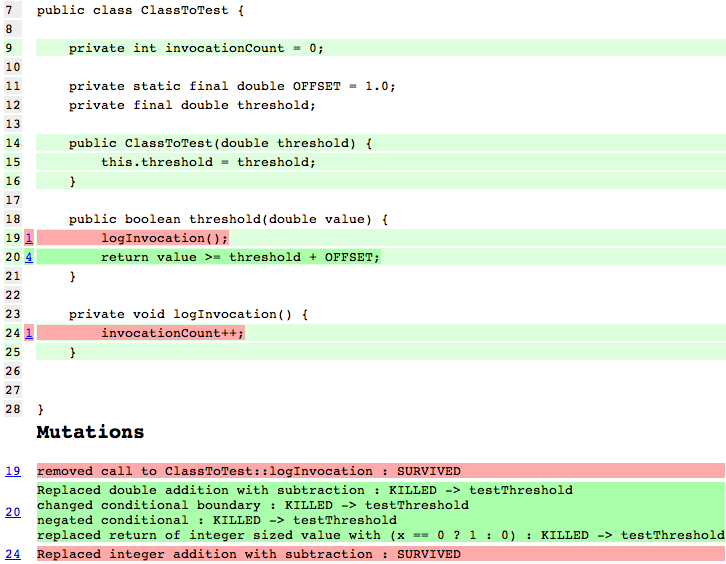
Success! Now we can quite accurately tell which code is really tested and which is not, and any “supposedly” tests that actually do not check anything will be quickly detected.
Why exactly pitest?
The idea of mutational testing, in general, is not new, and several libraries already existed. The most notable of them are Javalanche and Jumble . However, they and other libraries are not actively developing, some of them are slow and buggy, and practically have no integration with build systems and other libraries. A detailed comparison is available here .Check on a real project
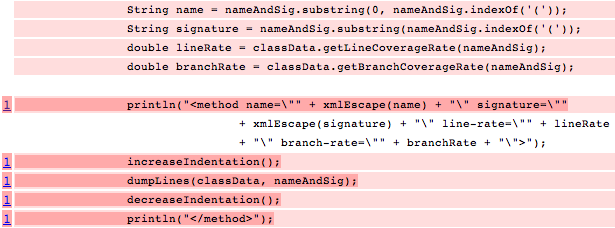
For greater interest, it would be right on some real project to demonstrate how mutation testing finds problems that code coverage does not find. Cobertura, a utility that considers code coverage is perfect for this. Her report can be found in its full form here , and I will give only a small piece. To get it, I had to sweat a bit with the addition of maven support to the sources and wait about twenty minutes until mutational testing will take place. . The result was this.| Cobertura shows that all is well: |
 |
| Pitest rips covers: |
 |
Total
Overall, the approach is cool, and it is obviously much more accurate to evaluate the quality of tests than code coverage. Of course, such checks and work significantly longer than the usual coverage, and therefore on large projects may take hours. In addition, the Pitest library itself is somewhat damp. For example, there is no possibility to conduct testing in several streams, or necessarily the successful execution of all tests without mutations. The project, however, opensource , and is very actively developing, so I believe that after a while it will be possible to start thinking about using it seriously.Waiting for your questions, comments and corrections in the comments!
Source: https://habr.com/ru/post/139337/
All Articles