Android App Configuration: Rapid Development
 When developing mobile applications, it is often necessary to store the settings of the application (the color theme chosen by the user, the password to access the application, the synchronization settings with the server, etc.). Since such tasks occur quite often, Google took care of the developers and created a mechanism for quick and easy implementation of this functionality. This mechanism allows you to easily create, save, display and produce various manipulations with the settings of the application. Moreover, it allows you to automatically create a user interface. When describing the type of the settings parameter, a part of the user interface is automatically generated depending on the type of the parameter (boolean - checkbox, String - input field, ...) without writing code. Sounds good for fast development, right?
The first step in implementing the application settings mechanism is inheriting the activity of your application's screen from the PreferenceActivity class. This class is inherited from the ListActivity class .
and allows you to create a user interface as described in the XML resource file. Moreover, this class allows you to automatically save settings in SharedPreferences imperceptibly for you. SharedPreferences - an interface that allows you to access and manipulate application configuration data manually by calling the getSharedPreferences method from your Activity (read more Android Essentials: Application Preferences ). In order to link together our class inherited from PreferenceActivity and an XML file describing configuration parameters, use the addPreferencesFromResource method:
- ...
- @Override
- public void onCreate ( Bundle savedInstanceState ) {
- super . onCreate ( savedInstanceState ) ;
- addPreferencesFromResource ( R. xml . preferences ) ;
- }
- ...
Now you need to create a res / xml / preferences.xml file which is a description of our list of application configuration options and will be picked up by our PreferenceActivity . This XML file has a specific format allowing the description of configuration parameter types. All types derive from the Preference class, which is the base unit of the user interface and generates a View that will subsequently appear in the right place of the user interface and will be associated with a SharedPreferences object that can be retrieved and saved. Consider the frequently used subclasses used to describe the types of configuration parameters:
- CheckBoxPreference : the checkbox represents a boolean type parameter.
- RingtonePreference : allows you to select a ringtone from those available on your device. The URI of the selected ringtone file will be represented as a string.
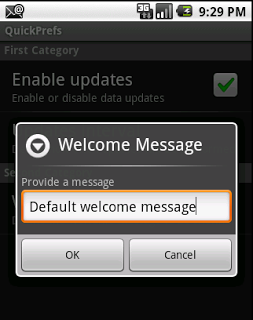
- EditTextPreference : text input string, represents parameters of type String .
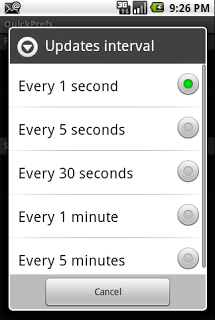
- ListPreference : shows the list of possible parameter values in the form of a dialog, represents parameters of type String .
It should also be noted that individual parameters can be grouped into categories using the PreferenceCategory class, which groups Preference objects and displays an inactive group header.
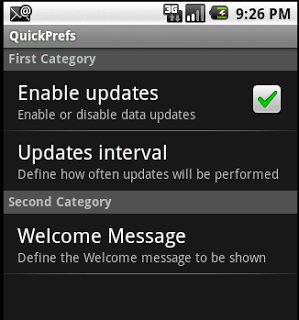
Now we describe what we want to see in our XML description. We will have two categories. In the first place a CheckBoxPreference which will activate / deactivate the data synchronization of our hypothetical application and the ListPreference in which we will set the data synchronization frequency. As you have probably noticed, there is a dependency between these two parameters; if the first is not selected, then the second must be deactivated. This is achieved by using the android: dependency attribute. In the second category we will place the EditTextPreference with which we will set the greeting text. Imagine all this in the form of XML:
- <? xml version = "1.0" encoding = "utf-8" ?>
- <PreferenceScreen xmlns: android = " schemas.android.com/apk/res/android" >
- <PreferenceCategory
- android: title = "First Category"
- android: key = "first_category" >
- <CheckBoxPreference
- android: key = "perform_updates"
- android: summary = "Enable or disable data updates"
- android: title = "Enable updates"
- android: defaultValue = "true"
- />
- <ListPreference
- android: key = "updates_interval"
- android: title = "Updates interval"
- android: summary = "Define how often updates will be performed"
- android: defaultValue = "1000"
- android: entries = "@ array / updateInterval"
- android: entryValues = "@ array / updateIntervalValues"
- android: dependency = "perform_updates"
- />
- </ PreferenceCategory >
- <PreferenceCategory
- android: title = "Second Category"
- android: key = "second_category" >
- <EditTextPreference
- android: key = "welcome_message"
- android: title = "Welcome Message"
- android: summary = "Define
- android: dialogTitle = "Welcome Message"
- android: dialogMessage = "Provide a message"
- android: defaultValue = "Default welcome message" />
- </ PreferenceCategory >
- </ PreferenceScreen >
Notice that for the ListPreference we specified an attribute android: entries which indicates where the possible values of the list are stored. These values are stored in the res / values / arrays.xml XML file. The values of “updateInterval” and “updateIntervalValue” are stored in this file. In fact, these are just key-value pairs, the keys are stored in the first array, and the values are in the second:
- <? xml version = "1.0" encoding = "utf-8" ?>
- <resources >
- <string-array name = "updateInterval" >
- <item name = "1000" > Every 1 second </ item >
- <item name = "5000" > Every 5 seconds </ item >
- <item name = "30000" > Every 30 seconds </ item >
- <item name = "60000" > Every 1 minute </ item >
- <item name = "300000" > Every 5 minutes </ item >
- </ string-array >
- <string-array name = "updateIntervalValues" >
- <item name = "1000" > 1000 </ item >
- <item name = "5000" > 5000 </ item >
- <item name = "30000" > 30000 </ item >
- <item name = "60000" > 60000 </ item >
- <item name = "300000" > 300000 </ item >
- </ string-array >
- </ resources >
I will add one more useful point that can be useful. It is often necessary to restrict access to the application using a password or PIN code that is set in the application configuration. It is obvious that for these purposes EditTextPreference is used. But it would be nice in the case of a password or PIN-code to hide the entered characters, and for the code also to restrict input to numbers only. To do this, you can use the attributes android: password and android: inputType respectively:
- <EditTextPreference
- android: key = "pin"
- android: title = "PIN code"
- android: summary = "If login screen is enabled"
- android: dialogTitle = "PIN code"
- android: dialogMessage = "Provide a PIN"
- android: defaultValue = ""
- android: inputType = "number"
- android: password = "true"
- android: dependency = "runLoginScreen"
- />
As mentioned above, the main part of the work is undertaken by the andriod framework itself. In order to show how to read already set parameters, we will create another screen activity, which will be launched from our main activity. But first look at the main code:
- package com.javacodegeeks.android.preferences ;
- import android.content.Intent ;
- import android.os.Bundle ;
- import android.preference.PreferenceActivity ;
- import android.view.Menu ;
- import android.view.MenuItem ;
- public class QuickPrefsActivity extends PreferenceActivity {
- @Override
- public void onCreate ( Bundle savedInstanceState ) {
- super . onCreate ( savedInstanceState ) ;
- addPreferencesFromResource ( R. xml . preferences ) ;
- }
- @Override
- public boolean onCreateOptionsMenu ( Menu menu ) {
- menu. add ( Menu . NONE , 0 , 0 , "Show current settings" ) ;
- return super . onCreateOptionsMenu ( menu ) ;
- }
- @Override
- public boolean onOptionsItemSelected ( MenuItem item ) {
- switch ( item. getItemId ( ) ) {
- case 0 :
- startActivity ( new Intent ( this , ShowSettingsActivity. class ) ) ;
- return true ;
- }
- return false ;
- }
- }
We created an optional menu with a single MenuItem item using the onCreateOptionsMenu method. When a user clicks on a menu item, we process this event in the onOptionsItemSelected method and start a new activity using the startActivity method. (more details using the options menus and customized dialogs for user interaction , Launching new activities with intents ).
')
Now we will create the second ShowSettingsActivity activity to display the application configuration parameters. But first we need to describe the new activity in the manifest AndroidManifest.xml file:
- <? xml version = "1.0" encoding = "utf-8" ?>
- <manifest xmlns: android = " schemas.android.com/apk/res/android"
- package = "com.javacodegeeks.android.preferences"
- android: versionCode = "1"
- android: versionName = "1.0" >
- <application android: icon = "@ drawable / icon" android: label = "@ string / app_name" >
- <activity android: name = ".QuickPrefsActivity" android: label = "@ string / app_name" >
- <intent-filter >
- <action android: name = "android.intent.action.MAIN" />
- <category android: name = "android.intent.category.LAUNCHER" />
- </ intent-filter >
- </ activity >
- <activity android: name = ".ShowSettingsActivity" />
- </ application >
- <uses-sdk android: minSdkVersion = "3" />
- </ manifest >
The second activity code looks like this:
- package com.javacodegeeks.android.preferences ;
- import android.app.Activity ;
- import android.content.SharedPreferences ;
- import android.os.Bundle ;
- import android.preference.PreferenceManager ;
- import android.widget.TextView ;
- public class ShowSettingsActivity extends Activity {
- @Override
- protected void onCreate ( Bundle savedInstanceState ) {
- super . onCreate ( savedInstanceState ) ;
- setContentView ( R. layout . show_settings_layout ) ;
- SharedPreferences sharedPrefs = PreferenceManager. getDefaultSharedPreferences ( this ) ;
- StringBuilder builder = new StringBuilder ( ) ;
- builder. append ( "n" + sharedPrefs. getBoolean ( "perform_updates" , false ) ) ;
- builder. append ( "n" + sharedPrefs. getString ( "updates_interval" , "-1" ) ) ;
- builder. append ( "n" + sharedPrefs. getString ( "welcome_message" , "NULL" ) ) ;
- TextView settingsTextView = ( TextView ) findViewById ( R. id . Settings_text_view ) ;
- settingsTextView. setText ( builder. toString ( ) ) ;
- }
- }
Here we retrieve application configuration parameters as a SharedPreferences class using the static getDefaultSharedPreferences method of the PreferenceManager class. Further, depending on the data type of the parameter, we use the appropriate data retrieval method (for example, getBoolean or getString ). The second argument in the data extraction method is the default value, in case a parameter with that name has not yet been specified. As parameter names, we use the keys specified in the XML file preferences.xml . Parameter values are concatenated and displayed in a TextView .
Here is a simple user interface description for the second activity:
- <? xml version = "1.0" encoding = "utf-8" ?>
- <LinearLayout
- xmlns: android = " schemas.android.com/apk/res/android"
- android: orientation = "vertical"
- android: layout_width = "fill_parent"
- android: layout_height = "fill_parent"
- >
- <Textview
- android: id = "@ + id / settings_text_view"
- android: layout_width = "fill_parent"
- android: layout_height = "wrap_content"
- />
- </ LinearLayout >
Let's run the application, we will see a list of our parameters:
Click on “Updates Interval” and see a list of possible values:
Click on the “Welcome Message” and see the editing of the greeting text:
Let's look at the set parameters. Click the menu button and select the single item “Show current settings”. Start the second activity in which we will see the values of our configuration parameters:

It's all. As you can see, it is really easy. Good luck!
Original: Android Quick Preferences Tutorial
Source: https://habr.com/ru/post/139330/
All Articles