Web development with the ChicagoBoss framework

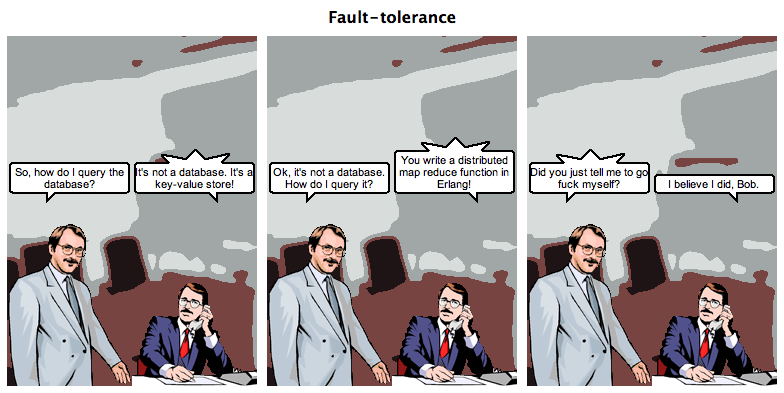
"Chicago Boss is an uncompromising web framework, loved by designers, engineers, and this guy with a pager." - © chicagoboss.org
“Erlang is a language for building fault-tolerant distributed applications. This is one of the few functional languages that has been successfully used for a long time in practice. For example - in telecoms (Ericsson AXD-301 switch), banking systems, automation systems, high-load web applications (Facebook Chat). At the same time, Erlang is an open source product and is distributed free of charge. ”Says the Russian-speaking Erlang community site .
This post is intended to expand the audience of Erlang programmers. If before that you thought that functional programming could not be used for domestic purposes, then it’s time to broaden your horizons. This post was written with the support of my friend, personally acquainted with the creator of this framework (Evan Miller) and recently a fan of this language.
')
According to both, the development of web applications based on this framework is no slower than the development on the same rails (Ruby on Rails). And in something even faster. I was not particularly familiar with functional programming before, but under pressure from a friend I decided to try. I want to say that the experience was very successful and I managed to create my first website faster than a year ago with the same Ruby on Rails.
Background:
It was in October 2010 at the next Erlang seminar , Chicago, Illinois. At the end of the lecture, the following happened (according to a friend): I heard his voice across the room, saying, “I am working on a Rails for Erlang” and 99 people went, “Yeah, right!” ( Translation: to the entire audience: “I am working on Rails for Erlang” and 99 people said “Aha, of course!” ). This guy's name is Evan Miller. After the seminar, my friend asked him about the concepts and ideas embedded in the “functional rails”. He liked the ideas very much, and since then he has spent all his free time on projects with this framework, and also helps with the documentation of Evan. He even organized lectures on this case and introduced some things in his company.
- Introduction
- Installation
- Setting up the working environment (optional)
- Creation of the first project
- Work with DB
- CRUD
- Addition
- Results
- Resources
Introduction
In this article we will make a web site, which will be an address book ( addressbook ) with the ability to add / delete / view / edit entries. Those. we implement standard CRUD .
For those interested: all development took about 4-5 hours, including installation, setting up tools and learning.
To achieve the task, the following tools were used:
Ubuntu 11.10 32bit, Erlang R15B , ChicagoBoss MVC framework, MongoDB document-oriented database, Gedit with iskin's Gmate plugin pack (Gedit is just a text editor).
Installing for Mac is as easy as installing for Ubuntu. For Windows, there is a separate instruction , but it is not very different from the one given here. Maybe there are good people who will share their installation experience for Windows / Mac in the comments.
For each of the tools you can write a separate large article, but still not one. But in order not to frighten the reader with scary words and tons of material, I will say that in fact for a quick entry it will be enough for this article alone.
I personally have never dealt with functional languages or document-oriented databases before, but this did not prevent me from creating my first application with them.
All links to useful resources, to source codes and to a ready web site in the section Resources.
It is worth mentioning that the site is on my personal laptop (Dual-Core CPU T4300 @ 2.10GHz, 2GB). So please, without fanaticism. About the falls (if any) will be reported. Anticipating your question: I launched the site locally, because I wanted to check at what load the server would crash. Well, it turns out cheaper to not buy extra hosting. Who can will show desire and will share the normal server, we will place the site there.
If the site does not open, then I am chemically with a laptop, try to open in a couple of minutes.
If any of the points is not clear, write in the comments, I will edit the article.
Installation
Erlang
First you need to install the latest version of Erlang. Go to this web site and follow the instructions for your operating system. You can also download the necessary distribution kit or view the necessary repo.
I have Ubuntu 11.10 32 bit. There is no distribution kit for it, only for 64-bit one. So I just downloaded the distribution for Ubuntu 11.04 32 bits. Some chips do not work in it, such as a graphical view of existing threads and processes ( appmon utility ).
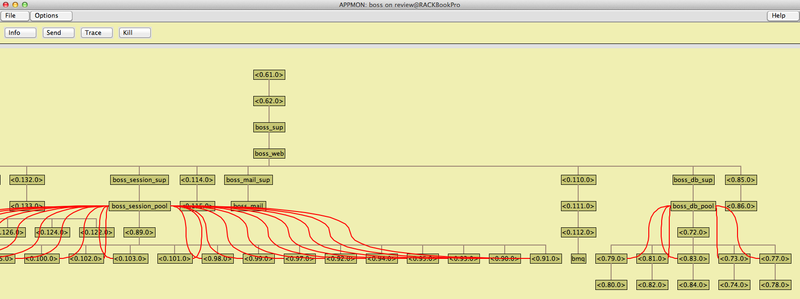
But it does not interfere with learning, and even creating normal projects.
And of course you can always build the right version for your version of the OS from the source :) My friend has already assembled his version 5 times for different machines: Ubuntu and Mac. He says that of course hemorrhoids, but it is quite possible to master in one evening.
You can also contact Erlang-Solutions with any problems. They say the guys are responsive.
After downloading the file and when starting the installation, I was given the following:
installing esl-erlang 1:15.bsize - 63.8 mbAfter installing to check the application, open the console and write the erl command. Which gives something like:
Erlang R15B (erts-5.9) [source] [smp:2:2] [async-threads:0] [hipe] [kernel-poll:false]Eshell V5.9ChicagoBoss
You can download the framework without Git, just go to the development page and download the latest version.
Install Git if you don't already have it:
apt-get install git-coreget a copy of the ChicagoBoss framework:
git clone git://github.com/evanmiller/ChicagoBoss.gitGo to the directory of your repo:
cd ChicagoBossCompile:
./rebar get-deps clean compileTo start a new project (you need to be located in the directory of our framework):
make app PROJECT=your_project_name_hereThen:
cd ../your_project_name_hereTo run debug (developer) mode:
./init-dev.shTo run in production:
./init.sh startWait until the messages stop moving. If there are no error or crash reports, you can open localhost: 8001
Now you can create new models, controllers, views and immediately see the result without recompiling and restarting the server. In some cases, recompilation is still needed, for example when changing routes (routes).
Compilation is invoked by the command:
./rebar compileChicagoBoss by default uses a web server on Misultin and when creating an application, the port 8001 is specified in the config. If desired, the server can be replaced with Mochiweb , and possibly with Cowboy .
MongoDB
It's all very simple. Download and install. In Ubuntu just do only one team:
apt-get install mongodbTo check the performance, you can enter one of the commands in the console:
mongoor
ps aux | grep mongoYou can also try knocking on localhost: 28017. The native port on which applications typically work with Mongo is 27017. The default browser is 28017.
To control the MongoDB server, use the following commands:
$ sudo status mongodb$ sudo stop mongodb$ sudo start mongodb$ sudo restart mongodbAfter an incorrect shutdown of the server, for example, when the machine is turned off / rebooted, when the database server is started, it still remains off. This is done specifically by creating a lock file. To start the server again, do the following:
1. Delete lock file
2. Run the recovery script
$ sudo rm /var/lib/mongodb/mongod.lock$ sudo -u mongodb mongod -f /etc/mongodb.conf --repairWell, that's all, we are ready to create our own applications. By and large, applications can be created without a database, or use another database. At your discretion. Supported databases are listed in the documentation.
Setting up the working environment (optional)
I downloaded the Gmate plugin package. Of these, I really use only Zen Coding so far. An excellent guide to using this plugin is presented in this video lecture . Really makes life easier.
A friend of mine said that this is HAML for the poor, but the use of this layer does not “insert” me yet.
And I also use snippets. This plugin comes with Gedit, but by default it is turned off. To enable, go to Edit -> Preferences -> Plugins -> Snippets.
It is easy to use, just open Tools -> Manage Snippets -> "your_language" and edit existing ones or add your snippets. Instructions for working with them are here . It took me 3 minutes to analyze them and then another 15 minutes to create my own. But then how convenient is it to write something like a div, click on Tab and get the following:
<div> </div> And if you wish, you can add more text, such as additional id, style, etc. fields. And also put the default values and the points where the cursor will jump the next time you press Tab.
I worked with snippet in Visual Studio, IMHO in Gedit working with them is much more convenient.
And yes, there are similar plugins for Emacs, Notepad ++ and also for a lot of other editors.
Creation of the first project
Everything is set, everything works. You can start creating your website. Go to the directory with ChicagoBoss and write the command:
make app PROJECT=addressbookYes, the project name must be a valid atom. An atom is a named constant. The name should begin only with a small letter, the name can contain only letters, numbers and the underscore symbol.
The framework creates a new directory, the default in the home directory. The whole project is inside, if there is a desire to move / transfer to someone / delete the project, it will be enough to manipulate this directory. Go to the newly created directory of our project.
cd ../addressbookAll our code / resources are in the src directory. General structure:
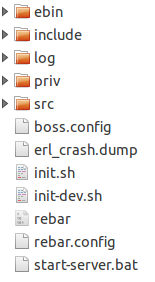
The src directory structure:
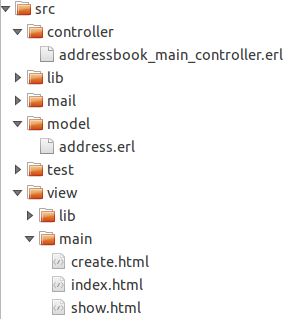
Resource files (javascript, css, media files) are in / priv / static / . Connecting the style file will look like this:
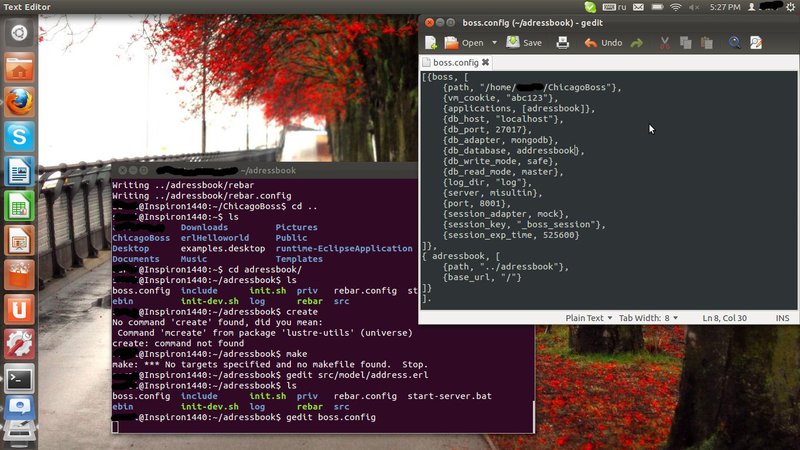
<link rel="stylesheet" href="/static/css/style.css" type="text/css" charset="utf-8" /> We edit the boss.config, add the data about the database:
{db_host, "localhost"},
{db_port, 27017},
{db_adapter, mongodb},
{db_database, addressbook},
{db_write_mode, safe},
{db_read_mode, master},
This is what my config looks like (and just do the environment):
The first time I wrote the word addressbook incorrectly, then I had to recreate the application with the correct name, because a lot is attached to the name.
Next, create the file address.erl in src / model /. It is needed to access the database. It looks like this for me:
-module(address, [Id, Firstname, Lastname, Address1, Address2, City, State, Country, Active, CreationTime, ModifictionTime ]). -compile([export_all]). Create a controller named addressbook_main_controller.erl ( appname_controllername_controller ) and write the following code inside:
-module(addressbook_main_controller, [Req, SessionID]). -compile([export_all]). index('GET', [])->{ok, [{data, "Hello World"}]}. index is our function
all that is after "->" is the function body.
This function will respond to a GET request and, if successfully processed, will return our string in the data variable.
ok means everything went well. For error handling, the word error is used. It may look like this:
index('GET', [])-> {ok, [{data, "Hello World"}]}; {error, Reason}-> Reason. In order to display the returned value on the page, in our view you will need to add the {{data}} tag. For verification, we will create our first html file in the / src / view / main / directory. Let's call it index.html:
<!DOCTYPE html> <html> <head> <meta charset="utf-8" /> <title>My addressbook</title> </head> <body> <form> <div id="main"> {{data}} </div> </form> </body> </html> The final touch is to set up routes. Open the file /priv/addressbook.routes and add our new route (by default we don’t have a single route, all the lines are commented out):
{"/", [{controller, "main"}, {action, "index"}]}. Compile our application ./rebar compile
And run ./init-dev.sh
If you now go to the browser and open localhost: 8001, you will see our Hello World.
All subsequent changes, with the exception of changing routes, will be applied without recompiling and restarting the server, i.e. on the fly.
About routes: you can strictly specify at what address which controller and method to call. Or you can specify the full path of the form / [controller name] / [action name] in the address. Those. in our case, we have a controller named main. If we add a new method called create to our controller, we can call it by contacting localhost: 8001 / main / create. Or by specifying the following route:
{"/create", [{controller, "main"}, {action, "create"}]}. And then the call will look like localhost: 8001 / create
Work with DB
Connection to our database has already taken place. You can even perform queries in the console while the web server is up. To do this, simply go to the console, where we executed the command to launch the application ./init-dev.sh, press, for example, Enter and enter in a new open line, for example, this:
boss_db:find(address, []). This command displays all entries associated with the address model. Now there is not a single entry (or there is an empty default).
You can enter boss_db: press Tab and see the available commands.
[] - means "parameters". If the brackets are empty, then you pass 0 parameters. In the case of the find command, you can get a list of records in which firstname = "ivan":
boss_db:find(address, [{firstname, "ivan"}]). In the console, you can perform many useful commands, and not only from the database.
CRUD
And so, our model is ready to work, now you can add new functions in the controller. Add a create function that will add new entries:
create('GET', [])->ok; create('POST', [])-> Firstname = Req:post_param("firstname"), Lastname = Req:post_param("lastname"), Address1 = Req:post_param("address1"), Address2 = Req:post_param("address2"), City = Req:post_param("city"), State = Req:post_param("state"), Country = Req:post_param("country"), Active = Req:post_param("active"), CreationTime = erlang:now(), ModificationTime = erlang:now(), NewAddress = address:new(id, Firstname, Lastname, Address1, Address2, City, State, Country, Active, CreationTime, ModificationTime), case NewAddress:save() of {ok, SavedAddress}-> {redirect, [{action, "index"}]}; {error, Reason}-> Reason end. I think reading the code for the programmer is not difficult, so I will not explain anything here. The only thing I can say is that the id is created automatically.
id is a reserved word.
Id - so you can call your variable.
Yes, the language is case-sensitive.
Now we will create an html file for this method. Let's call it create.html:
<!DOCTYPE html> <html> <head> <title>My addressbook</title> </head> <body> <form method="post"> <header></header> <div id="main"> <table> <tr><td>Frist name</td> <td><input type="text" id="firstname" name="firstname" size="45" maxlength="255" value="" /></td></tr> <tr><td>Last name</td> <td><input type="text" id="lastname" name="lastname" size="45" maxlength="255" value="" /></td></tr> <tr><td>Address1</td> <td><input type="text" id="address1" name="address1" size="45" maxlength="255" value="" /></td></tr> <tr><td>Address2</td> <td><input type="text" id="address2" name="address2" size="45" maxlength="255" value="" /></td></tr> <tr><td>City</td> <td><input type="text" id="city" name="city" size="45" maxlength="255" value="" /></td></tr> <tr><td>State</td> <td><input type="text" id="state" name="state" size="45" maxlength="255" value="" /></td></tr> <tr><td>Country</td> <td><input type="text" id="country" name="country" size="45" maxlength="255" value="" /></td></tr> <tr><td>Active</td> <td><input type="checkbox" id="active" name="active" value="true" /></td></tr> </table> <button type="submit">Submit</button> </div> </form> </body> </html> It is important to note here that for our controls that transmit values, you need to specify both the id and name parameters. Each of them is used by different parts of the framework. In my opinion, Evan wants to fix this case and leave only one required parameter. By the way, updates are released quite often, almost every week, so it is possible that by the time this article is published, the fix will already be released.
Add another function to view all the records in our database (more precisely, we replace the previously written function index):
index('GET', [])->Addresses = boss_db:find(address, []), {ok, [{addresses, Addresses}]}. Also we change the code of our index.html page:
<!DOCTYPE html> <html> <head> <meta charset="utf-8" /> <title>My addressbook</title> </head> <body> <form method="post"> <header></header> <div id="main"> <table cellspacing="0" cellpadding="0"> <tr> <th>First name</th> <th>Last name</th> <th>City</th> <th>Address1</th> <th>Address2</th> <th>State</th> <th>Country</th> <th>Active</th> </tr> {% if addresses %} {% for address in addresses %} <tr> <td>{{address.firstname}}</td> <td>{{address.lastname}}</td> <td>{{address.city}}</td> <td>{{address.address1}}</td> <td>{{address.address2}}</td> <td>{{address.state}}</td> <td>{{address.country}}</td> <td>{{address.active}}</td> </tr> {% endfor %} {% endif %} </table> </div> </form> </body> </html> ChicagoBoss uses the Django template system, through the ErlyDTL library. The Django Template language .
Now when accessing the addresses / main / and / main / create you will receive 2 forms: with the input and output of information from the database.
To delete (delete) an entry, the following function in our controller will suffice:
delete('GET', [Id])-> boss_db:delete(Id), {redirect, [{action, "index"}]}. It remains only to call it localhost: 8001 / main / delete / [id]
To display the record (show), add this function to the controller:
show('GET', [Id])-> Address = boss_db:find(Id), {ok, [{address, Address}]}. Create a view show.html file:
<!DOCTYPE html> <html> <head> <title>My addressbook</title> </head> <body> <form method="post"> <div id="main"> <table cellspacing="0" cellpadding="0"> {% if address %} <tr><td>First name</td><td>{{address.firstname}}</td></tr><tr> <td>Last name</td><td>{{address.lastname}}</td></tr><tr> <td>City</td><td>{{address.city}}</td></tr><tr> <td>Address1</td><td>{{address.address1}}</td></tr><tr> <td>Address2</td><td>{{address.address2}}</td></tr><tr> <td>State</td><td>{{address.state}}</td></tr><tr> <td>Country</td><td>{{address.country}}</td></tr><tr> <td>Modification time</td><td>{{address.modification_time}}</td></tr><tr> <td>Creation time</td><td>{{address.creation_time}}</td></tr><tr> <td>Active</td><td>{{address.active}}</td></tr> {% endif %} </table> </div> </form> </body> </html> Editing a record is a mixture of create and show. Add two more functions to our controller:
edit('GET', [Id])-> Address = boss_db:find(Id), {ok, [{address, Address}]}; edit('POST', [Id])-> Address = boss_db:find(Id), NewAddress = Address:set([{firstname, Req:post_param("firstname")}, {lastname, Req:post_param("lastname")}, {address1, Req:post_param("address1")}, {address2, Req:post_param("address2")}, {city, Req:post_param("city")}, {state, Req:post_param("state")}, {country, Req:post_param("country")}, {active, Req:post_param("active")}, {modification_time, erlang:now()}]), case NewAddress:save() of {ok, SavedAddress}-> {redirect, [{action, "index"}]}; {error, Reason}-> Reason end. It is important to note that in Erlang all variables are unchanged! Therefore, you first have to get the Address, and then assign the changed state of this variable to NewAddress.
The first function does the same as the show function, the second updates the information in the database after clicking the Submit button on the form.
Add this same edit.html form:
<!DOCTYPE html> <html> <head> <title>My addressbook</title> </head> <body> <form method="post"> <table cellspacing="0" cellpadding="0"> {% if address %} <tr><td>First name</td><td><input type="text" id="firstname" name="firstname" size="45" maxlength="255" value="{{address.firstname}}" /></td></tr><tr> <td>Last name</td><td><input type="text" id="lastname" name="lastname" size="45" maxlength="255" value="{{address.lastname}}" /></td></tr><tr> <td>City</td><td><input type="text" id="city" name="city" size="45" maxlength="255" value="{{address.city}}" /></td></tr><tr> <td>Address1</td><td><input type="text" id="address1" name="address1" size="45" maxlength="255" value="{{address.address1}}" /></td></tr><tr> <td>Address2</td><td><input type="text" id="address2" name="address2" size="45" maxlength="255" value="{{address.address2}}" /></td></tr><tr> <td>State</td><td><input type="text" id="state" name="state" size="45" maxlength="255" value="{{address.state}}" /></td></tr><tr> <td>Country</td><td><input type="text" id="country" name="country" size="45" maxlength="255" value="{{address.country}}" /></td></tr><tr> <td>Active</td><td><input type="checkbox" id="active" name="active" value="{{address.active}}" /></td></tr> {% endif %} </table> <button type="submit">Submit</button> </form> </body> </html> Well, that's all, our CRUD is ready.
Addition
While writing the article, I managed to fasten my login, registration, list of registered users, chat, input validation, as well as admin panel (all site code is on github, the link is in the Resources section).
Chat without any frills, exclusively for the test and still contains bugs, especially when working under IE, so I specifically forbade him to login, otherwise it causes some problems. You can chat with him, the server does not fall, but not comfortable. My task is to show the work of Erlang, and not solve Ajax problems in IE.
The admin panel can be installed on any new site, it works for 5 minutes.
And also played with templates. In the end, I got one master template that looks like this:
<!DOCTYPE html> <html lang="en"> <head> <meta http-equiv="Content-Type" content="text/html; charset=utf-8" /> <link rel="stylesheet" href="/static/css/style.css" type="text/css" charset="utf-8" /> <title>{% block title %}My amazing site{% endblock %}</title> {% block res %} {% endblock %} </head> <body> <header> {% if person %} Hello, {{person.name}} (<a href="/user/logout">Quick, Log Me Out!</a>) <br /> {% endif %} Your IP: {{ip}} </header> <nav> <ul class="nav"> <li class="nav"><a href="/">Home</a></li> <li class="nav"><a href="/create">Create</a></li> <li class="nav"><a href="/chat/live/public">Chat</a></li> <li class="nav"><a href="/user/login">Login</a></li> <li class="nav"><a href="/user/showall">Users</a></li> </ul> </nav> <section> {% block content %}{% endblock %} </section> <footer> {% block footer %}{% endblock %} </footer> </body> </html> And this is how my show.html now looks like:
{% extends "layout/application.html" %} {% block title %}My addressbook{% endblock %} {% block content %} <table cellspacing="0" cellpadding="0"> {% if address %} <tr><td>First name</td><td>{{address.firstname}}</td></tr><tr> <td>Last name</td><td>{{address.lastname}}</td></tr><tr> <td>City</td><td>{{address.city}}</td></tr><tr> <td>Address1</td><td>{{address.address1}}</td></tr><tr> <td>Address2</td><td>{{address.address2}}</td></tr><tr> <td>State</td><td>{{address.state}}</td></tr><tr> <td>Country</td><td>{{address.country}}</td></tr><tr> <td>Modification time</td><td>{{address.modification_time}}</td></tr><tr> <td>Creation time</td><td>{{address.creation_time}}</td></tr><tr> <td>Active</td><td>{{address.active}}</td></tr> {% endif %} </table> {% endblock %} It turns out one frame and different content.
You can read more about Django templates on the official site, the link is in the Resources below.
Also, ChicagoBoss has its own templates in its arsenal. A little information about them can be found on the official website . There is nothing complicated. Just replacing frequently used code with tags. Well, some more buns.
Results
Here will be the results of the server after two days.
UPD: At the moment from the totals only the following:
The site was made without any protection against injecting, without the purpose of conducting a security check. The site was made only to show an example of how technology works with simple examples.
UPD: Habraeffect was observed only on March 30th. On the other days, the users visited can be counted on the fingers.
According to Google Analytics and my local logs per day:
- site has been visited by 1489 users
- page views - 9070
- queries to the database - 43051
- maximum number of users in chat at the same time ~ 100
There could be more requests if the chat were not put by nicknames with javascript code.
For all the time the server never fell. It was necessary to turn off only for cleaning the database from harmful names and in order to add at least some protection from marauders.
Resources
Link to test site
Link to source
The official ChicagoBoss website . On the same site you will find API documentation, links to the Wiki, training to work with the framework.
Erlang Official Website
Russian community Erlang . There is also a Russian Wiki.
Great site to learn Erlang
Erlang documentation
Erlang solutions . From here you can download the correct version of Erlang.
Training video from Evan: episode 1 , episode 2 , episode 3
Competitive programming with Erlang . Good video material for learning.
Differences between Ruby on Rails and ChicagoBoss
Nodejs and Erlang comparison
How to serve a million users!
The Django Template language . Django template system.
ChicagoBoss Google Group
Source: https://habr.com/ru/post/139316/
All Articles