Android + Arduino + 4 wheels. Part 2
This post is a continuation of my article "Android + Arduino + 4 wheels . " Not at all what I planned to describe in the next step. I was going to solve the problem of transmitting video from the robot to the PC, but I am still in the stage of collecting information. Unfortunately, there is not enough free time, and then I had to rearrange the system on my home computer from scratch and re-configure the development environment.
Against the background of questions posed to me in the mail about the launch of the source of Mitya (the name hooked on my robot) and my unscheduled system rearrangement, I decided to describe what medium I use, how to configure it, how to deploy the sources, and how to run Mitya. If interested, I invite you to read further. Almost no pictures, no video, dry text flow on setting up the development environment. Severe inside of robotics.
I hope this article is useful to those DIY lovers who lack the experience in organizing the programming of .NET applications or Android applications. I will not raise the questions of programming languages, but the main question: “where to start?”, I think, will be revealed here.
In addition to the description of installing three IDEs for developing .NET applications, Android applications and Arduino-sketches, the article will describe how to install StyleCop (C # code design control) on Microsoft Visual C # 2010 Express, install CheckStyle (Java design code control) under Eclipse and organization of unit testing in the same Express Studio and Eclipse.
')
What determines such a choice of development tools ... My project is non-commercial, home and open. Hence the idea that all software products involved in it will be free. Is that Windows does not fit into this series (on my computer the operating system is Windows 7 x64). Now, however, I am developing for Android and Arduino and for Ubuntu (I had to for the purpose of transmitting video from a robot to a PC), but this is a separate story and it is too early for her. I must say that at work I am used to using the paid version of Visual Studio (Professional). In contrast to the Express version, it is expandable and the set of plug-ins to which I am used makes the work much more enjoyable. Nevertheless, I managed to put everything I needed “on” the Express version and make it a little more functional.
I doubted whether to publish this article and publish it in DIY, but I considered that this is an integral part of Mitya is no less important than assembling the mechanics of a robot or installing its electronics. Often a DIY project combines many very different topics at once: mechanics, electronics, programming. And programming here turned out both under Arduino, and under Android, and under Windows - three programming languages and three different development environments. DIY amateur, as a rule, universal, but I think it will not hurt help, and this article will come in handy in another project.
The article turned out to be large again, so I will provide the table of contents
A few words why my robot Mitya. His wife gave the name to him, remembering Tr-tr Mitya from Prostokvashino (if someone does not know, “Tr-tr” is TRacToR, and “Mitya” is the Model of the Engineer Tyapkin). So it was the namesake. Although no I'm not a chopper. And Mitya doesn’t give me name. And he is not a tractor. But you can't prove all this to your wife, and the name Mitya stuck with my tractor robot at home, at work, among friends, so I will skip further in the article.
Now in order.
The project is published on the Google code service. I use the Subversion version control system (SVN) , so to get the source I recommend to install some SVN client, for example, TortoiseSVN.
Download the latest version of TortoiseSVN here . A Russian language pack was also posted here, but I was somehow not used to using it.
I’ll bring up the topic of version control systems beyond the scope of this article, but for those who are still unfamiliar with SVN, I’ll describe in any case how to download the source code to a local disk.
After installing TortoiseSVN, create a folder somewhere, naming it, for example, “robot-mitya”. Click on it with the right mouse button and select the item “SVN Checkout ...” in the context menu. In the window that opens, in the “URL of repository” field, copy the text “http://robot-mitya.googlecode.com/svn/trunk/”. The “robot-mitya” folder must be specified in the “Checkout directory” field. Click OK. All sources will be uploaded to the “robot-mitya” folder, and the Android, Arduino and Windows directories will appear there.
The Windows folder contains the sources of a Windows application that implements the user interface and sends commands to the Android application level. The application is written in C # using the XNA framework. I will describe how to set it all up.
More precisely, the installation and configuration of Microsoft Visual C # 2010 Express. Here download the installation file. When installing, you can opt out of Microsoft Silverlight and Microsoft SQL Server 2008 Express Edition. Mita doesn’t need them.
Then install Microsoft XNA Game Studio 4.0. The distribution is here . After installation, the studio will be able to work with projects created on the basis of the “Windows Game” template. The RobotGamepad.csproj project is the very case.
To control the quality of the C # code, I use StyleCop . This is not mandatory, but, in my opinion, extremely useful tool. Especially for beginners.
If you do not want to use it, or if you have Visual Studio Professional and higher, you need to check the project files “robot-mitya \ Windows \ RobotGamepad \ RobotGamepad \ RobotGamepad \ RobotGamepad.csproj” and “robot-mitya \ Windows \ RobotGamepad \ RobotGamepadTest \ RobotGamepadTest.csproj ”. They should not have lines:
The path to the “Microsoft.SourceAnalysis.Targets” file may be slightly different. It depends on the StyleCop version.
If you use StyleCop with Visual Studio Professional and above, it is enough to install it by choosing the default installation options. The distribution can be downloaded here . When installing StyleCop integrated into the Studio.
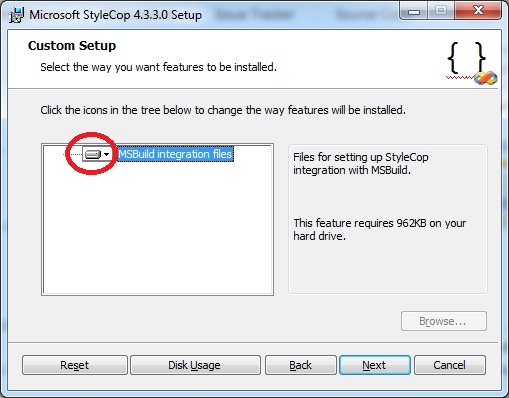
If you want to use StyleCop for Visual Studio Express versions, you will have to pick it up a bit, since the Express version does not support extensions.
During installation, you must select “Custom Setup” and mark for the installation “MSBuild integration files”.
After installing StyleCop, in the project files for which you want to enable code quality control ("robot-mitya \ Windows \ RobotGamepad \ RobotGamepad \ RobotGamepad \ RobotGamepad.csproj" and "robot-mitya \ Windows \ RobotGamepad \ RobotGamepadTest \ RobotGamepadTest.csproj" ), after the line
need to add a line
Do it better in Notepad. The path to the “Microsoft.SourceAnalysis.Targets” file should be clarified in the “Program Files” directory. Once again, the addition of this line is necessary only for "fastening" StyleCop to the Express version of the Studio. For the Professional version and above, you do not need to do anything - the StyleCop installer will do everything by itself.
StyleCop is installed, now deviations from the code design rules will be punished by compiler warnings.
For unit testing, I use NUnit. At the time of this writing, it was NUnit version 2.5.10. When installing, all installer options are left by default.
To configure, perform the following steps:
The basic environment setting for programming for Android is described here . There is no official Russian translation yet, so I will describe my actions below. In addition, I will somewhat expand the basic settings of the project.
By the way, this topic has already been raised on Habré, but the purpose of my article is to prepare the environment for the Mitya robot project, so I’ll have to repeat somewhere. Moreover, there will be differences.
The distribution is here .
For Windows 7 x64, I download the latest version of the JDK to date: jdk-7u3-windows-x64.exe. Installation is not difficult - leave all the default options.
Download the SDK here . You can Windows-installer, and you can zip-archive. I did this and that, now it was generally copying the “Android-SDK” folder from another hard drive (oh, once I had everything). I recommend installing it in the “c: \ android-sdk” folder.
I am using Eclipse Classic 3.7.1. You can download it here . Again, the version for Windows 7 (in my case, under x64). Get the archive “eclipse-SDK-3.7.1-win32-x86_64.zip”. I unpacked it directly to the root directory of the C drive. At one time, I already “grasped” Microsoft's virtual storage in Windows Vista and Windows 7. I can deal with this madness, but I don’t want to go around the same rake. Therefore, I do not put Eclipse in Program Files. If you do not want to clutter up the root directory (we’ll further throw folders there), I recommend having one at the root, and dump the rest into it.
Now you can run Eclipse (I have c: \ eclipse \ eclipse.exe). At the first launch, the “Workspace Launcher” window will appear with a suggestion to choose a working directory (workspace). I indicated “c: \ robot-mitya”. Next, the IDE Eclipse opens. We do not open Mitya’s projects yet - we still need to do something.
The Android Development Tools (ADT) plugin extends the functions of Eclipse just in terms of software development for Android. To install and configure the ADT plug-in do the following:
Run the “SDK Manager”. Now it can be done directly from Eclipse (Window> Android SDK Manager), it seems to be convenient, but I do not advise. The fact is that the manager opens for some reason as a modal window, and you lose Eclipse while working with the manager. Now it is not scary, but when you start programming, it will be inconvenient. So it is better to run the manager, bypassing the IDE: “c: \ android-sdk \ SDK Manager.exe”.
This is my least favorite place to set up a development environment for Android. I don't know why, but the SDK manager is awfully slow. The traffic account goes to gigabytes, the time account for the clock (even for the night left!). I don’t understand what it is connected with and what it does there, but I can’t call a quick installation step. I now managed to skip this step, because I copied the previously configured directory c: \ android-sdk. And then, even copying it from an external HDD took about twenty minutes. I have this directory contains about 67 thousand files.
For Mitya, as I understand it, enough packages “SDK Platform” and “Google APIs by Google Inc.” from Android 2.3.3 (API 10), as well as packages from the groups “Tools” and “Extras”. True, I put packages for all platforms. From greed, and you never know what projects I still will. So you can significantly save on installation time of packages.
Honestly, the appointment of most packages is a mystery to me. Several of them are not installed, but this, as I understand it, is normal.
Android SDK is installed and configured, if you want, you can see what is inside and read about its contents here . For fans of the command line, they even recommend adding paths to the tools / and platform-tools / folders in the PATH environment variable. I still did without the command line.
Very convenient service for finding and installing plugins in Eclipse. It seems to me that earlier after installing Eclipse Indigo (the version that we just installed), the Market was already part of the IDE, but no, or I’m mistaken, or no longer included.
To install do the following:
Now the “Eclipse Marketplace ...” item will appear in the Help menu.
A useful tool, analogue of StyleCop in Visual Studio, which does not allow it to be out of the ordinary when styling code. I strongly recommend to put, especially, beginners (and then have nowhere to go). Installation:
Now, in terms of Checkstyle rules, parts of the code will be marked with something yellow and will have to be fixed. For my projects, I use the “Sun Checks (Eclipse)” rule set, included in the plug-in distribution. The code design rules can be customized, but I am categorically against adjusting the Checkstyle rules (and any code design control system) “for themselves”, “for the company” or “for the project”. This is the path to nowhere, then you can not enter the control code design. But one rule of all that I had in principle brought to the pen and had to turn it off. I repent. This is a maximum character limit of 80 characters. 80 characters on a modern monitor looks weird. In the description of the rule it says: "If you have the IDE, you can find the information on the project." Pathetic rationale.
Mitya's Android projects have already added the Checkstyle configuration, so nothing will need to be further configured.
A virtual device or Android Virtual Device (AVD) is a phone emulator on which you can run Android applications and tests. Although I often debugged right on the phone.
Before you create a virtual device, I recommend in Windows to correct the environment variables:
To create a virtual device, run the application “c: \ android-sdk \ AVD Manager.exe”. It can also be called from Eclipse, but also (like the SDK Manager) for some reason in the form of a modal window (Window> AVD Manager). Remember to restart Eclipse if it was loaded before defining environment variables. Click “New ...”, in the opened dialog, fill in the “Name” field, for example, “Google_APIs_Level_10” (spaces are not allowed), in the “Target” field select “Google APIs (Google Inc.) API Level 10”. The remaining fields can be left unchanged. Create AVD button. If we have redefined the ANDROID_SDK_HOME variable, the folder “c: \ android-sdk” will have the folder “.android” with the image and configuration of the virtual device.
We try to launch a virtual device: select it in the list and click the “Start ...” button, then “Launch”. The first launch will be quite long.
Phone setup:
Now you need to install the driver to access the phone. If you have an Android Developer Phone (what if?), Nexus One, or Nexus S, Google provides its own driver . In other cases, Google sends to the manufacturers. The easiest way to install a driver for my HTC Sensation turned out to be HTC Sync (the program is free).
Now everything is ready for downloading to the phone and launching the RoboHead application. Go to Eclipse, click Run on the RoboHead project, select the phone in the dialog that opens and a happy Mitya should appear on its screen.
Installation and configuration of the development environment is described in detail on the Arduino project website. Briefly describe the installation under Windows. The only addition to the typical installation required by the project is the addition of two libraries.
The current sketch at the time of this writing was written under Arduino version 1.0. It is exactly compatible with the version of Arduino 0022 and 0023. I can not say about other versions, did not check. Download the IDE archive here . I unpacked the archive directly to the root directory of drive C.
They promise that the installation in Vista is identical. Perform the following steps:
Now you can run “c: \ arduino-1.0 \ arduino.exe” to forgive again the “unknown publisher” and put a couple of useful checkboxes.
The instructions on the arduino.cc website suggest that you complete the installation and configuration of the IDE by running the demo sketch. To do this, perform the following actions:
To compile the sketch of Mitya, we need two libraries that are not included in the standard IDE Arduino distribution. From the project page you need to download the IRremote.zip and USBHostShield2.zip archives . All you need to do to install the libraries is to unpack these archives in the “C: \ arduino-1.0 \ libraries” folder and restart the Arduino IDE.
Everything, you can pour Mitin sketch into the controller.
To control Mitei from a PC, the phone and computer must be on the same local network. It's great that my smartphone can still act as a router, so you can do without an external Wi-Fi router.
So for now:
Turn on the power of the robot. Servos will lift the holder to simplify installation of the phone. We connect and fasten the phone to the holder. On the phone, the identification of the connection to the robot controller should work, and the RoboHead application will automatically start.
Now run the RobotGamepad application on the PC and press the Start button on the gamepad. Mitya is ready, let's go!
UPD:
I have already said that for Mitya I had to deploy the development environment for Android and Ubuntu (11.10). There are some features. I’m not going to torture users with a repetition of a rather tedious article, so if anyone is interested in this topic, everything is described here .
Against the background of questions posed to me in the mail about the launch of the source of Mitya (the name hooked on my robot) and my unscheduled system rearrangement, I decided to describe what medium I use, how to configure it, how to deploy the sources, and how to run Mitya. If interested, I invite you to read further. Almost no pictures, no video, dry text flow on setting up the development environment. Severe inside of robotics.
I hope this article is useful to those DIY lovers who lack the experience in organizing the programming of .NET applications or Android applications. I will not raise the questions of programming languages, but the main question: “where to start?”, I think, will be revealed here.
In addition to the description of installing three IDEs for developing .NET applications, Android applications and Arduino-sketches, the article will describe how to install StyleCop (C # code design control) on Microsoft Visual C # 2010 Express, install CheckStyle (Java design code control) under Eclipse and organization of unit testing in the same Express Studio and Eclipse.
')
What determines such a choice of development tools ... My project is non-commercial, home and open. Hence the idea that all software products involved in it will be free. Is that Windows does not fit into this series (on my computer the operating system is Windows 7 x64). Now, however, I am developing for Android and Arduino and for Ubuntu (I had to for the purpose of transmitting video from a robot to a PC), but this is a separate story and it is too early for her. I must say that at work I am used to using the paid version of Visual Studio (Professional). In contrast to the Express version, it is expandable and the set of plug-ins to which I am used makes the work much more enjoyable. Nevertheless, I managed to put everything I needed “on” the Express version and make it a little more functional.
I doubted whether to publish this article and publish it in DIY, but I considered that this is an integral part of Mitya is no less important than assembling the mechanics of a robot or installing its electronics. Often a DIY project combines many very different topics at once: mechanics, electronics, programming. And programming here turned out both under Arduino, and under Android, and under Windows - three programming languages and three different development environments. DIY amateur, as a rule, universal, but I think it will not hurt help, and this article will come in handy in another project.
The article turned out to be large again, so I will provide the table of contents
- Download source
- Windows
- Android
- Installing the Java Development Kit (JDK)
- Install Android SDK
- Install IDE
- Install ADT plugin for Eclipse
- Installing / updating packages for the platform
- Install Eclipse Market (optional)
- Install Checkstyle (optional)
- Adding projects to the working directory (workspace)
- Creating a virtual device (Android Virtual Device)
- Running the application on the phone
- Arduino
- Run Mitya
A few words why my robot Mitya. His wife gave the name to him, remembering Tr-tr Mitya from Prostokvashino (if someone does not know, “Tr-tr” is TRacToR, and “Mitya” is the Model of the Engineer Tyapkin). So it was the namesake. Although no I'm not a chopper. And Mitya doesn’t give me name. And he is not a tractor. But you can't prove all this to your wife, and the name Mitya stuck with my tractor robot at home, at work, among friends, so I will skip further in the article.
Now in order.
Download source
The project is published on the Google code service. I use the Subversion version control system (SVN) , so to get the source I recommend to install some SVN client, for example, TortoiseSVN.
Download the latest version of TortoiseSVN here . A Russian language pack was also posted here, but I was somehow not used to using it.
I’ll bring up the topic of version control systems beyond the scope of this article, but for those who are still unfamiliar with SVN, I’ll describe in any case how to download the source code to a local disk.
After installing TortoiseSVN, create a folder somewhere, naming it, for example, “robot-mitya”. Click on it with the right mouse button and select the item “SVN Checkout ...” in the context menu. In the window that opens, in the “URL of repository” field, copy the text “http://robot-mitya.googlecode.com/svn/trunk/”. The “robot-mitya” folder must be specified in the “Checkout directory” field. Click OK. All sources will be uploaded to the “robot-mitya” folder, and the Android, Arduino and Windows directories will appear there.
Windows
The Windows folder contains the sources of a Windows application that implements the user interface and sends commands to the Android application level. The application is written in C # using the XNA framework. I will describe how to set it all up.
Installing and configuring Visual Studio
More precisely, the installation and configuration of Microsoft Visual C # 2010 Express. Here download the installation file. When installing, you can opt out of Microsoft Silverlight and Microsoft SQL Server 2008 Express Edition. Mita doesn’t need them.
Then install Microsoft XNA Game Studio 4.0. The distribution is here . After installation, the studio will be able to work with projects created on the basis of the “Windows Game” template. The RobotGamepad.csproj project is the very case.
Installing StyleCop and customizing the solution
To control the quality of the C # code, I use StyleCop . This is not mandatory, but, in my opinion, extremely useful tool. Especially for beginners.
If you do not want to use it, or if you have Visual Studio Professional and higher, you need to check the project files “robot-mitya \ Windows \ RobotGamepad \ RobotGamepad \ RobotGamepad \ RobotGamepad.csproj” and “robot-mitya \ Windows \ RobotGamepad \ RobotGamepadTest \ RobotGamepadTest.csproj ”. They should not have lines:
<Import Project = "$ (ProgramFiles) \ MSBuild \ Microsoft \ StyleCop \ v4.3 \ Microsoft.SourceAnalysis.Targets" />
The path to the “Microsoft.SourceAnalysis.Targets” file may be slightly different. It depends on the StyleCop version.
If you use StyleCop with Visual Studio Professional and above, it is enough to install it by choosing the default installation options. The distribution can be downloaded here . When installing StyleCop integrated into the Studio.
If you want to use StyleCop for Visual Studio Express versions, you will have to pick it up a bit, since the Express version does not support extensions.
During installation, you must select “Custom Setup” and mark for the installation “MSBuild integration files”.
After installing StyleCop, in the project files for which you want to enable code quality control ("robot-mitya \ Windows \ RobotGamepad \ RobotGamepad \ RobotGamepad \ RobotGamepad.csproj" and "robot-mitya \ Windows \ RobotGamepad \ RobotGamepadTest \ RobotGamepadTest.csproj" ), after the line
<Import Project = "$ (MSBuildBinPath) \ Microsoft.CSharp.targets" />
need to add a line
<Import Project = "$ (ProgramFiles) \ MSBuild \ Microsoft \ StyleCop \ v4.3 \ Microsoft.SourceAnalysis.Targets" />
Do it better in Notepad. The path to the “Microsoft.SourceAnalysis.Targets” file should be clarified in the “Program Files” directory. Once again, the addition of this line is necessary only for "fastening" StyleCop to the Express version of the Studio. For the Professional version and above, you do not need to do anything - the StyleCop installer will do everything by itself.
StyleCop is installed, now deviations from the code design rules will be punished by compiler warnings.
Install and configure NUnit
For unit testing, I use NUnit. At the time of this writing, it was NUnit version 2.5.10. When installing, all installer options are left by default.
To configure, perform the following steps:
- In the “RobotGamepadTest” project, delete and re-add the links “nunit-console-runner” and “nunit.framework”. The libraries are located in the folder in which NUnit was installed, the path to them may differ from the one that was installed in the project, so it is better to rebind them.
- Run “c: \ Program Files (x86) \ NUnit 2.5.10 \ bin \ net-2.0 \ nunit-x86.exe”. Run tests, make sure everything works. "X86" may not be, I just have Windows 7 x64 and a test project compiled for x86.
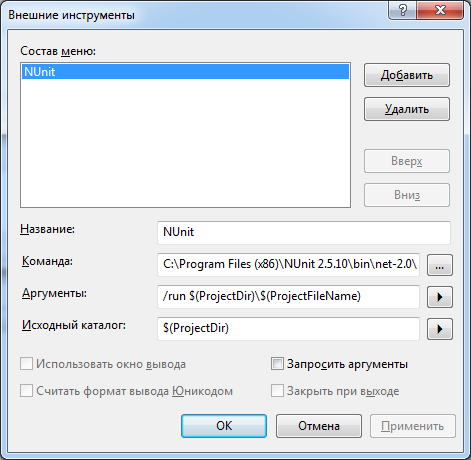
- Configure test run. To do this, add a call to the NUnit user interface to the Studio external tools:
- Put a check in Tools> Options> Advanced options. Just "Parameters", not "Parameters ..."!
- Choose Tools> External Tools ...
- In the "External Instruments" dialog fill in the fields:
- Assign the project to start RobotGamepadTest. To do this, right-click on the RobotGamepadTest project, context menu item "Set as Launch Project".
Android
The basic environment setting for programming for Android is described here . There is no official Russian translation yet, so I will describe my actions below. In addition, I will somewhat expand the basic settings of the project.
By the way, this topic has already been raised on Habré, but the purpose of my article is to prepare the environment for the Mitya robot project, so I’ll have to repeat somewhere. Moreover, there will be differences.
Installing the Java Development Kit (JDK)
The distribution is here .
For Windows 7 x64, I download the latest version of the JDK to date: jdk-7u3-windows-x64.exe. Installation is not difficult - leave all the default options.
Install Android SDK
Download the SDK here . You can Windows-installer, and you can zip-archive. I did this and that, now it was generally copying the “Android-SDK” folder from another hard drive (oh, once I had everything). I recommend installing it in the “c: \ android-sdk” folder.
Install IDE
I am using Eclipse Classic 3.7.1. You can download it here . Again, the version for Windows 7 (in my case, under x64). Get the archive “eclipse-SDK-3.7.1-win32-x86_64.zip”. I unpacked it directly to the root directory of the C drive. At one time, I already “grasped” Microsoft's virtual storage in Windows Vista and Windows 7. I can deal with this madness, but I don’t want to go around the same rake. Therefore, I do not put Eclipse in Program Files. If you do not want to clutter up the root directory (we’ll further throw folders there), I recommend having one at the root, and dump the rest into it.
Now you can run Eclipse (I have c: \ eclipse \ eclipse.exe). At the first launch, the “Workspace Launcher” window will appear with a suggestion to choose a working directory (workspace). I indicated “c: \ robot-mitya”. Next, the IDE Eclipse opens. We do not open Mitya’s projects yet - we still need to do something.
Install ADT plugin for Eclipse
The Android Development Tools (ADT) plugin extends the functions of Eclipse just in terms of software development for Android. To install and configure the ADT plug-in do the following:
- Help> Install New Software menu ...
- Add button.
- In the “Add Repository” dialog, in the Name field, enter, for example, “ADT Plugin”, in the Location field, “https://dl-ssl.google.com/android/eclipse/”, click OK.
- In the “Available software” dialog, tick the “Developer Tools” box, click Next, or Next, accept the license agreement, click Finish.
- Restart Eclipse (he will suggest).
- Eclipse, after the restart, greeted me with the “Welcome to Android Development” window and offered to re-download the Android SDK or specify the folder of the already installed SDK. Naturally, I chose the latter and clicked Next, then I exercised my right to refuse to send statistics to Google and did away with this window. In the manual , from which I drew all this knowledge, by the way, there was not a word about this window. It describes another way to set the path to the Android SDK. Just in case, I will describe it: Window> Preferences menu, then select Android on the left and fill in the “SDK Location” field on the right.
Installing / updating packages for the platform
Run the “SDK Manager”. Now it can be done directly from Eclipse (Window> Android SDK Manager), it seems to be convenient, but I do not advise. The fact is that the manager opens for some reason as a modal window, and you lose Eclipse while working with the manager. Now it is not scary, but when you start programming, it will be inconvenient. So it is better to run the manager, bypassing the IDE: “c: \ android-sdk \ SDK Manager.exe”.
This is my least favorite place to set up a development environment for Android. I don't know why, but the SDK manager is awfully slow. The traffic account goes to gigabytes, the time account for the clock (even for the night left!). I don’t understand what it is connected with and what it does there, but I can’t call a quick installation step. I now managed to skip this step, because I copied the previously configured directory c: \ android-sdk. And then, even copying it from an external HDD took about twenty minutes. I have this directory contains about 67 thousand files.
For Mitya, as I understand it, enough packages “SDK Platform” and “Google APIs by Google Inc.” from Android 2.3.3 (API 10), as well as packages from the groups “Tools” and “Extras”. True, I put packages for all platforms. From greed, and you never know what projects I still will. So you can significantly save on installation time of packages.
Honestly, the appointment of most packages is a mystery to me. Several of them are not installed, but this, as I understand it, is normal.
Android SDK is installed and configured, if you want, you can see what is inside and read about its contents here . For fans of the command line, they even recommend adding paths to the tools / and platform-tools / folders in the PATH environment variable. I still did without the command line.
Install Eclipse Market (optional)
Very convenient service for finding and installing plugins in Eclipse. It seems to me that earlier after installing Eclipse Indigo (the version that we just installed), the Market was already part of the IDE, but no, or I’m mistaken, or no longer included.
To install do the following:
- Help> Install New Software menu ...
- In the “Install” dialog that opens, in the “Work with” field, select “Indigo - https: //download.eclipse.org/releases/indigo” from the drop-down list.
- Below in the filter field type the word “market”, for example. In the filtered list we tick off the “Marketplace Client”.
- Next, Next, we accept the terms of the license agreement, Finish, Restart now (Ecplipse).
Now the “Eclipse Marketplace ...” item will appear in the Help menu.
Install Checkstyle (optional)
A useful tool, analogue of StyleCop in Visual Studio, which does not allow it to be out of the ordinary when styling code. I strongly recommend to put, especially, beginners (and then have nowhere to go). Installation:
- Help menu> Eclipse Marketplace ...
- In the “Find” field, type “checkstyle”, press the “Go” button.
- “Checkstyle Plug-in” will be found, click the “Install” button, then everything is clear.
Now, in terms of Checkstyle rules, parts of the code will be marked with something yellow and will have to be fixed. For my projects, I use the “Sun Checks (Eclipse)” rule set, included in the plug-in distribution. The code design rules can be customized, but I am categorically against adjusting the Checkstyle rules (and any code design control system) “for themselves”, “for the company” or “for the project”. This is the path to nowhere, then you can not enter the control code design. But one rule of all that I had in principle brought to the pen and had to turn it off. I repent. This is a maximum character limit of 80 characters. 80 characters on a modern monitor looks weird. In the description of the rule it says: "If you have the IDE, you can find the information on the project." Pathetic rationale.
Mitya's Android projects have already added the Checkstyle configuration, so nothing will need to be further configured.
Adding projects to the working directory (workspace)
- Add a project RoboHead. Menu File> New> Project ...
- In the “New Project” dialog that opens, in the “Select a wizard” step, open the Android list, select “Android Project”. Click the Next button.
- In the “Create Android Project” step, select the “Create project from existing source” option and specify the Location “c: \ robot-mitya \ Android \ RoboHead”.
- Here (step “Create Android Project”) in the field “Project Name” enter “RoboHead”. Next.
- In the “Select build target” step, make sure that the “Google APIs” platform is selected with API Level 10. Next.
- In the “Application Info” step, in the “Application Name” field, indicate “RoboHead”. Finish.
- Now add the project RoboHeadTest. Again menu File> New> Project ...
- In the “New Project” dialog, in the “Select a wizard” step, expand the Android list, select “Android Test Project”. Click the Next button.
- In the “Create Android Project” step, enter “RoboHeadTest” in the “Project Name” field.
- Here (step “Create Android Project”) select the option “Create project from existing source” and specify the Location “c: \ robot-mitya \ Android \ RoboHeadTest”. Next.
- In the “Select build target” step, make sure that the “Google APIs” platform is selected with API Level 10. Next. I came across cases when on this item the Next button, being active, was not pressed. Then it helped roll back to the step of adding a test project and add it not as an “Android Test Project”, but as an “Android Project”.
- In the “Application Info” step in the “Application Name” field specify “RoboHeadTest”. Finish.
Creating a virtual device (Android Virtual Device)
A virtual device or Android Virtual Device (AVD) is a phone emulator on which you can run Android applications and tests. Although I often debugged right on the phone.
Before you create a virtual device, I recommend in Windows to correct the environment variables:
- Add a new system variable ANDROID_SDK_HOME with a value, for example “c: \ android-sdk”. There are many discussions on the Web around the features of Windows 7 and this variable. For errors loading Android on an emulator for Windows 7, it is recommended to define this variable. I did not encounter such problems, but I liked the fact that this variable reassigns the directory in which the images and settings of the created virtual devices are stored. By default, this directory is buried somewhere in the user's folder.
- Since we are in the dialog for setting environment variables, we can add to the list of paths in the PATH variable. Add “c: \ android-sdk \ tools \; c: \ android-sdk \ platform-tools \”.
To create a virtual device, run the application “c: \ android-sdk \ AVD Manager.exe”. It can also be called from Eclipse, but also (like the SDK Manager) for some reason in the form of a modal window (Window> AVD Manager). Remember to restart Eclipse if it was loaded before defining environment variables. Click “New ...”, in the opened dialog, fill in the “Name” field, for example, “Google_APIs_Level_10” (spaces are not allowed), in the “Target” field select “Google APIs (Google Inc.) API Level 10”. The remaining fields can be left unchanged. Create AVD button. If we have redefined the ANDROID_SDK_HOME variable, the folder “c: \ android-sdk” will have the folder “.android” with the image and configuration of the virtual device.
We try to launch a virtual device: select it in the list and click the “Start ...” button, then “Launch”. The first launch will be quite long.
Running the application on the phone
Phone setup:
- In the phone menu, select Settings> Applications. Put a tick on the option "Unknown sources."
- Here we select the “Development” sub-item and tick the “USB debugging” options.
Now you need to install the driver to access the phone. If you have an Android Developer Phone (what if?), Nexus One, or Nexus S, Google provides its own driver . In other cases, Google sends to the manufacturers. The easiest way to install a driver for my HTC Sensation turned out to be HTC Sync (the program is free).
Now everything is ready for downloading to the phone and launching the RoboHead application. Go to Eclipse, click Run on the RoboHead project, select the phone in the dialog that opens and a happy Mitya should appear on its screen.
Arduino
Installation and configuration of the development environment is described in detail on the Arduino project website. Briefly describe the installation under Windows. The only addition to the typical installation required by the project is the addition of two libraries.
IDE installation
The current sketch at the time of this writing was written under Arduino version 1.0. It is exactly compatible with the version of Arduino 0022 and 0023. I can not say about other versions, did not check. Download the IDE archive here . I unpacked the archive directly to the root directory of drive C.
Installing Arduino Uno drivers in Windows 7
They promise that the installation in Vista is identical. Perform the following steps:
- We connect Arduino Uno to the computer. On the controller, the green power LED should light up. Windows is beginning to imitate driver installation.
- Windows exposes itself with the message "The driver software has not been installed."
- Open the Device Manager. We see the Arduino Uno with an exclamation mark. Right click on Arduino Uno, “Update drivers ...”. Next, select "Run a search for drivers on this computer." And specify the path “C: \ arduino-1.0 \ drivers”. Windows will suspect the publisher as unkind, but we must persevere. Result: “The software update for this device completed successfully.” The window title indicates the port. I had it COM3. Remember the number, it will be useful to us.
Launch and configure IDE
Now you can run “c: \ arduino-1.0 \ arduino.exe” to forgive again the “unknown publisher” and put a couple of useful checkboxes.
- In the File> Preferences menu, you can enable the “Automatically associate .ino files with Arduino” option. Strange, but I have not saved this option. I had to associate the file extension with the IDE manually.
- Make sure the Arduino Uno controller is selected in the Tools> Board menu.
- In the Tools> Serial Port menu, select the COM port to which the controller is connected. Earlier we remembered it, it was COM3 for me. If you do not remember, we look in the Device Manager.
Verifying the installation and configuration of an IDE Arduino
The instructions on the arduino.cc website suggest that you complete the installation and configuration of the IDE by running the demo sketch. To do this, perform the following actions:
- File> Examples> 1.Basics> Blink menu. The IDE window opens with a short sketch that allows you to blink the yellow LED installed on the controller board.
- To check the compilation of the sketch, click the Sketch> Verify / Compile menu item.
- To upload the sketch to the controller's memory and launch it for execution, select the menu item File> Upload. Everything, the LED on the 13th leg of the controller should start blinking with a period of 2 seconds.
Installing the libraries required by the sketch of Mitya
To compile the sketch of Mitya, we need two libraries that are not included in the standard IDE Arduino distribution. From the project page you need to download the IRremote.zip and USBHostShield2.zip archives . All you need to do to install the libraries is to unpack these archives in the “C: \ arduino-1.0 \ libraries” folder and restart the Arduino IDE.
Everything, you can pour Mitin sketch into the controller.
Run Mitya
To control Mitei from a PC, the phone and computer must be on the same local network. It's great that my smartphone can still act as a router, so you can do without an external Wi-Fi router.
So for now:
- smartphone and PC are connected to one local network;
- in Mitin the controller is filled in with the robot_control.ino sketch;
- RoboHead is installed on the phone;
- XBOX 360 Gamepad is connected to PC;
- compiled and ready to run the Windows application RobotGamepad.exe.
Turn on the power of the robot. Servos will lift the holder to simplify installation of the phone. We connect and fasten the phone to the holder. On the phone, the identification of the connection to the robot controller should work, and the RoboHead application will automatically start.
Now run the RobotGamepad application on the PC and press the Start button on the gamepad. Mitya is ready, let's go!
UPD:
I have already said that for Mitya I had to deploy the development environment for Android and Ubuntu (11.10). There are some features. I’m not going to torture users with a repetition of a rather tedious article, so if anyone is interested in this topic, everything is described here .
Source: https://habr.com/ru/post/139304/
All Articles