Prototyping Windows Phone Applications in SketchFlow
Hi,% username%,% wpdeveloper%,% designer% and everyone else reading this topic!
Before the end of receiving applications for the Imagine Cup: Windows Phone Challenge there are a little more than 2 weeks, it's time to do it! But the application must also include a prototype of the application, made in SketchFlow . How to create it today and talk.
Careful, a lot of pictures under the cut!
')
So, you wrote the application, invented the theme of the application, it remains the case for the prototype. To create it we need:
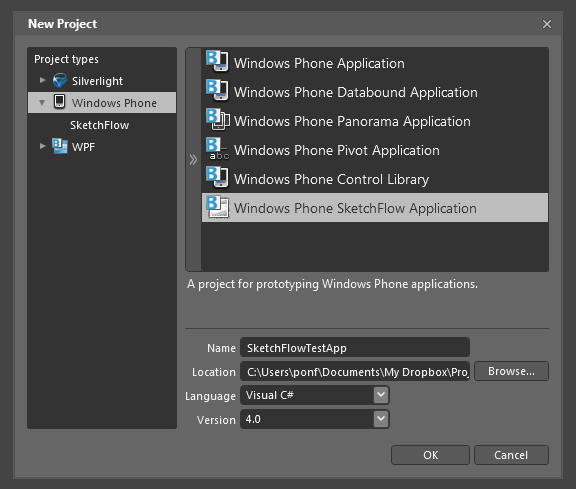
After installing the SketchFlow Template , when you create a new project in Expression Blend, you will be able to select the Windows Phone SketchFlow Application .
This time I will not develop any sample applications, just show the main features that will be useful to you when creating a prototype. I just want to make a reservation that the purpose of the sketches is not to create highly reliable prototypes, but to show in general how the application will look like and what basic functionality it will have.
This article is intended for people who are familiar with SketchFlow at least in general terms. To understand the basic principles I recommend to get acquainted with the series of articles "Prototyping in Expression Blend + SketchFlow" from kichik ( 1 , 2 , 3 ). Everything, now it is possible to begin!
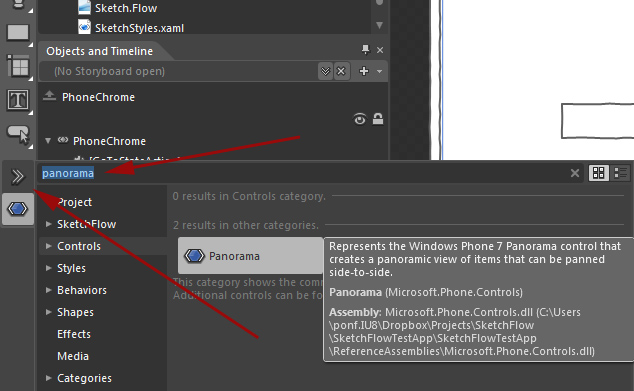
SketchFlow Map - a map of your application that shows all the connections between screens and components. If you read the second article from Prerequisites , you know that the main functions of the map are the addition of new screens and components (component screen, an element that will be displayed on several pages).
From the features of the sketch for Windows Phone, when you create a project, you create 4 screens: 3 system screens and the main screen of your application:
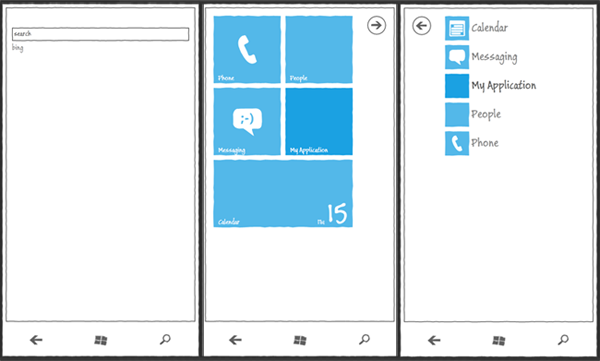
As you can see, all the application screens are linked to the main screen (Home) and the search screen (Search). This is done to handle pressing the corresponding buttons on the phone's sketch.
Also on the main page and the application page you can make your own tile icon or Toast Notification.
When creating any new screen, links to Home and Search screens are created automatically.

You can create navigation between pages in two ways: using Behaviors or the right mouse button (in fact, this is the same thing, but in the second case less gestures are required). We'll talk about Behaviors a bit later, and now let's use the quick way:

To change the parameters of elements, use the States tab. As you can see, initially in the SketchFlow template for Windows Phone there are already 2 states: the portrait and landscape position of the phone. Let's create our own group of states (the Add State Group button on the top right of the tab). Now you can add your own states to this group using the Add State button. As an example, I will change the text Opacity in a regular TextBlock .
When you click on any of the states, the working window is surrounded by a red frame, which means that any changes will be recorded and reproduced when you switch to this event. To go to the initial state, select Base in the States tab.
So, create our new state:

Clickable
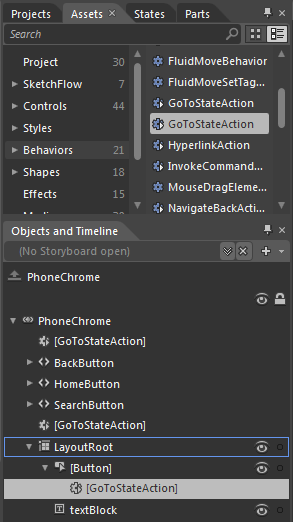
So, the state we created, let's call it now when we press the button. Unfortunately, I could not bind the state through the context menu (right button on the button, Activate State ). Therefore, we go to the Assets tab, there we select the Behaviors and drag the GoToStateAction to our button.
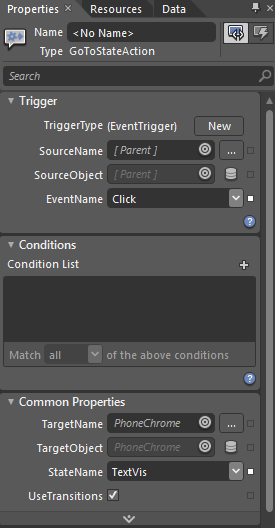
For any behavior, you can assign an event (for the button - Click ), some conditions and specify the state that will be triggered.
If you did everything correctly, then after launching the prototype in the browser, when you press the button, the text will appear smoothly.
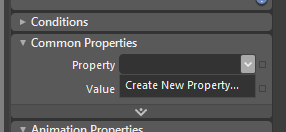
It’s hard to imagine an application in which you wouldn’t need to transfer any data between pages. When creating a real application, this problem is easily solved by passing parameters or creating some static field. But what if you need to transfer data in a SketchFlow prototype? SketchFlow has some built-in data storage, and in order to use it, the SetDataStoreValueAction behavior is useful .
Let's complicate the previous example a little. Now we will display text from TextBlock in TextBlock . Of course, this can be implemented using the normal Binding , but having learned how to do this using the built-in storage, you can transfer data between pages in the same way.
Add our button a new Behavior : SetDataStoreValueAction . Go to its properties, on the Common Properties tab, click on the Property field and create a new property in the DataStore . I called it new_text . Next you need to assign it a value. In our case, you need to click on the box to the right of the Value field, there select the Element Property Binding and point to our TextBox .
Now it remains to add the value of our variable to the TextBlock : click on the box next to the Text field in the TextBlock properties and select Binding in the menu.
Done! You can run the application again and check the performance of our use of the repository. Of course, the benefits of using it to transfer data within a single page are very doubtful, but the approach is indispensable when developing a multi-page data application.
Unfortunately, working with panoramic or pivot pages in SketchFlow is rather poorly implemented. Of course, in the demo mode, these pages work fine, react to gestures and smoothly scroll, but in creation mode we can see only the first page, and when you change the page on the Objects and Timeline contribution, the panorama does not switch to it, as it would when editing pages in Expression Blend .
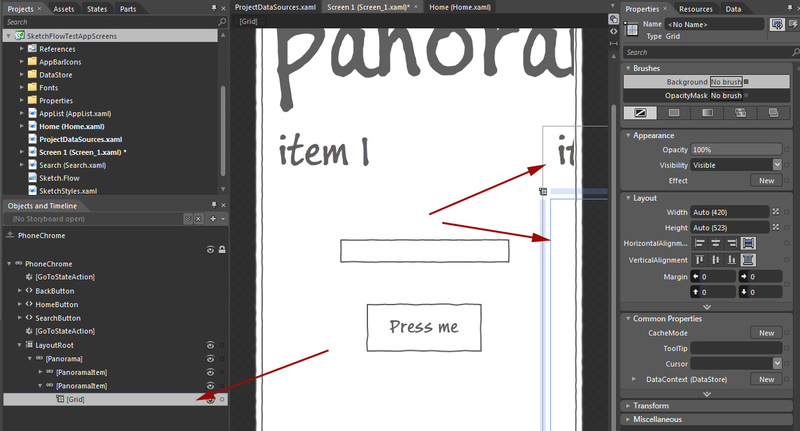
Let's add a panorama to our page and drag the already created items to the first PanoramaItem .
If we select the second PanoramaItem , then the editor will not switch to it. This creates minor problems when editing content on other elements of the panorama. If in this case the second Item is still slightly visible, then if you use more than 2 elements, or the page does not contain a panorama, but Pivot , it becomes unreal to work with them visually.
As a solution, I drag the Grid from other pages of the panorama onto the first one, and on it I am creating and editing elements, and then simply returning this Grid to the desired PanoramaItem . The same scheme works when editing the Pivot Page .
Directly to Windows Phone, this item does not apply, but I just could not leave the second page of the panorama blank :). SketchFlow supports the ability to generate data of various formats to fill the application with content.
The generated data can be 4 types: text, numeric, boolean, and images. For text data, there are the following presets: Lorem Ipsum (just the text with the given parameters), names, dates, addresses, phone numbers and many others. For numerical data, the length is indicated, and for images, the folder from which to take them.
You can create test data as follows: on the Data tab, click the Create Data Sample button and select New Sample Data there . As you can see, data can also be obtained from Xml, or with the help of some class.
Using the Edit Sample Values button, you can change the number of elements and edit the elements themselves.
In order to create a ListBox with the generated data, simply drag the required collection from the Data tab to our prototype. Then you can edit the ListBoxItemTemplate template to give the list the type we need. If you want to use the generated data somewhere else, then you need to use the Binding mechanism.
In my example, I created a ListBox on a new Grid , then dragged this Grid back into the second PanoramaItem . Thus, I managed to edit the contents of the second page of the panorama without any problems.
In this article, I tried to consider all the features of prototyping an application for Windows Phone using SketchFlow .
Download an example from the article: SkyDrive .
For more information, you can use the following links:
I wish you all a good acquaintance with the SketchFlow template for Windows Phone, and hopefully see you in Australia!
Before the end of receiving applications for the Imagine Cup: Windows Phone Challenge there are a little more than 2 weeks, it's time to do it! But the application must also include a prototype of the application, made in SketchFlow . How to create it today and talk.
Careful, a lot of pictures under the cut!
')
Ready to Get Started?
So, you wrote the application, invented the theme of the application, it remains the case for the prototype. To create it we need:
- Windows Phone SDK
- Expression Blend 4 (students available for free on Dreamspark )
- SketchFlow Template for Windows Phone
- Windows Phone Silverlight Toolkit
After installing the SketchFlow Template , when you create a new project in Expression Blend, you will be able to select the Windows Phone SketchFlow Application .
This time I will not develop any sample applications, just show the main features that will be useful to you when creating a prototype. I just want to make a reservation that the purpose of the sketches is not to create highly reliable prototypes, but to show in general how the application will look like and what basic functionality it will have.
Prerequisites
This article is intended for people who are familiar with SketchFlow at least in general terms. To understand the basic principles I recommend to get acquainted with the series of articles "Prototyping in Expression Blend + SketchFlow" from kichik ( 1 , 2 , 3 ). Everything, now it is possible to begin!
Sketchflow map
SketchFlow Map - a map of your application that shows all the connections between screens and components. If you read the second article from Prerequisites , you know that the main functions of the map are the addition of new screens and components (component screen, an element that will be displayed on several pages).
From the features of the sketch for Windows Phone, when you create a project, you create 4 screens: 3 system screens and the main screen of your application:
As you can see, all the application screens are linked to the main screen (Home) and the search screen (Search). This is done to handle pressing the corresponding buttons on the phone's sketch.
Also on the main page and the application page you can make your own tile icon or Toast Notification.
When creating any new screen, links to Home and Search screens are created automatically.
Navigation between pages
You can create navigation between pages in two ways: using Behaviors or the right mouse button (in fact, this is the same thing, but in the second case less gestures are required). We'll talk about Behaviors a bit later, and now let's use the quick way:
Creating states and animations
To change the parameters of elements, use the States tab. As you can see, initially in the SketchFlow template for Windows Phone there are already 2 states: the portrait and landscape position of the phone. Let's create our own group of states (the Add State Group button on the top right of the tab). Now you can add your own states to this group using the Add State button. As an example, I will change the text Opacity in a regular TextBlock .
When you click on any of the states, the working window is surrounded by a red frame, which means that any changes will be recorded and reproduced when you switch to this event. To go to the initial state, select Base in the States tab.
So, create our new state:
- make sure that you have selected the Base state. Change the opacity of your item to 0;
- select the state you created. If a red frame appears, you can start recording. Click the Show Timeline button;
- create a keyframe, move the slider for a few seconds and create another keyframe in which you set Opacity to 100;
- when you're done creating the animation, select the Base state again and make sure your Opacity element is 0.
Clickable
So, the state we created, let's call it now when we press the button. Unfortunately, I could not bind the state through the context menu (right button on the button, Activate State ). Therefore, we go to the Assets tab, there we select the Behaviors and drag the GoToStateAction to our button.
For any behavior, you can assign an event (for the button - Click ), some conditions and specify the state that will be triggered.
If you did everything correctly, then after launching the prototype in the browser, when you press the button, the text will appear smoothly.
Data transfer using storage
It’s hard to imagine an application in which you wouldn’t need to transfer any data between pages. When creating a real application, this problem is easily solved by passing parameters or creating some static field. But what if you need to transfer data in a SketchFlow prototype? SketchFlow has some built-in data storage, and in order to use it, the SetDataStoreValueAction behavior is useful .
Let's complicate the previous example a little. Now we will display text from TextBlock in TextBlock . Of course, this can be implemented using the normal Binding , but having learned how to do this using the built-in storage, you can transfer data between pages in the same way.
Add our button a new Behavior : SetDataStoreValueAction . Go to its properties, on the Common Properties tab, click on the Property field and create a new property in the DataStore . I called it new_text . Next you need to assign it a value. In our case, you need to click on the box to the right of the Value field, there select the Element Property Binding and point to our TextBox .
Now it remains to add the value of our variable to the TextBlock : click on the box next to the Text field in the TextBlock properties and select Binding in the menu.
Done! You can run the application again and check the performance of our use of the repository. Of course, the benefits of using it to transfer data within a single page are very doubtful, but the approach is indispensable when developing a multi-page data application.
Using Pivot / Panorama Elements
Unfortunately, working with panoramic or pivot pages in SketchFlow is rather poorly implemented. Of course, in the demo mode, these pages work fine, react to gestures and smoothly scroll, but in creation mode we can see only the first page, and when you change the page on the Objects and Timeline contribution, the panorama does not switch to it, as it would when editing pages in Expression Blend .
Let's add a panorama to our page and drag the already created items to the first PanoramaItem .
If we select the second PanoramaItem , then the editor will not switch to it. This creates minor problems when editing content on other elements of the panorama. If in this case the second Item is still slightly visible, then if you use more than 2 elements, or the page does not contain a panorama, but Pivot , it becomes unreal to work with them visually.
As a solution, I drag the Grid from other pages of the panorama onto the first one, and on it I am creating and editing elements, and then simply returning this Grid to the desired PanoramaItem . The same scheme works when editing the Pivot Page .
Filling application with test data
Directly to Windows Phone, this item does not apply, but I just could not leave the second page of the panorama blank :). SketchFlow supports the ability to generate data of various formats to fill the application with content.
The generated data can be 4 types: text, numeric, boolean, and images. For text data, there are the following presets: Lorem Ipsum (just the text with the given parameters), names, dates, addresses, phone numbers and many others. For numerical data, the length is indicated, and for images, the folder from which to take them.
You can create test data as follows: on the Data tab, click the Create Data Sample button and select New Sample Data there . As you can see, data can also be obtained from Xml, or with the help of some class.
Using the Edit Sample Values button, you can change the number of elements and edit the elements themselves.
In order to create a ListBox with the generated data, simply drag the required collection from the Data tab to our prototype. Then you can edit the ListBoxItemTemplate template to give the list the type we need. If you want to use the generated data somewhere else, then you need to use the Binding mechanism.
In my example, I created a ListBox on a new Grid , then dragged this Grid back into the second PanoramaItem . Thus, I managed to edit the contents of the second page of the panorama without any problems.
Conclusion
In this article, I tried to consider all the features of prototyping an application for Windows Phone using SketchFlow .
Download an example from the article: SkyDrive .
For more information, you can use the following links:
- 5 Helpful Windows Phone Mango SketchFlow Tutorials
- blend 3 and sketch flow: we prototype applications (speaker - girl)
- prototyping silverlight applications with expression sketchflow: part 2.
I wish you all a good acquaintance with the SketchFlow template for Windows Phone, and hopefully see you in Australia!
Source: https://habr.com/ru/post/138981/
All Articles