We collect your Bluetooth machine running on Android
At the last session, as usual, I carefully prepared for exams (that is, I did not know what to do), and as a lucky chance, I had a radio-controlled machine, large and beautiful, although clearly designed for children. After playing for about ten minutes, I wanted to upgrade it, namely, instead of an uncomfortable joystick with a range of 3 meters, use a bluetooth communicator. And it is more convenient, and the range is greater, and further improvements are clearly visible, which, as well as the process of screwing the communicator to a children's typewriter, will be discussed in this article.
In the past, my friends and I wrote our own firmware for Lego Mindstorms NXT robots, which supports remote control of the robot via bluetooth from the Android-communicator. For experiments, the Olimex SAM7 debug board with ARM7 on board was then purchased, which this time can be used as a control controller.
')
As the chassis we use the toy car body.
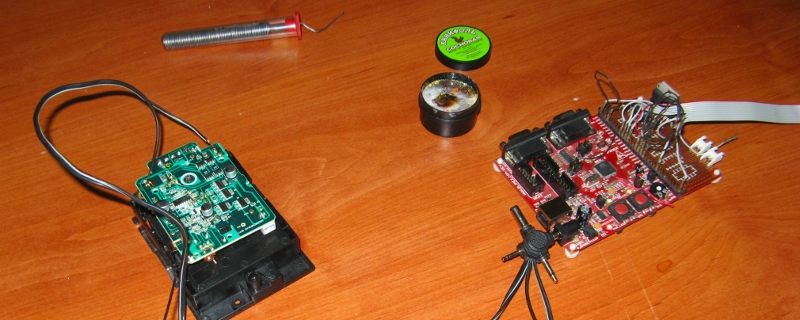
Need a bluetooth module. I wanted to get the result quickly, so the module was chosen from the only BTM-112 available in the store at the time, although it turned out to be relatively expensive.
In addition, it turned out that the control from the board cannot go directly to the motors, we need an amplifying controller (more on that later).
In total, our components are:
To begin with, we will configure the delivery of commands to the control unit. The connection scheme of the bluetooth module and the controller is simple: in fact, it is a UART with some control legs, that is, you just need to connect the module to the integrated UART controller.
The software component is not much more complicated. When connected, the module writes a string of the form
As promised, remote control is carried out using an Android-based communicator.
Our past Android application (which controlled Lego Mindstorms NXT, also via bluetooth) tracked the slope of the communicator with an accelerometer and sent the appropriate control commands to the NXT. So the simplest solution was to add a machine control protocol to an existing application. The protocol itself is rather primitive: a fixed command length, a fixed header, followed by control along the X and Y axes.
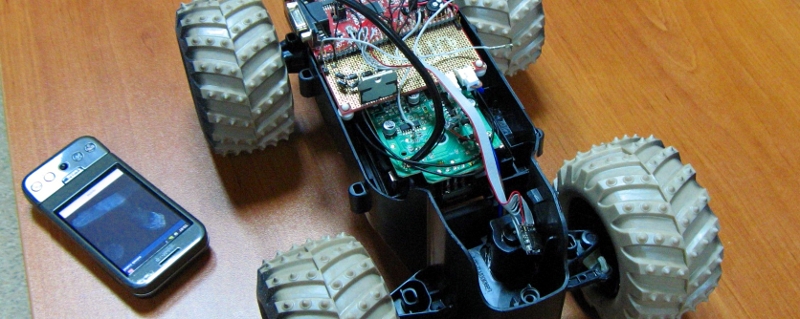
So, at this stage, we can “steer” our handkerchief, although the motors are not connected yet, so the indication of movements is made by the built-in LEDs (video, unfortunately, no, at this moment took only a photo), but there is still progress, it is visible and it warms the soul.
Initially, I thought that I could use the control from the old board (sewn into the machine itself), but it turned out that it could not be used in its pure form, since the control of the motors was firmly linked to the radio part. Controlling the motors directly from the legs of the head controller will not work either, due to the low output power of the chip. Unfortunately, I have no experience in this field (after all, I am a programmer, not a circuit designer), so I had to resort to the help of my acquaintances. On the advice, I took the L298N amplifier chip (redundant for my needs, but working out of the box) and assembled the reference circuit .
Let me remind you that the prepared machine is for children, and its control is a bit lame; when I started to deal with motors, I understood one of the reasons. For the mechanism of rotation is not used the servo, and the usual electric motor, which can be in one of three states (off, forward and backward). Thus, it is not necessary to dream of a smooth turn.
In general, the functional scheme is simple, one motor is used as an engine, the second motor is used as a steering wheel (it has a lock at a certain angle of rotation).
To control each motor, the voltage must be applied to the corresponding control legs (positive or negative voltage or zero). The voltage is measured between two points (control input feet), that is, I need to apply voltage to a pair of control legs something like this:
Since the Android application transmits smooth control, the state of the motors changes to overcome a given threshold.
The code is very simple, I will not give it here, but at the end of the post there are links to the source code of the entire project.
Movie with a working machine:
Clearly, there are drawbacks:
All code is publicly available.
The firmware for the Olimex board is here .
The Android application code is here , the compiled version on the Android Market .
Select components
In the past, my friends and I wrote our own firmware for Lego Mindstorms NXT robots, which supports remote control of the robot via bluetooth from the Android-communicator. For experiments, the Olimex SAM7 debug board with ARM7 on board was then purchased, which this time can be used as a control controller.
')
As the chassis we use the toy car body.
Need a bluetooth module. I wanted to get the result quickly, so the module was chosen from the only BTM-112 available in the store at the time, although it turned out to be relatively expensive.
In addition, it turned out that the control from the board cannot go directly to the motors, we need an amplifying controller (more on that later).
In total, our components are:
- Typewriter
- Controller Olimex SAM7
- Bluetooth module BTM-112
- Controller for controlling motors L298N
Connect bluetooth with control board
To begin with, we will configure the delivery of commands to the control unit. The connection scheme of the bluetooth module and the controller is simple: in fact, it is a UART with some control legs, that is, you just need to connect the module to the integrated UART controller.
The software component is not much more complicated. When connected, the module writes a string of the form
"CONNECT RE:MO:TE:BT:MA:CC xxx \r\n" , and when disconnected, it is "DISCONNECT xxx \r\n" . The task of the driver is to monitor the flow of characters and, if the connection is now active, transfer the stream to the control application. As a result, the driver is a state machine whose state switching means switching the handler function.Remote control
As promised, remote control is carried out using an Android-based communicator.
Our past Android application (which controlled Lego Mindstorms NXT, also via bluetooth) tracked the slope of the communicator with an accelerometer and sent the appropriate control commands to the NXT. So the simplest solution was to add a machine control protocol to an existing application. The protocol itself is rather primitive: a fixed command length, a fixed header, followed by control along the X and Y axes.
So, at this stage, we can “steer” our handkerchief, although the motors are not connected yet, so the indication of movements is made by the built-in LEDs (video, unfortunately, no, at this moment took only a photo), but there is still progress, it is visible and it warms the soul.
Connect control board with motors
Initially, I thought that I could use the control from the old board (sewn into the machine itself), but it turned out that it could not be used in its pure form, since the control of the motors was firmly linked to the radio part. Controlling the motors directly from the legs of the head controller will not work either, due to the low output power of the chip. Unfortunately, I have no experience in this field (after all, I am a programmer, not a circuit designer), so I had to resort to the help of my acquaintances. On the advice, I took the L298N amplifier chip (redundant for my needs, but working out of the box) and assembled the reference circuit .
Let me remind you that the prepared machine is for children, and its control is a bit lame; when I started to deal with motors, I understood one of the reasons. For the mechanism of rotation is not used the servo, and the usual electric motor, which can be in one of three states (off, forward and backward). Thus, it is not necessary to dream of a smooth turn.
In general, the functional scheme is simple, one motor is used as an engine, the second motor is used as a steering wheel (it has a lock at a certain angle of rotation).
To control each motor, the voltage must be applied to the corresponding control legs (positive or negative voltage or zero). The voltage is measured between two points (control input feet), that is, I need to apply voltage to a pair of control legs something like this:
| forward | reverse | off | ||
|---|---|---|---|---|
| PIN1 | one | 0 | 0 | one |
| PIN2 | 0 | one | 0 | one |
The code is very simple, I will not give it here, but at the end of the post there are links to the source code of the entire project.
Total
Movie with a working machine:
Clearly, there are drawbacks:
- Discrete left / right control, forward / backward. Now the motors are controlled by GPIO, but the lines selected for control can be reassigned under the PWM controller. Thus, the turns and acceleration will be smooth.
- Dear amp. Everything is simple, replaced with a cheaper chip or circuit with several transistors.
- Modest opportunities. Once the control is carried out using a smartphone, it is possible to expand the functionality in comparison with a simple control panel.
Where to look
All code is publicly available.
The firmware for the Olimex board is here .
The Android application code is here , the compiled version on the Android Market .
Source: https://habr.com/ru/post/138967/
All Articles