Shared hosting for Django (FreeBSD + Apache + mod_python / mod_wsgi)
 Creating a new project on Django, you once again climb to change the configuration of your web-server. And it seems to be okay, but only you change the configuration more often than you walk your dog. Somehow wrong? I agree (the dog, I think, also does not mind). Exit - virtual hosting. Having studied a couple of articles on the Internet, you fill in the configurations of your sites in httpd-vhosts.conf. And for a while, even enjoy it. Time passes and on the local host you no longer have two and a half sites, but dozens of projects (even small ones). And, once again opening httpd-vhosts.conf to add any option, you start thinking “Was there a boy?”, Did you really create this site? Indeed, in such okroshka from the projects it is not easy to find anything. And if we take into account that half of the projects interact with the web server using the mod_python module, and the other with the mod_wsgi module, for example, then it becomes sad to work at all. Yes, and life also becomes sad (and as your dog is sad at the door).
Here I will try to tell you how to make shared hosting more friendly, and at the same time how to configure the above modules (mod_python and mod_wsgi).
I do not think that I am discovering America with my own thoughts on this. But, I will be glad if someone my examples will help reduce the time spent on setting up this configuration, and spend it with greater benefit for yourself (or for your dog).
')
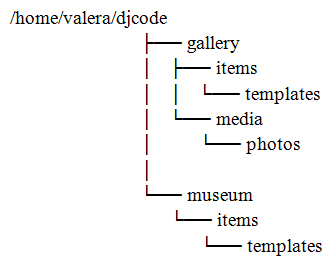
So, I will try to describe what I have and what should happen at the end of my solo performance. Python 2.7, Django 1.3 and Apache 2.2 web server are installed on the FreeBSD 9.0 operating system. My home directory contains two django-projects, ready to use. Things are easy - you need to select and install a module for Apache and Django interaction, and also set up virtual hosting for simultaneous management of several django projects. Here is my directory tree obtained with the tree command:
To deploy Django on a server, it is necessary to install and configure a module that interacts with a web server. There are several such modules. Which one to give preference depends on the properties and characteristics of the system, experience and psychological characteristics of the person making the choice, degree of sanity, curvature of the / dev / hands device, weather outside, etc. Simply put, a matter of taste. I am sure that everyone will have a lot of arguments in support of their favorite module. I will not argue, because I would not like to hear them all. I will cite only the setting of those modules with which I had to interact.
I just want to note that I am acting on behalf of the superuser, so in my listings there are no commands like su or sudo. I ask you not to forget about these magic words of those who set up the system under the account of a less privileged user.
So let's go!
MOD_PYTHON
The Apache web server with the mod_python module has historically always been considered the main working environment for Django (this combination was used by the creators of the Django platform as the basis of their highly loaded news sites). This module implements the Python language interpreter inside the web server and loads the code written in Python at the time the server is started. The code remains in memory all the time while the Apache process is running. Such a bunch of Apache + mod_python is still a well-tested and well-documented deployment option. But, this module is already obsolete, and its support will be removed in Django 1.5. Therefore, on the official website of Django, it is strongly recommended that when deploying a new project, consider using the mod_wsgi module (the topic of which we will touch on later in this article).
So mod_python. The module itself is in the ports, so install it from there:
# cd /usr/ports/www/mod_python3 # make install clean After installation, the module adds its settings to the Apache configuration file - httpd.conf. If you use a version control system to save the httpd.conf file (as it should be “in a normal family”), it means that before installing the port, do not forget to capture the file.
Next, open the above-mentioned httpd.conf for editing (I personally use the ee editor, but you can also use something radically different, such as vi):
# ee /usr/local/etc/apache22/httpd.conf It is necessary to check the presence of the following lines in this file:
LoadModule python_module libexec/apache22/mod_python.so
(loading mod_python module. This is the line that should have been added to the file automatically in the previous step.)User www Group www
(running the server on behalf of an unprivileged user. Although sometimes there are recommendations to run Apache as root, you should not do this. If an attacker hacks your web server, he will receive root rights on your system as an extra reward!)ServerName localhost
(web site name. It must be a real host name and have a corresponding entry in DNS. However, during testing, instead of a DNS entry, you can use an entry in / etc / hosts. Actually, this is what we will do. Therefore, I specified localhost in ServerName When testing on a local host, you may not add this line at all, but then the web server will suspiciously snort in your direction every time it is restarted.)
Immediately, in order not to forget, I will add an entry in / etc / hosts (these are the names of my sites):
127.0.0.1 gallery.ru museum.ru Now we will configure virtual hosting. In the case of virtual hosting, several host names refer to the same machine. The server should distinguish between requests to different domains, and then provide relevant pages. To enable the virtual hosts service function, you can uncomment the Include etc / apache22 / extra / httpd vhosts.conf line in the httpd.conf file and write the configurations of all our sites into one httpd-vhosts.conf file (as described above). But, since a single Apache server is able to serve a fairly decent number of virtual hosts, it is much more convenient to store the configuration of each such host in a separate file in the Includes directory (/ usr / local / etc / apache22 / Includes). If the name of the file contained in this directory has the .conf extension, then Apache automatically connects the configuration from this file on subsequent reloads. In addition, in order not to get lost in the set of files, we will assign them names containing the names of the domains that they will serve.
So, at the end of the httpd.conf file we add the following instructions:
Include etc/apache22/ Includes/*.conf NameVirtualHost * Then in the folder Includes create files with the names of our future sites:
# cd /usr/local/etc/apache22/Includes # touch gallery.ru.conf # touch museum.ru.conf All we have left now is to make the configuration settings in the newly created files. I will list only the gallery.ru.conf file:
<VirtualHost *> ServerName gallery.ru ServerAlias www.gallery.ru ServerAdmin test@test.ru DocumentRoot /home/valera/djcode/gallery <Location "/"> SetHandler python-program PythonHandler django.core.handlers.modpython SetEnv DJANGO_SETTINGS_MODULE gallery.settings PythonDebug On PythonPath "['/home/valera/djcode'] + sys.path" </Location> <Location "/media/"> SetHandler None </Location> </VirtualHost> <Directory /home/valera/djcode/gallery> Order allow,deny Allow from 127.0. </Directory> The file.ru.conf and all subsequent configurations of your sites are filled in the same way. I don't use images in the museum.ru project, so the following lines are not included in its config:
<Location "/media/"> SetHandler None </Location> That's actually all the cases. The only thing I would like to remind is that the web server should have write access to the directory containing image files, js scripts, etc. (in my case, this is the media folder). To do this, in the directory containing the media folder, follow these instructions:
# chgrp www media # chmod g+w media Restart the server:
# /usr/local/etc/rc.d/apache22 restart Enter in the browser line the name of our site (in my case, gallery.ru or museum.ru) and rejoice in not wasted time!
MOD_WSGI
Positioned as a mod_python replacement. The main advantage of the module is low memory consumption and high performance compared to mod_python, as well as the ability to work in daemon mode.
Now let's get a little easier. I will not explain why in a particular case I am doing this and not otherwise (all the answers can be found in the description of the previous module), but simply give the procedure and the necessary commands.
Install the module from the ports:
# cd /usr/ports/www/mod_wsgi3 # make install clean Open for editing httpd.conf:
# ee /usr/local/etc/apache22/httpd.conf We check the presence of the following lines in this file:
LoadModule wsgi_module libexec/apache22/mod_wsgi.so
(loading module mod_wsgi. This line should appear automatically when installing the module from the ports.)User www Group www
(starting the server as an unprivileged user)ServerName localhost
(web site name)
So, at the end of the httpd.conf file we add the following instructions:
Include etc/apache22/ Includes/*.conf NameVirtualHost * The entry in the / etc / hosts file is one-on-one, as for the previous module. That is, in my case:
127.0.0.1 gallery.ru museum.ru Next, in the Includes folder, create files with the names of our future sites:
# cd /usr/local/etc/apache22/Includes # touch gallery.ru.conf # touch museum.ru.conf Now we will enter the configuration settings in the newly created files. I will list only the gallery.ru.conf file:
<VirtualHost *> ServerName gallery.ru ServerAlias www.gallery.ru ServerAdmin test@test.ru WSGIScriptAlias / /home/valera/djcode/gallery/mod.wsgi Alias /media/ /home/valera/djcode/gallery/media/ </VirtualHost> <Directory /home/valera/djcode/gallery> Order allow,deny Allow from 127.0. </Directory> The file.ru.conf and all subsequent configurations of your sites are filled in the same way. I do not use images in the museum.ru project, so the following line is not included in its config:
Alias /media/ /home/valera/djcode/gallery/media/ It remains only to create the mod.wsgi file mentioned in the listing:
# cd /home/valera/djcode/gallery # touch mod.wsgi Here are its contents:
import os, sys sys.path.append('/home/valera/djcode') os.environ['DJANGO_SETTINGS_MODULE'] = 'gallery.settings' import django.core.handlers.wsgi application = django.core.handlers.wsgi.WSGIHandler() Make the media directory writable:
# chgrp www media # chmod g+w media Restart the server:
# /usr/local/etc/rc.d/apache22 restart Enter in the browser line the name of our site (in my case, gallery.ru and museum.ru) and, again, rejoice!
LAST ONE
As a result, we get a bunch of configuration files that are responsible for our sites in one single folder. In this case, all configs are broken down by name, and each contains on average no more than 30 lines of code. Compared to the monolithic configuration, when all settings are concentrated in one file, this approach allows you to simplify troubleshooting on the site.
If you need different sites to interact with the server through different modules, then you can customize each config in the way outlined above that you need. The main thing is to make sure that both modules are loaded in the httpd.conf file:
LoadModule python_module libexec/apache22/mod_python.so LoadModule wsgi_module libexec/apache22/mod_wsgi.so If you, like me, store all projects in one directory, then, to create a new config, it is enough to proceed as follows. Find a config that is similar to the one you have to create. Copy it, changing the file name. And to replace all those present in it, the names of the old site with the names of the new. I.e:
# cp old_site.ru.conf new_site.ru.conf # sed –i –e 's/old_site/new_site/g' new_site.ru.conf As a result, adding a new site to the web server configuration takes exactly as long as it takes to type two of the above commands on the keyboard and restart the server (in case of using the mod_wsgi module, a copy of the mod.wsgi file is also added).
On this seems to be finished. Have a nice day!
The books that influenced the train of thought in this article:
Source: https://habr.com/ru/post/138830/
All Articles