Twitter Bootstrap Starter UI
annotation
In the article I will try to talk about how Twitter Bootstrap can very easily implement the pleasant user interface of a small (one-page) web application, having only basic knowledge of html. Immediately I warn you, the specialists will not be interested, it will be about the basic standard functionality.
Introductory
In my spare time I develop a one-page aggregator of interesting news headlines as a hobby. At some point, the basic functionality of the prototype was ready, there was not enough mark just opposite the task "Design".
Formulation of the problem
Get a beautiful user interface, not owning the magic of the designer (there is only a basic knowledge of paint) and a programmer (there is only a basic knowledge of html and css).
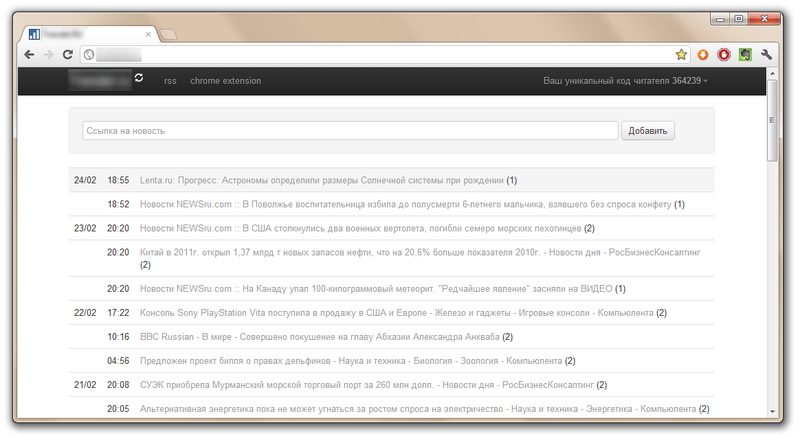
The page consists of the following elements.
- Title
- Form to send links to the news
- Form of sending a unique reader code to e-mail
- Input form for a unique reader code
- List of news grouped by date (date, time, title link, number of transitions, the news can be read or new)
- Rss link
- Chrome extension link
- release identifier
- e-mail feedback
')
Process
After several days of relaxed search for a ready-made template (css template), I came to the conclusion that this is not the way of a real Jedi, since all that went through the aesthetic filter, got stuck in the technical filter (see the formulation of the problem, I simply could not adapt a complex code to my needs). And now, almost by accident, I went to heaven . I will not describe in detail the Bootstrap, you can see the details by clicking on the link, list the main elements for which there are ready-made styles (sometimes several):
- Standard html formatting elements
- Lists
- Code snippets
- Tables
- Forms
- Buttons
- Navigation elements
- Tabs
- Pagination
- Thumbnails
- Informational messages
- Progress Bars
In my opinion, this is very cool. All you need to design a prototype. Next, I will tell you how I used the elements 1,4,5 and 7 from the list.
So, step 1. We connect Bootstrap
Download and unpack the archive with Bootstrap to the root folder of our site, connect css:
<head> ... <link href="/bootstrap/css/bootstrap.css" rel="stylesheet"> <link href="/bootstrap/css/bootstrap-responsive.css" rel="stylesheet"> ... </head> The second drain is needed to automatically adapt the interface for supported Bootstrap devices.
Step 2. We make out "meat".
By "meat" I mean the list of news. The easiest way to do this is to make a table with frames off. The first column is the date (only once for a group), the second column is the time, the third is the title and the number of transitions. All this, according to the rules of Bootstrap, needs to be packaged in a container:
<body> <div class="container"> <table class="table"> <tbody> <tr> <td>{}</td> <td>{}</td> <td><a href="{}">{}</a> ({ })</td> </tr> </tbody> </table> </div> </body> For read news, we indicate a special class:
<a href="{}" class="muted">{}</a> Step 3. Form of sending links to the news.
Here again, everything is simple, Bootstrap provides several ready-made form styles: the usual form, the form in one line, the search form ... We need the second, we finish it in our container in front of the table:
<div class="container"> <form class="well form-inline" method="post"> <input type="text" class="span10" placeholder=" " name="new_link"> <button type="submit" class="btn"></button> </form> ... </div> class = "span10" - Bootstrap involves building an interface based on a grid of 12 columns, our elements can be aligned with it. By scientific method of trial and error, I came to the width of the input field equal to 10.
Step 4,5,6. Cap.
My ideas about how a comfortable site should look like assume a minimalist style: everything unnecessary is hidden, everything that could not be hidden is pale. We hide the forms in the drop-down menu, make the links to rss and chrome extension pale. All this is packaged in the header, which we paste to the top of the site (class = "navbar navbar-fixed-top "):
<body> <div class="navbar navbar-fixed-top"> <div class="navbar-inner"> <div class="container"> <a class="brand" href="">***</a> <ul class="nav"> <li><a href="{}">rss</a></li> <li><a href="{}">chrome extension</a></li> </ul> <ul class="nav pull-right"> <li class="dropdown"> <a href="#" class="dropdown-toggle" data-toggle="dropdown"> <strong>{}</strong><b class="caret"></b></a> <ul class="dropdown-menu"> <li><a data-toggle="modal" href="#email"> e-mail</a></li> <li><a data-toggle="modal" href="#new_uid"> </a></li> </ul> </li> </ul> </div> </div> </div> ... </body> Forms themselves:
... <form method="post"> <div class="modal hide fade" id="email"> <div class="modal-header"> <a class="close" data-dismiss="modal">×</a> <h3> e-mail</h3> </div> <div class="modal-body"> <input type="text" class="span5" placeholder="e-mail" name="email"> <p class="help-block"> .</p> </div> <div class="modal-footer"> <button type="submit" class="btn" data-dismiss="modal"></button> <button type="submit" class="btn btn-primary"></button> </div> </div> </form> <form method="post"> <div class="modal hide fade" id="new_uid"> <div class="modal-header"> <a class="close" data-dismiss="modal">×</a> <h3> </h3> </div> <div class="modal-body"> <input type="text" class="span5" placeholder=" " name="new_uid"> <p class="help-block"> .</p> </div> <div class="modal-footer"> <button type="submit" class="btn" data-dismiss="modal"></button> <button type="submit" class="btn btn-primary"></button> </div> </div> </form> An important point. To make it work, you need to connect a couple of scripts:
<head> ... <script src="/bootstrap/js/jquery-1.7.1.js"></script> <script src="/bootstrap/js/bootstrap-dropdown.js"></script> <script src="/bootstrap/js/bootstrap-modal.js"></script> </head> Step 7. Footer.
We add the main container:
<div class="container"> ... <hr> <p class="pull-right muted"> 2012/02/19 23:49 *****</p> </div> Result
Epilogue
Twitter Bootstrap allowed without much effort and knowledge, without writing a single css line and without breaking the html-code, to get a very nice interface of the prototype, which is not ashamed to show people. If it’s interesting, in the next article I’ll tell you how to implement a functional without displaying deep knowledge of PHP + MySQL (with only basic programming skills) that allows you to show your idea for a million dollars not just on paper, but in the form of a working prototype.
Thanks for attention!
UPD: I do not want to remove the topic in “I am promoting”, removed all unnecessary links
Source: https://habr.com/ru/post/138818/
All Articles