PostGIS + Mapnik + TileCache on FreeBSD
Hello! There is a need on one of the servers in our network to do “something like openstreetmap.org”, but so that it all continues to work without being connected to the Internet.
Unfortunately, I did not find a good manual on the “Great and Mighty” about how to implement it, so after spending two days on it, I decided to tell about how I did it.
In general, there are many options for how to implement the required, but I decided to stop at this set of tools:
1. We put PostGIS
There were no problems with this, it is in ports, namely
After installation, you need to go to the
2. We put Mapnik
He himself is also in the ports:
After installation, you need to download the necessary utilities, here:
svn.openstreetmap.org/applications/rendering/mapnik (which ones we will need will be described below).
3. We put TileCache
TileCache is still easier - download the archive from here tilecache.org/tilecache-2.11.tar.gz .
Naturally, the setting is much more fascinating than the installation!
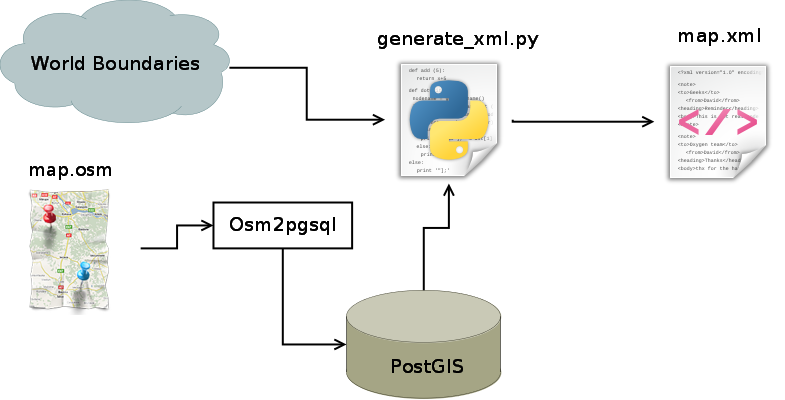
To begin with, I will explain in the picture how it should work:
So. First you need to get the osm file. There are many options for this, for example, export directly from openstreetmap.org (however, there are restrictions on the size of the area) or
download already ready export, for example from here: gis-lab.info/projects/osm_dump
This file must now be loaded into the PostGIS database, with a command like
where user is the login to the database, and RU-SPE.osm is the map to download. In my case, this is a map of St. Petersburg.
The console output should be something like this:
')
If there are no errors, then go further.
Now we need the borders and coastline of the whole world - this will be the substrate for our map. If this is not done, the substrate will be just one color.
To keep everything in one place and in order, create a folder / mapnik / in your home directory.
Now we move there and load these boundaries there, for this we use the commands:
Above, I promised to tell which utilities from svn.openstreetmap.org/applications/rendering/mapnik we would need.
So, we will need:
generate_xml.py (Most likely you will have to edit the file, and replace the import mapnik with import mapnik2 as mapnik)
osm.xml
and folders
inc /
symbols /
You may also need a script to update the osm.xml file, you can take it here: github.com/mapnik/mapnik/tree/master/utils/upgrade_map_xml
And you can download osm.xml, which I have already corrected from here: pastebin.com/bMsXytcc
Now we will generate map.xml, for this we will run:
where --accept-none means to accept untranslated parameters as empty.
We should have a fairly large map.xml file.
Already almost everything, it remains to configure only TileCache.
Download the downloaded archive to
In the first, you need to explain TileCache where to get the data from (and you need to take it from map.xml, which we just did).
To do this, add the same lines:
Important parameters here:
resolutions = ... this is the most interesting. These numbers are resolutions of different zoom levels, which should be such that when dividing them, the number 20037508.34 * 2/256 will give a power of two. This number is the side of the “square” of the world divided by the side of one tile (small square), which is by default equal to 256 pixels.
All other layers are best commented out to check that ours works.
Now go to index.html.
It is necessary to configure the function init (), for example:
It is necessary to pay attention to the following parameters:
Minor hint: allow apache to execute tilecache.cgi:
And
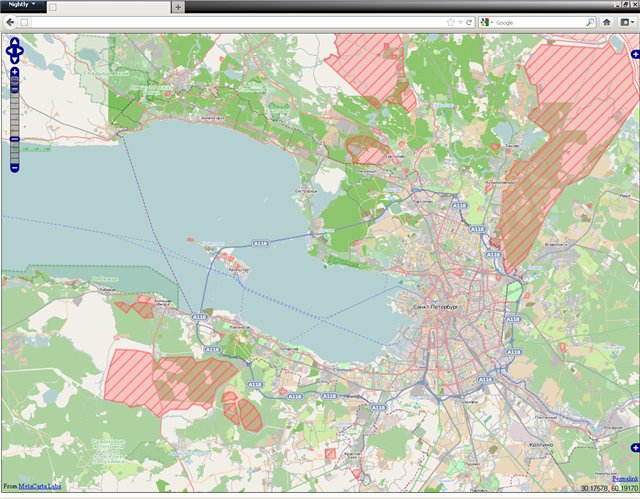
To check, you just need to open the tilecache folder with your browser and if everything went well, see just such a map (though Leningrad Region is still loaded here):
The result should be a server that can read data from the PostGIS database and turn it into tiles without an Internet connection.
I will try to answer questions if something goes wrong.
Unfortunately, I did not find a good manual on the “Great and Mighty” about how to implement it, so after spending two days on it, I decided to tell about how I did it.
What was given:
- FreeBSD 8.2
- PostgreSQL 8.4.9
- Apache 2.2
- Python 2.7.2
In general, there are many options for how to implement the required, but I decided to stop at this set of tools:
Installation
1. We put PostGIS
There were no problems with this, it is in ports, namely
/usr/ports/databases/postgisAfter installation, you need to go to the
/usr/local/share/postgis/contrib/postgis-1.5 folder and execute postgis.sql and spatial_ref_sys.sql there using the psql utility2. We put Mapnik
He himself is also in the ports:
/usr/ports/graphics/mapnikAfter installation, you need to download the necessary utilities, here:
svn.openstreetmap.org/applications/rendering/mapnik (which ones we will need will be described below).
3. We put TileCache
TileCache is still easier - download the archive from here tilecache.org/tilecache-2.11.tar.gz .
Customization
Naturally, the setting is much more fascinating than the installation!
To begin with, I will explain in the picture how it should work:
So. First you need to get the osm file. There are many options for this, for example, export directly from openstreetmap.org (however, there are restrictions on the size of the area) or
download already ready export, for example from here: gis-lab.info/projects/osm_dump
This file must now be loaded into the PostGIS database, with a command like
osm2pgsql -U user RU-SPE.osmwhere user is the login to the database, and RU-SPE.osm is the map to download. In my case, this is a map of St. Petersburg.
The console output should be something like this:
')
osm2pgsql SVN version 0.80.0 (32bit id space)

Using projection SRS 900913 (Spherical Mercator)
Setting up table: planet_osm_point
Setting up table: planet_osm_line
Setting up table: planet_osm_polygon
Setting up table: planet_osm_roads
Mid: Ram, scale=100

Reading in file: RU-SPE.osm
Processing: Node(1767k 176.7k/s) Way(264k 18.88k/s) Relation(7314 1828.50/s) parse time: 28s

Node stats: total(1767355), max(1633105798) in 10s
Way stats: total(264350), max(150391691) in 14s
Relation stats: total(7314), max(2024096) in 4s

Writing way (264k)

Writing relation (7314)
Committing transaction for planet_osm_point
Sorting data and creating indexes for planet_osm_point
Committing transaction for planet_osm_roads
Sorting data and creating indexes for planet_osm_roads
Committing transaction for planet_osm_line
Sorting data and creating indexes for planet_osm_line
Committing transaction for planet_osm_polygon
Sorting data and creating indexes for planet_osm_polygon
Indexes on planet_osm_roads created in 0s
Completed planet_osm_roads
Indexes on planet_osm_point created in 3s
Completed planet_osm_point
Indexes on planet_osm_line created in 4s
Completed planet_osm_line
Indexes on planet_osm_polygon created in 6s
Completed planet_osm_polygon

Osm2pgsql took 48s overall
If there are no errors, then go further.
Now we need the borders and coastline of the whole world - this will be the substrate for our map. If this is not done, the substrate will be just one color.
To keep everything in one place and in order, create a folder / mapnik / in your home directory.
Now we move there and load these boundaries there, for this we use the commands:
wget tile.openstreetmap.org/world_boundaries-spherical.tgz
tar xvzf world_boundaries-spherical.tgz
wget tile.openstreetmap.org/processed_p.tar.bz2
tar xvjf processed_p.tar.bz2 -C world_boundaries
wget tile.openstreetmap.org/shoreline_300.tar.bz2
tar xjf shoreline_300.tar.bz2 -C world_boundaries
wget www.naturalearthdata.com/http//www.naturalearthdata.com/download/110m/cultural/110m-admin-0-boundary-lines.zip
unzip 110m-admin-0-boundary-lines.zip -d world_boundaries
wget www.naturalearthdata.com/http//www.naturalearthdata.com/download/10m/cultural/10m-populated-places.zip
unzip 10m-populated-places.zip -d world_boundaries
Above, I promised to tell which utilities from svn.openstreetmap.org/applications/rendering/mapnik we would need.
So, we will need:
generate_xml.py (Most likely you will have to edit the file, and replace the import mapnik with import mapnik2 as mapnik)
osm.xml
and folders
inc /
symbols /
You may also need a script to update the osm.xml file, you can take it here: github.com/mapnik/mapnik/tree/master/utils/upgrade_map_xml
And you can download osm.xml, which I have already corrected from here: pastebin.com/bMsXytcc
Now we will generate map.xml, for this we will run:
./generate_xml.py osm.xml --host localhost --user user --dbname gis --symbols symbols/ --world_boundaries world_boundaries/ --port 5432 --epsg='900913' --accept-none > map.xmlwhere --accept-none means to accept untranslated parameters as empty.
We should have a fairly large map.xml file.
Already almost everything, it remains to configure only TileCache.
Download the downloaded archive to
/usr/local/www/data/tilecache . Here you need to configure only two files: tilecache.cfg and index.html.In the first, you need to explain TileCache where to get the data from (and you need to take it from map.xml, which we just did).
To do this, add the same lines:
[osm-map]
type=MapnikLayer
mapfile=/usr/home/user/mapnik/map.xml
spherical_mercator=true
bbox=-20037508.34,-20037508.34,20037508.34,20037508.34
resolutions=2445.984375,1222.9921875,611.49609375,305.748046875,152.8740234375,76.43701171875,38.218505859375,19.1092529296875,9.55462646484375,4.777314,2.388657,1.1943285,0.59716427,0.298582
metaTile=true
metaSize=8,8
metaBuffer=40
levels=12
extent_type=loose
Important parameters here:
mapfile=/usr/home/user/mapnik/map.xml path to the data filebbox=-20037508.34,-20037508.34,20037508.34,20037508.34 borders of the region. These are borders for the whole world, you can read more here: docs.openlayers.org/library/spherical_mercator.htmlresolutions = ... this is the most interesting. These numbers are resolutions of different zoom levels, which should be such that when dividing them, the number 20037508.34 * 2/256 will give a power of two. This number is the side of the “square” of the world divided by the side of one tile (small square), which is by default equal to 256 pixels.
All other layers are best commented out to check that ours works.
Now go to index.html.
It is necessary to configure the function init (), for example:
function init(){

map = new OpenLayers.Map("map", {
maxExtent: new OpenLayers.Bounds(-20037508.34,-20037508.34,20037508.34,20037508.34),
numZoomLevels:14,
maxResolution:156543.03125/64,
units:'m',
projection: "EPSG:900913",
displayProjection: new OpenLayers.Projection("EPSG:4326")
});

layer = new OpenLayers.Layer.WMS( "OSM",
"tilecache.cgi?", {layers: 'osm-map', format: 'image/png'} );
map.addLayer(layer);
map.addControl(new OpenLayers.Control.Permalink());
map.addControl(new OpenLayers.Control.PanZoomBar());
map.addControl(new OpenLayers.Control.LayerSwitcher({'ascending':false}));
map.addControl(new OpenLayers.Control.Permalink());
map.addControl(new OpenLayers.Control.Permalink('permalink'));
map.addControl(new OpenLayers.Control.MousePosition());
map.addControl(new OpenLayers.Control.OverviewMap());
map.addControl(new OpenLayers.Control.KeyboardDefaults());

if (!map.getCenter()) {
var proj = new OpenLayers.Projection("EPSG:4326");
var point = new OpenLayers.LonLat(30, 60);
map.setCenter(point.transform(proj, map.getProjectionObject()),4);
}
}
It is necessary to pay attention to the following parameters:
maxExtent: new OpenLayers.Bounds(-20037508.34,-20037508.34,20037508.34,20037508.34) borders should be exactly the same as in tilecache.cfg.maxResolution:156543.03125/64 is 2445.984375, i.e. maximum resolution.map.setCenter(point.transform(proj, map.getProjectionObject()),4); setting the center of the map and the initial zoom so that you can see the general plan of St. Petersburg.Minor hint: allow apache to execute tilecache.cgi:
<Directory "/usr/local/www/data/tilecache">
AllowOverride None
Options None
Order allow,deny
Allow from all
And
chmod 755 tilecache.cgiCheck
To check, you just need to open the tilecache folder with your browser and if everything went well, see just such a map (though Leningrad Region is still loaded here):
Total
The result should be a server that can read data from the PostGIS database and turn it into tiles without an Internet connection.
I will try to answer questions if something goes wrong.
Source: https://habr.com/ru/post/138791/
All Articles