Deploying Java applications to Windows Azure using ant

This article discusses the use of the popular ant tool:
- Build Java applications for Windows Azure using ant
- Laying out the collected packages in Windows Azure and using a local emulator
Before you begin, it is recommended that you familiarize yourself with general information about Windows Azure - Windows Azure e-book - Microsoft cloud platform and 24 articles about Windows Azure in Russian . To work with Java applications in Windows Azure, we will use the Windows Azure Starter Kit for Java (for Eclipse users, there is the Windows Azure Plugin for Eclipse plugin ). Windows Azure Starter Kit for Java uses Apache Ant as a tool in the build process - documentation on it is available here: Apache Ant manual (available materials are also available in Russian: Ant in 10 steps (make ant java) or Apache Ant 101: Instant build Java programs ). The article describes the use of the Windows Azure emulator — you can install it in the Downloads section of the Windows Azure site (the “Emulators” link); for more information, see Windows Azure Emulators On Your Desktop
Windows Azure Starter Kit for Java
In the Downloads section there is a link to a ZIP file within which a project template is contained - to get started, it is enough just to unpack the contents of the archive. In addition to the standard Java components within the project, there are several files that facilitate work with Windows Azure.')

Key elements of the project template
| File | Description |
| .cspack.jar | Implement ant windowsazurepackage tasks |
| ServiceConfiguration.cscfg | Windows Azure service configuration file |
| ServiceDefinition.csdef | Windows Azure service configuration file |
| package.xml | Configuration file (script) for ant |
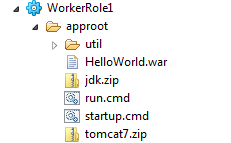
| WorkerRole1 \ approot \ HelloWorld.war | A simple example of the implementation of upload. |
| WorkerRole1 \ approot \ startup.cmd | This startup script (batch file) is launched each time the reloading process starts. In this file, you must implement all the actions that must be done when starting an instance of WindowsAzure - such as installing and configuring individual components, such as installing and starting a Java application server. |
| samples | Inside this directory are examples of installing and configuring popular Java application servers (Tomcat, JBoss, GlassFish, Jetty, etc.) - these examples can be used to create the desired startup.cmd implementation. |
| WorkerRole1 \ approot \ run.cmd | This script (batch file) is launched every time after the reupload procedure starts. It is assumed that this script runs all the time while the application is in working condition. In case there was an exit from this script, Azure assumes that the instance data needs to be restarted. In the template, an example run.cmd is implemented in which you can see a call to another script - util \ whileproc.cmd with the java.exe parameter. The whileproc.cmd script (located in WorkerRole1 \ approot \ util) every 15 seconds checks that the java.exe process is running. |
| WorkerRole1 \ approot \ util unzip.vbs | The script (visual basic script) implements the unpacking of zip archives - this script is useful for implementing startup.cmd in cases when you may need to unpack the zip archives. |
| WorkerRole1 \ approot \ util download.vbs | The script (visual basic script) implements the loading of the specified URL in the approot folder. This script can be very useful when implementing startup.cmd in cases when you need to download any data - it can be downloading a large distribution (in order not to include this distribution in the package of our application for Windows Azure), for example, the Java distribution package. A link (URL) can point to any resource that does not require authentication (including data hosted in anonymous access blobs - see Restricting Access to Containers and Blobs ) or links to which all information required for authorization is contained in URL itself (for example, it can be blobs with a shared access signature enabled). |
| cert \ SampleRemoteAccessPrivate.pfx | An example of a private key with a certificate that can be downloaded via the Windows Azure web portal to allow access via Remote Desktop to the running instance of Windows Azure - see Remote Desktop or Microsoft Windows Azure. Fast start. Part 4. Inside a Windows Azure virtual machine |
| cert \ SampleRemoteAccessPublic.cer | An example of a public key with a certificate - this key should be used in conjunction with a private key to gain access via Remote Desktop - for more details, see Remote Desktop or Microsoft Windows Azure. Fast start. Part 4. Inside a Windows Azure virtual machine |
Selection of the start script implementation
The project template allows you to use different Java application servers: Tomcat, Jetty, JBoss and GlassFish (use with other application servers is also possible, but with some changes to the settings). To configure a template for a specific Java server, you need to take the corresponding startup script (they are in the samples folder) and copy the contents of this script into the startup.cmd script (thus completely replacing its contents). Further, if you need to make any changes to the startup script, it is recommended to immediately make them into startup.cmdAdding the jdk.zip package to approot
For example, we will consider using JDK v1.6 from
Adding java server package to approot
The next step is to add the selected Java application server to approot - to minimize changes in the startup script, it is recommended to use the default names. Depending on the selected server, rename the packaged archive in ZIP with Java server in accordance with the table.| Server | File name |
| Apache Tomcat 7.x | tomcat7.zip |
| GlassFish Server OSE 3.x | glassfish3.zip |
| JBoss Application Server 6.x | jboss6.zip |
| JBoss Application Server 7.x | jboss7.zip |
| Jetty 7.x | jetty7.zip |
The next step is to set the correct value for the SERVER_DIR_NAME variable in the start script - the variable should indicate the directory in which the Java server will be unpacked. As a rule, it is enough to set it equal to the name of the folder with the Java server inside the ZIP file. The reason why the name of the folder for unpacking the Java server is best chosen to be equal to the name of the folder inside the ZIP is that, as a rule, different releases of the Java server have a strong connection between the version and the directory name. The examples in samples contain values that may no longer be relevant and do not correspond to the latest releases of Java servers, so it is recommended to update the SERVER_DIR_NAME value in accordance with the version used. For example, in the example for Apache Tomcat (file samples / startupApacheTomcat7.txt), the value of this variable is set to SET SERVER_DIR_NAME = apache-tomcat-7.0.22. It is likely that by the time you read this document, version 7.0.22 will not be the last, and accordingly you will use the new version (for example, 7.0.29), so do not forget to update the value of the SERVER_DIR_NAME variable accordingly (in this case, on SERVER_DIR_NAME = apache -tomcat-7.0.29). If this is not done, it is highly likely that the application will not even be able to correctly deploy on the running instance. I would also like to note that a frequent source of errors is the use of extra (and imperceptible) spaces when initializing this variable - please note that the initialization string should look like this (without double quotes) "SET SERVER_DIR_NAME = apache-tomcat-7.0.29" and after = sign, as well as after the end of the initialization string (after the 9 character in this case) there should be no spaces. After this step you can already try building and running this project in the local Windows Azure emulator - you should see that the Java server is OSCAL and HelloWorld application is set correctly. The HelloWorld application is included in the default template - you can see it in approot, the value of WAR_NAME in the start script also indicates this application. After you tried to start the Java server and deploy the "Hello World" application, you can proceed to the next steps - if you do not plan to connect another Java application, you can skip the next section and go straight to building and testing the application.
Java Application Preparation
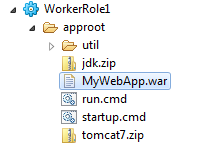
To begin, I would like to once again draw attention to the fact that projects in Windows Azure are deployment projects, and not Java programming projects (moreover, in the Windows Azure project, there may be no Java code at all). That is, it is assumed that there is already a Java application that you are developing and it is possible to create a WAR file that contains the application. Then the steps to incorporate the application into a Windows Azure project will be as follows:- Create a WAR file with the application (for example, MyWebApp.war).
- Copy this WAR file to approot (this step can be added to the procedure for creating WAR files)
- In the startup script startup.cmd, modify the variable WAR_NAME accordingly - in our case WAR_NAME = MyWebApp.war
Assembly and testing in the Windows Azure emulator
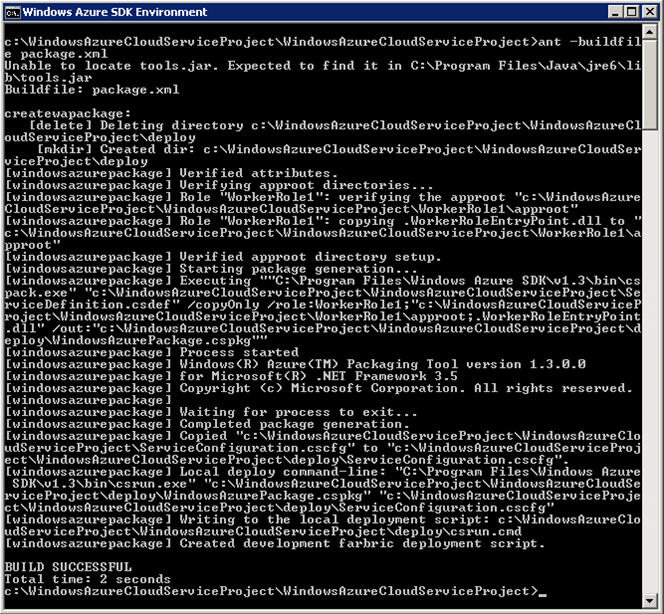
Open a Windows command prompt, go to the folder where the project is located and run ant:ant -buildfile package.xml
This command tells ant to use the information from package.xml to build the application. The assembly process may take some time and be long enough, depending on the size of the application and the performance of the computer. If the build is completed successfully, you will see a message in the command line window stating that "BUILD SUCCESSFUL", it may look like this:
By default, the project is configured to be localized to the emulator (the setting is set by the packagetype parameter in the package.xml file — by default packagetype = "local"). A folder named "emulatorTools" is created immediately after the "deploy" folder during project building. The folder "emulatorFolder" contains two scripts (batch files) that allow you to more conveniently work with the Windows Azure emulator - upload the project, restart the service, start it:
- RunInEmulator.cmd - this script starts the Windows Azure cloud emulator on the local computer and uploads the project to this environment. If the project uses storage and you plan to use a Windows Azure storage emulator, you need to run the Azure Storage emulator separately.
- ResetEmulator.cmd - deletes all running instances of the application in the local Azure Compute Emulator emulator, unlocks the files that the emulator used and turns off the application factory. This command should be used at the end of testing or debugging the application.
cd emulatorToolsRunInEmulatorIf everything went well, the application will be launched on port 8080 - this can be checked by opening the link http: // localhost: 8080 / MyWebApp in a web browser
Changes in the project for laying out in Windows Azure
In order to make the project available to work in the Windows Azure cloud, we need to make a few changes in the package.xml file. In this file there is a special windowsazurepackage tag that defines the configuration of putting the project into a local or remote Windows Azure cloud environment.<windowsazurepackage packagefilename="WindowsAzurePackage.cspkg" packagedir="${wapackagedir}" packagetype="local" projectdir="${basedir}" definitionfilename="ServiceDefinition.csdef" configurationfilename="ServiceConfiguration.cscfg"
>
Pay attention to the packagetype attribute - when the value of this attribute is packagetype = "local", then the structure of the assembled project will be exactly the same as for use in the Windows Azure cloud, but the assembly itself will not be packaged for download, but rather prepared for running in the Windows emulator environment Azure. If the value of the packagetype = "cloud" attribute is then the assembly will be archived as a .cspkg file — you can upload the .cspkg and .cscfg files to the cloud through the Windows Azure web portal and deploy and launch the application in the cloud.
Laying out a project in Windows Azure
Laying out the application in the Windows Azure cloud is quite simple - you enter the Windows Azure portal using your login / password and take two simple steps:- Downloading PFX certificates (if this has not been done before). This step is required to enable remote access to running virtual machines in the Windows Azure cloud via Remote Desktop — remote access is useful when developing, debugging, and testing applications in Windows Azure — for more details, see Remote Desktop or Microsoft Windows Azure. Fast start. Part 4. Inside a Windows Azure virtual machine
- We create a new deployment (deployment) and load the .cspkg and .cscfg files that were created during the build process of the application for Azure.
useful links
- Windows Azure website
- Windows Azure e-book - Microsoft cloud platform
- 24 articles about Windows Azure in Russian
- Windows Azure Development Center
- Microsoft Windows Azure. Fast start
Source: https://habr.com/ru/post/138785/
All Articles