Semi-Prezi in 10 minutes in .NET and WPF
It will be about creating a program to play a presentation like the Prezi web service, although a similar concept could be seen earlier in PowerPoint 2010 in one of the standard templates.
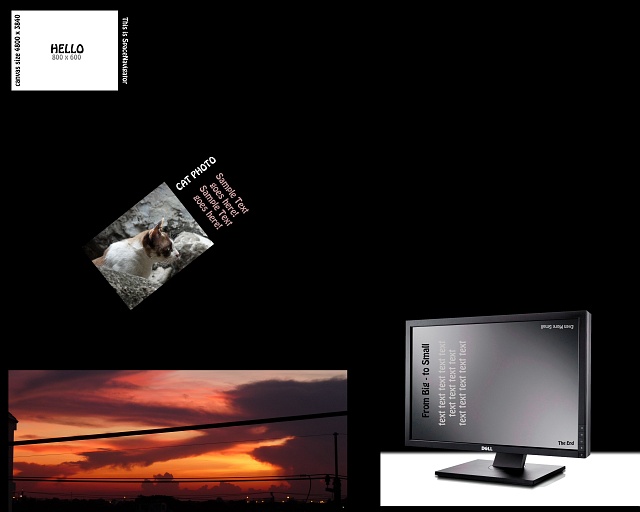
The difference from the usual presentation in the form of slides is the presence of a solid background, like a canvas for content, where moving from one area with content to another occurs by moving, zooming and turning.
')
So, we do something similar in .NET and WPF. Personally, I like VB.NET (probably due to the lack of {...}, which occupy the whole line in C #).
Necessary: VisualStudio, Framework 4 and a healthy picture, for example 4800x3800, drawn in Photoshop with some content (you can stick a couple of slides by exporting from PowerPoint):
In VisualStudio, we create an empty WPF project and add the following cases to the “form”:
ImageBg background image with a banner under the form, a ScrollViewer component with hidden bars and another Image1 image in it without stretching.
Set the variables:
Preload images into Window_Loaded:
Files bg.jpg with some background (for example in black color) and content.jpg need to be put in the Debug folder.
You can also add a .png transparency mask to the content, but for now this is unnecessary.
In the same place after loading the image we register the transformation parameters:
Those. a transformation group is created, which includes three separate types of transformation.
We set the initial state of the content so that the big picture fits into the screen with a small gap (humanly this is done with the Stretch and Margin properties, but in this case it is necessary through transformation):
Loading lists of steps from file:
File structure: each line is a new step, and in a line there are 5 parameters separated by a comma (scale, angle, x and y coordinates, movement time)
Add the processing of moving between steps:
There are just 4 animations for scale, angle and coordinates (of course, variables could be set in advance for the purity of the code, but it is also almost compact).
Actually that's all in essence.
It remains to write a set of steps in a text file loc.ini, for example:
And activate the switch between steps in the code:
If you clicked on the left side of the content image - one step back, on the right - forward.
For normal operation, of course, you need a setup mode and then save the new parameters. But here I will not describe it, and you can download the working beta version here . To start you need a framework 4 .
You can also improve the program in many areas - add support for vector content (which is closer to Prezi), save the project, add a multi-touch for customization, quick navigation, change the content canvas and so on.
The difference from the usual presentation in the form of slides is the presence of a solid background, like a canvas for content, where moving from one area with content to another occurs by moving, zooming and turning.
')
So, we do something similar in .NET and WPF. Personally, I like VB.NET (probably due to the lack of {...}, which occupy the whole line in C #).
Necessary: VisualStudio, Framework 4 and a healthy picture, for example 4800x3800, drawn in Photoshop with some content (you can stick a couple of slides by exporting from PowerPoint):
In VisualStudio, we create an empty WPF project and add the following cases to the “form”:
ImageBg background image with a banner under the form, a ScrollViewer component with hidden bars and another Image1 image in it without stretching.
<Grid Name="Grid1"> <Image Name="ImageBg" Stretch="Fill"/> <ScrollViewer HorizontalScrollBarVisibility="Hidden" VerticalScrollBarVisibility="Hidden"> <Image Name="Image1" Stretch="None"/> </ScrollViewer> </Grid> Set the variables:
' Dim base_dir As String = System.AppDomain.CurrentDomain.BaseDirectory() ' Dim trTranslate As New TranslateTransform ' Dim trRotate As New RotateTransform ' Dim trScale As New ScaleTransform ' (- ) Dim stp As Integer = 0 '- Dim stp_count As Integer = 0 ' Dim ease As New PowerEase ' (, , ) Dim init_s, init_a As Double Dim init_x, init_y As Integer ' (, , ) Dim new_z(99) As Double Dim new_a(99) As Double Dim new_x(99) As Double Dim new_y(99) As Double Dim new_t(99) As Double Preload images into Window_Loaded:
ImageBg.Source = New BitmapImage(New Uri(base_dir + "bg.jpg"))
Image1.Source = New BitmapImage(New Uri(base_dir + "content.jpg"))
Files bg.jpg with some background (for example in black color) and content.jpg need to be put in the Debug folder.
You can also add a .png transparency mask to the content, but for now this is unnecessary.
In the same place after loading the image we register the transformation parameters:
Dim transf_grp As New TransformGroup
transf_grp.Children.Add(trTranslate)
transf_grp.Children.Add(trRotate)
transf_grp.Children.Add(trScale)
Image1.RenderTransform = transf_grp
Those. a transformation group is created, which includes three separate types of transformation.
We set the initial state of the content so that the big picture fits into the screen with a small gap (humanly this is done with the Stretch and Margin properties, but in this case it is necessary through transformation):
init_s = Math.Round(Grid1.ActualWidth / (Image1.Source.Width + 50), 2)
init_a = 0
init_x = 50
init_y = (Grid1.ActualHeight - (Image1.Source.Height) * init_s) * 2
trScale.ScaleX = init_s
trScale.ScaleY = init_s
trRotate.Angle = init_a
trTranslate.X = init_x
trTranslate.Y = init_y
Loading lists of steps from file:
If File.Exists(base_dir + "loc.ini") Then
Dim oRead As System.IO.StreamReader = File.OpenText(base_dir + "loc.ini")
Dim data(99) As String
Dim i As Integer = 0
Do While oRead.Peek >= 0
i += 1
data(i) = oRead.ReadLine()
Dim param() As String = data(i).Split(",")
new_z(i) = CDbl(param(0))
new_a(i) = CDbl(param(1))
new_x(i) = CDbl(param(2))
new_y(i) = CDbl(param(3))
new_t(i) = CDbl(param(4))
If new_z(i) <> 0 Then stp_count += 1
Loop
oRead.Close()
End If
File structure: each line is a new step, and in a line there are 5 parameters separated by a comma (scale, angle, x and y coordinates, movement time)
Add the processing of moving between steps:
Private Sub NavigationStep()
Dim Z_anim As New DoubleAnimation(trScale.ScaleX, new_z(stp), TimeSpan.FromSeconds(new_t(stp)))
Dim A_anim As New DoubleAnimation(trRotate.Angle, new_a(stp), TimeSpan.FromSeconds(new_t(stp) / 2))
Dim X_anim As New DoubleAnimation(trTranslate.X, new_x(stp), TimeSpan.FromSeconds(new_t(stp)))
Dim Y_anim As New DoubleAnimation(trTranslate.Y, new_y(stp), TimeSpan.FromSeconds(new_t(stp)))
ease.EasingMode = EasingMode.EaseInOut
Z_anim.EasingFunction = ease
A_anim.EasingFunction = ease
X_anim.EasingFunction = ease
Y_anim.EasingFunction = ease
trScale.BeginAnimation(ScaleTransform.ScaleXProperty, Z_anim)
trScale.BeginAnimation(ScaleTransform.ScaleYProperty, Z_anim)
trRotate.BeginAnimation(RotateTransform.AngleProperty, A_anim)
trTranslate.BeginAnimation(TranslateTransform.XProperty, X_anim)
trTranslate.BeginAnimation(TranslateTransform.YProperty, Y_anim)
End Sub
There are just 4 animations for scale, angle and coordinates (of course, variables could be set in advance for the purity of the code, but it is also almost compact).
Actually that's all in essence.
It remains to write a set of steps in a text file loc.ini, for example:
1.5,0,-70,-40,1.5
2,-100,-1200,-100,2
3,85,110,-640,1
4,35,-735,-1800,0.5
And activate the switch between steps in the code:
Private Sub Image1_MouseUp(ByVal sender As System.Object, ByVal e As System.Windows.Input.MouseButtonEventArgs) Handles Image1.MouseUp
If Not setup_mode And Not sel_mode Then
If e.GetPosition(Grid1).X < Grid1.ActualWidth / 2 Then
stp -= 1
If stp <= 0 Then stp = stp_count
NavigationStep()
End If
If e.GetPosition(Grid1).X >= Grid1.ActualWidth / 2 Then
stp += 1
If stp = stp_count + 1 Then stp = 1
NavigationStep()
End If
End If
End Sub
If you clicked on the left side of the content image - one step back, on the right - forward.
For normal operation, of course, you need a setup mode and then save the new parameters. But here I will not describe it, and you can download the working beta version here . To start you need a framework 4 .
You can also improve the program in many areas - add support for vector content (which is closer to Prezi), save the project, add a multi-touch for customization, quick navigation, change the content canvas and so on.
Source: https://habr.com/ru/post/138593/
All Articles