Practical application of DNSSEC
The article describes the shortcomings of the existing DNS structure, the full implementation of DNSSEC using the example of the .com and .org domains, the procedure for creating a valid self-signed SSL certificate signed with DNSSEC.
')
What is bad DNS
The current DNS system was developed over 20 years ago, when information protection was not particularly thought of. It has several fundamental vulnerabilities.
The reliability of the DNS server response is not verified. This allows you to send the user who accessed the domain name to an arbitrary IP address, replacing the server's response. In practice, such an attack might look like this .
Caching DNS servers of providers acting as resolvers for clients are also vulnerable: Attack of Kaminsky .
Today, there are technologies that include storing public keys in DNS records, for example, DKIM signatures in email, SSH keys in SSHFP records, etc. All of these technologies require protection against DNS fraud.
DNSSEC theory
DNSSEC is a technology that allows you to uniquely verify the authenticity of DNS information using a cryptographic signature.
Popular DNSSEC can be found here: dxdt.ru/2009/03/04/2163
In more detail here: habrahabr.ru/blogs/sysadm/120620
And on the site Verisign.com
Before proceeding, it is strongly recommended that you carefully read the above links, since at first glance the procedure for signing the zone seems rather confusing.
As simplified as possible, it looks like this: there is a root zone ".", Which contains information about all the first-level domains. Relatively speaking, this is a text file with some set of lines that does not change very often. A public / private key pair is created and each line in this file is signed (with the “clear sign” type in PGP / GPG, which is used in e-mail for open text signing and starts with “BEGIN PGP SIGNATURE”).
Now, having the public key of this pair, you can verify the authenticity of each entry in this list. For example, check that the ripn.net servers are really responsible for the “ru.” Zone:
dig -t any + dnssec @ k.root-servers.net en.
In the response, you can see the RRSIG record containing the hash signature.
But this is not enough, since downstream servers are involved in the rezolve, whose responses also need to be verified. Then the owners of the top-level domain, for example “com.”, Create the same pair of keys and sign all the records in their zone, and then add an impression of their public key to the root zone. As a result, by trusting the public key of the root zone, you can verify the authenticity of the key of the “com.” Zone and, accordingly, trust it:
dig -t any + dnssec @ k.root-servers.net com.
In the response, the DS record contains a key cast that signs the “com.” Zone.
It is important to understand that after each change in the zone, the signing occurs again. But, since the root zone only signs the public key of the “com.” Zone, there is no need to re-record the records in the root zone with each change in the “com.” Zone
Now you can authenticate responses from servers responsible for the “com.” Domain:
dig + dnssec -t any @ a.gtld-servers.net verisign.com.
It is seen that the domain record verisign.com. signed, but at this stage it is possible to establish only the authenticity of the addresses of the NS servers responsible for the domain verisign.com. To resolve IP addresses, you need to get a response from them, so the owners of these NS servers have their own pair of keys that sign the zone and put the public key impression in the DS record.
We request an A-record for the domain verisign.com .:
dig + dnssec -ta verisign.com @ a2.nstld.com
As a result, the following chain of trust is built up to verify the authenticity of the fact that the A-record of verisign.com contains the value 192.5.6.31:
we already know the public key of the root zone "." and we trust him. In the root zone there is a DS-record that all the records of the “com.” Zone are signed by the key specified in it and the record itself, respectively, is signed by the key of the root zone. Having verified the authenticity of this record, we trust all the records in the “com.” Zone signed by this key. The servers responsible for the “com.” Zone contain the DS-record with the public key verisign.com, signed with the key of the “com.” Zone, which allows you to verify the authenticity of the signature in the answer of the NS server responsible for verisign.com.
Schematically it looks like this:

The above description is quite primitive and ridiculous. It is written to explain the principle of work "on the fingers." Probably, it will not in the least simplify understanding, but only further confuse.
DNSSEC implementation practices
Attention! This instruction is outdated. Signing a zone without using NSEC3 allows you to detect all DNS records of a zone.
Current instruction www.digitalocean.com/community/tutorials/how-to-setup-dnssec-on-an-authoritative-bind-dns-server--2
Currently, only some top-level domain zones have been signed, in particular: .net, .com, .org.
The .ru zone has not yet been signed, the .ua zone is signed in test mode, the .su zone is officially signed, but so far no registrar supports the addition of DS records.
The full list can be viewed on the ICANN website.
To sign your zone, this feature must be supported by a domain registrar. At the moment, I do not know the domestic registrars supporting DNSSEC. Registrar R01 and dnssec.ru, which advertises the delegation of .ru domains with DNSSEC support, are absurd, because the .ru zone itself is not signed and, in this case, the starting point for building the trust chain is the R01 server.
Among the supporters it is possible to single out the largest ones:
- Godaddy.com
- Dyn.com
- 101domain.com
- GKG.net
UPD: Now nic.ru also supports DNSSEC www.nic.ru/news/2012/dnssec.html
A partial list can be found here .
In addition to the registrar, NS-servers with DNSSEC support are required. Some registrars provide such services. The cheapest option for Godaddy is called Premium DNS $ 35 / year. The most expensive from dyn.com called DynECT Lite $ 30 / month. This article will show an example of setting up your own master DNS server based on BIND 9.7.3.
Further it is assumed that we already have a domain delegated to our own, fully configured DNS, and ready-made zone file.
To enable DNSSEC support in named.conf in the options section, add:
 options {
        ...
       dnssec-enable yes;
        ...
 };
Tools for generating keys and signing zones are included in the latest BIND package.
At this stage, it is assumed that the reader already knows what ZSK (Zone Sign Key) and KSK (Key Sign Key) are.
All the operations below must be carried out in a separately created folder.
ZSK key generation:
dnssec-keygen -a RSASHA1 -b 1024 -n ZONE my-domain.com
KSK key generation:
dnssec-keygen -a RSASHA1 -b 2048 -f KSK -n ZONE my-domain.com
where my-domain.com is the domain for which keys are generated. As a result of these commands, two pairs of keys will be created.
Next, you need to copy the zone file into the current folder and sign it:
dnssec-signzone -S -N INCREMENT my-domain.com
where my-domain.com is a zone text file. It is important to execute the command, being in the same folder with the keys and the zone file; The file name is specified without a path.
As a result, two files will be created:
my-domain.com.signed - signed zone file
dsset-my-domain.com - a file containing two DS-records
The source zone file will remain unchanged. Next, in the BIND config, you need to replace the file with a signed one:
  zone "my-domain.com" {
         type master;
         file "my-domain.com.signed";
	 allow-query {any;  };
         allow-transfer {....;  };
 };
Detailed examples of zone files can be viewed at nox.su.
To increase the resiliency of their DNS, it is recommended to use secondary servers. There are several free services offering slave servers with DNSSEC support. Here is a partial list of http://www.frankb.us/dns/ . I use rollernet.us, therefore I allow transfer from addresses 208.79.240.3 and 208.79.241.3. When using secondary servers, records about them must be present in the zone file before signing. I recommend activating the transfer after the signed zone is located on the master server.
Further, it is assumed that the signed zone is already located on the authoritarian NS server and is accessible from the outside:
dig + dnssec -t any @ super.vip.my.dns.com my-domain.com
The team must return the signed zone.
At this stage, you can activate the secondary server and synchronize the zone by AXFR.
Next, you need to add DS-records in the domain registrar panel. They were generated when running the dnssec-signzone and are in the dsset-my-domain file in this form:
 my-domain.com.  IN DS 40513 5 1 6198D29A9FB9797719CDFD2316986BDFF5C29323
 my-domain.com.  IN DS 40513 5 2 1AAB29EC7B67013F45865AEB06D93899B45C598D65A4E4D5522BC39E B5B9212F
This is the form for adding DS records in the GoDaddy panel:
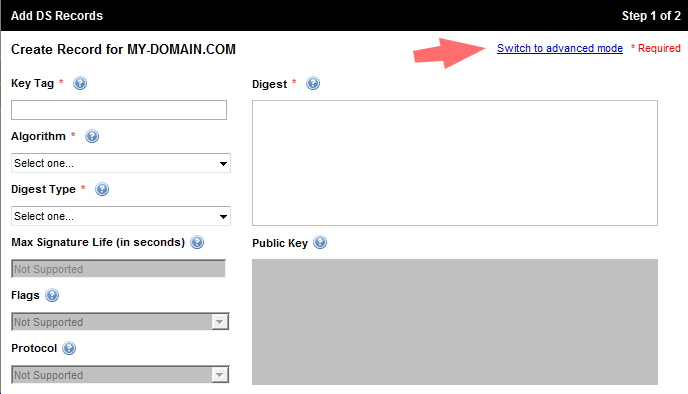
It is necessary to switch to “Advanced mode” and copy both lines, having previously edited it. You need to add the TTL value and remove the space in the second line in the key fingerprint, otherwise the form will return an error. As a result, the copied lines should look like this:
  my-domain.com.  86400 IN DS 40513 5 1 6198D29A9FB9797719CDFD2316986BDFF5C29323
  my-domain.com.  86400 IN DS 40513 5 2 1AAB29EC7B67013F45865AEB06D93899B45C598D65A4E4D5522BC39EB5B9212F
Records will be added only if the zone on the master server is available and signed correctly.
Field values in DS records:
86400 - TTL of this record
40513 - Key Tag
5 - Algorithm
1/2 - Digest Type
In the example above, the RSA-SHA1 algorithm was used to generate keys, so the entry has number five.
Algorithm number table:
| Number | Algorithm |
|---|---|
| one | RSAMD5 |
| 2 | DH |
| 3 | DSA / SHA1 |
| four | ECC |
| five | RSA / SHA-1 |
| 6 | DSA-NSEC3-SHA1 |
| 7 | RSASHA1-NSEC3-SHA1 |
| eight | RSA / SHA-256 |
| 9 | - |
| ten | RSA / SHA-512 |
| eleven | - |
| 12 | GOST R 34.10-2001 |
Digest Type in the above example, the first record is 1, in the second 2.
Digest Type Number Table:
| Number | Digest type |
|---|---|
| one | SHA-1 |
| 2 | SHA-256 |
| 3 | SHA-512 |
For some registrars, such as Dyn.com, the form for adding a DS record does not copy the lines, but requires filling all the fields separately:
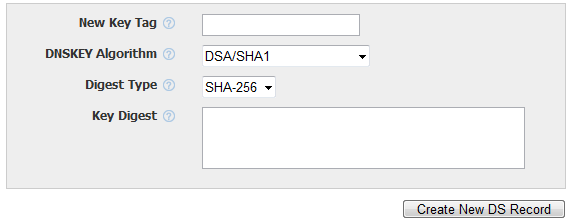
Due to the fact that Dyn.com's list of algorithms is out of order and not marked with numbers, this causes some confusion. When adding through this form, you also need to remove the space in the print of the second key.
After adding DS records, you can check their appearance on the servers responsible for the top-level domain. For the com domain, it looks like this:
dig + dnssec -t DS @ a.gtld-servers.net my-domain.com
When this happens, you can verify that the zone is signed correctly using Verseign's DNSSEC Debugger and the signing chain visualizer .
Let me remind you that after each change in the records of the zone, you must sign again. DS records do not need to be updated.
If everything is correct, you can proceed to setting up the client part.
Configuring client resolver
To verify client-side signatures, this function must be supported by the system DNS, through which the address resolver occurs. Google's public DNS 8.8.8.8 supports the transfer of DNSSEC records, but does not verify them. Read more in the FAQ .
UPD: On 03/19/2013, Google Public DNS verifies DNSSEC signatures, and in the case of an invalid signature, does not resolve the domain googleonlinesecurity.blogspot.com/2013/03/google-public-dns-now-supports-dnssec.html
The simplest option is a plugin for Firefox and Chrome .
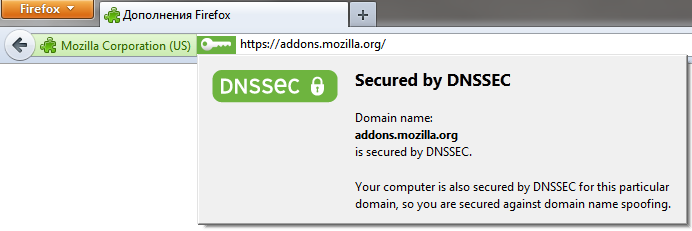
The plug-in allows rezolv to bypass the system DNS, has its own pre-installed servers with support for DNSSEC validation. By default, the plugin uses system DNS, you can change this in the plugin settings: select CZ.NIC's or 217.31.57.6
In order to teach the dig utility to verify the signature, you need to create a starting point in the trust chain by creating a file with the root zone key:
dig +nocomments +nostats +nocmd +noquestion -t dnskey . > /etc/trusted-key.key Then you need to delete the line in the /etc/trusted-key.key file:
;; Truncated, retrying in TCP mode. If this is not done, dig will return:
No trusted keys present You can now verify the authenticity of signatures with dig:
dig +sigchase @217.31.57.6 whitehouse.gov How to set up a recursive resolver with signature verification function can be found here.
Practical use
Despite the fact that the DNSSEC standard is still in development, it is already possible to benefit from it.
Public SSH Key
When you first connect to the SSH server, the client asks to independently verify the fingerprint of the server’s public key and enter yes, after which the server’s public key is stored in the file known_hosts.
With the advent of DNSSEC, the public key can be placed in a DNS record of the SSHFP type and, when it is first connected to the server, can be automatically verified without a request. To activate this function, you need to add the VerifyHostKeyDNS = yes option to the SSH client config, it is also necessary that the system resolver supports DNSSEC verification.
Self-Signed SSL Certificate (HTTPS)
UPD: Described below is no longer relevant, after the standard for storing ssl-keys in the DNS was published, and was named DANE ru.wikipedia.org/wiki/DANE Google removed DANE support from Chrome. Discussion on this issue with the Chrome developer github.com/agl/dnssec-tls-tools/issues/4
With DNSSEC, you can independently sign an SSL certificate that will be “valid” in the browser.
This experimental feature is currently in active development and is currently only supported by Google Chrome / Chromium.
Draft Standard: tools.ietf.org/html/draft-agl-dane-serializechain-01
The technology is developed by a Google employee named Adam Langley (Adam Langley), he maintains a very interesting blog http://www.imperialviolet.org/ .
Post about this technology.
Further, it is assumed that the domain for which the certificate is generated may be signed by DNSSEC.
Download dnssec-tls-tools:
git clone git: //github.com/agl/dnssec-tls-tools.git
And compile:
gcc -o gencert gencert.c -Wall -lcrypto
Generating RSA keys:
  openssl genrsa 1024> privkey.pem
 openssl rsa -pubout -in privkey.pem> pubkey.pem
Create key fingerprint:
python ./gencaa.py pubkey.pem
where is the gencaa.py file from the dnssec-tls-tools package.
The command will return a string like:
EXAMPLE.COM. 60 IN TYPE257 \ # 70 020461757468303e3039060a2b06010401d6790203010 ...
This is the DNS record that you need to add to your zone file, replacing EXAMPLE.COM. its value. If the zone is not yet signed, it must be done. If a record is added to a zone that has already been signed, you need to sign again, respectively.
Check the correctness of the key in the DNS:
dig + dnssec + sigchase -t type27 example.com
The command should return DNSSEC validation is ok: SUCCESS
After the type27 entry is available and signed, you can generate a DNSSEC trust chain:
python ./chain.py example.com chain
And the certificate itself:
./gencert privkey.pem chain> cert.pem
Connecting a certificate to Nginx looks like this:
 server {
         ...
	 ssl on;
	 ssl_certificate cert.pem;
	 ssl_certificate_key privkey.pem;
         ...
  }
Due to the fact that the DNSSEC signing chain may change, the creation of a chain and certificate generation (the last two commands) must be added to cron and executed, for example, once a day.
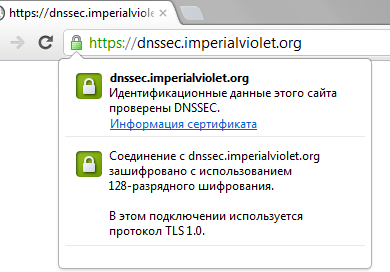
The result should look like this: https://dnssec.imperialviolet.org/
Due to the fact that the entire DNSSEC chain is placed in a certificate, the browser does not need to perform a full chain verification, so the certificate will be “valid” even if the system resolver does not support DNSSEC validation.
PS The article does not consider the validity of the DNSSEC keys, nor the alternative DLV trust chain (DNSSEC Look-aside Validation). I will be grateful to those who understand these issues and describe them.
PPS I am aware of the negative impact of such step-by-step HOWTOs, which lead to thoughtless copying of commands without understanding the essence. But, due to the fact that there is little information on this issue and in some places it is contradictory, I hope this article will help someone to avoid confusion that I had to face. Thanks to Alexander Venedyukhin for advice and his articles .
Source: https://habr.com/ru/post/138490/
All Articles