Creating an "API Centric" Web Application for PHP
What is the “API-Centric” Web Application?
This is a web application that most of the functionality is implemented through the API. For example: if you are logged in, you send your data through API functions, and the API already returns the result of success or an error. Another characteristic of the API is that the API is independent of the state of the user.
Why do you need it?
As web developers, we see technology evolving every day. And everyone knows that people use not only browsers on pc, but also android, apple, windows phone and other gadgets to access the Internet to their favorite sites.
So where is the API?
One of the advantages of creating an api-centric application is to help build functionality that can be used on any other device, be it a browser, mobile phone, tablet, or even a desktop application. All you need to do is create an API so that all these devices can interact with it.

')
By creating applications in this way, we can use it in different environments and different people. In this article we will create a simple TODO application and the client part interacting with the server. let's begin!
Step 1. Planning functionality
In the todo application that we will now do, we will implement crud operations.
Each TODO item will have:
Checkbox indicating that the TODO item is satisfied
Let's create the layout of our application.
Step 2. Creating a server API
Let's create 2 projects: API server (back end) and client part (front end)
Create a folder simpletodo_api and create an index.php file in it. It will be the main controller of our API (front controller) so that all requests to the API server will be carried out through this file. Open it and paste the following code:
We essentially built a simple front controller which:
Also create folders controllers, models and data.
The controllers folder will contain all the controllers used by the API server. We will build mvc architecture to make our api server clean and flexible.
The models folder will contain all api server models.
The data folder will store all data.
Go to the controller folder and create todo.php
This will be our controller for other TODO list of related tasks. We create a class procurement and functionality for our application:
Now we add the necessary action action functionality. We create the createAction method. If you are in a good mood, then you can create functionality for other actions, I just provided an interface.
We create todoItem.php in models so that we can create code that implements "Creating a list item". By the way speaking in this example - without DB (on files). Of course you can not be limited.
The createAction method calls 2 functions of the todoItem model:
localhost / simpletodo_api /? controller = todo & action = create & title = test% 20title & description = test% 20description & due_date = 12/08/2011 & username = nikko & userpass = test1234 If everything works, you should see a new folder in the data folder with a text document with this content:

Congratulations! We have successfully created an API server and made an API call.
Step 3. We protect the server API with app id and app secret.
Now our api server accepts all requests. We must restrict access to the server to ensure that only our own clients are able to make API requests. You can also create a system in which users can create their own applications that have access to the API server, just as Facebook and Twtter applications work.
Let's start by creating an id-key pair for clients that will be used by our server. Since this is a demo, we can use a random 32-character string. For an APP ID, let's say 'app001'.
Open index.php and edit it:
We have made a simple implementation of a very simple way to authenticate users using public-private key authentication. Here's what it looks like:
Step 4. Making the front end
Let's create a new directory simpletodo_client_browser.
And index.php:
It should look like this:
By the way, we included 2 js and 1 css files
Next, create a login.php to save the login and password within the session:
Here we simply create a new user session based on the username and password entered. This action is a simple key combination that allows us to access lists stored by TODO. Then redirect to todo.php to start interacting with the api server. Before creating todo.php, let's first define the ApiCaller class, which encapsulates all the API call methods we need, including encrypting requests.
Create apicaller.php:
We will use the ApiCaller class to send requests to our API server. Thus, all the necessary encryption and initialization of CURL will be in one place, and there will be no repetition of the code.
The constructor contains 3 parameters:
And the function sendRequest ():
Now, let's create todo.php. Namely, create a code that will return a list of todo items for the user anton and the password habr_hello.
Go to the main page and log in as anton and habr_hello and you should see the result of var_dump. Congratulations! You have successfully executed api request to api server. In this code, we:
Let's change our page by adding some features.
By the way, do not forget to remove the war dump ^ _ ^.
It should look like this:
Looks good, is not it? Now add the same functionality, new_todo.php
That contains the todo / create call, creating a new TODO item element. Creating other pages: (update_todo.php and delete_todo.php) should be simple.
Open new_todo.php:
As you see, new_todo.php uses ApiCaller to send todo / create a request to the server'y API.
Congratulations! We have successfully created an API-centric web application.
Conclusion:
There are many advantages in developing applications made with the API. If you want to create an Android version of SimpleTODO, then all the functionality that you may need is already in the API server, so all you need to do is simply create an Android client! Want to reorganize or optimize some classes? No problem - just make sure the output will be the same. Need to add more functionality? You can do this without changing the client code!
The nettuts article served as inspiration.
Write if where you made a mistake, and comments about where it would be better to do
This is a web application that most of the functionality is implemented through the API. For example: if you are logged in, you send your data through API functions, and the API already returns the result of success or an error. Another characteristic of the API is that the API is independent of the state of the user.
Why do you need it?
As web developers, we see technology evolving every day. And everyone knows that people use not only browsers on pc, but also android, apple, windows phone and other gadgets to access the Internet to their favorite sites.
So where is the API?
One of the advantages of creating an api-centric application is to help build functionality that can be used on any other device, be it a browser, mobile phone, tablet, or even a desktop application. All you need to do is create an API so that all these devices can interact with it.
')
By creating applications in this way, we can use it in different environments and different people. In this article we will create a simple TODO application and the client part interacting with the server. let's begin!
Step 1. Planning functionality
In the todo application that we will now do, we will implement crud operations.
- Create TODO items
- Read TODO items
- Update TODO items
- Delete TODO items
Each TODO item will have:
- Headline
- expiration date
- Description
Checkbox indicating that the TODO item is satisfied
Let's create the layout of our application.
Step 2. Creating a server API
Let's create 2 projects: API server (back end) and client part (front end)
Create a folder simpletodo_api and create an index.php file in it. It will be the main controller of our API (front controller) so that all requests to the API server will be carried out through this file. Open it and paste the following code:
<?php // Define path to data folder define('DATA_PATH', realpath(dirname(__FILE__).'/data')); //include our models include_once 'models/TodoItem.php'; //wrap the whole thing in a try-catch block to catch any wayward exceptions! try { //get all of the parameters in the POST/GET request $params = $_REQUEST; //get the controller and format it correctly so the first //letter is always capitalized $controller = ucfirst(strtolower($params['controller'])); //get the action and format it correctly so all the //letters are not capitalized, and append 'Action' $action = strtolower($params['action']).'Action'; //check if the controller exists. if not, throw an exception if( file_exists("controllers/{$controller}.php") ) { include_once "controllers/{$controller}.php"; } else { throw new Exception('Controller is invalid.'); } //create a new instance of the controller, and pass //it the parameters from the request $controller = new $controller($params); //check if the action exists in the controller. if not, throw an exception. if( method_exists($controller, $action) === false ) { throw new Exception('Action is invalid.'); } //execute the action $result['data'] = $controller->$action(); $result['success'] = true; } catch( Exception $e ) { //catch any exceptions and report the problem $result = array(); $result['success'] = false; $result['errormsg'] = $e->getMessage(); } //echo the result of the API call echo json_encode($result); exit(); We essentially built a simple front controller which:
- Accepts API calls with any number of parameters.
- Retrieves Controller and Action to call API
- Makes the necessary check on the existence of the controller and actions
- Performs an API call
- Catches errors
- Sends result
Also create folders controllers, models and data.
The controllers folder will contain all the controllers used by the API server. We will build mvc architecture to make our api server clean and flexible.
The models folder will contain all api server models.
The data folder will store all data.
Go to the controller folder and create todo.php
This will be our controller for other TODO list of related tasks. We create a class procurement and functionality for our application:
<?php class Todo { private $_params; public function __construct($params) { $this->_params = $params; } public function createAction() { //create a new todo item } public function readAction() { //read all the todo items } public function updateAction() { //update a todo item } public function deleteAction() { //delete a todo item } } Now we add the necessary action action functionality. We create the createAction method. If you are in a good mood, then you can create functionality for other actions, I just provided an interface.
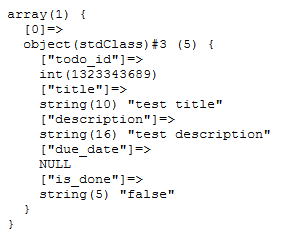
public function createAction() { //create a new todo item $todo = new TodoItem(); $todo->title = $this->_params['title']; $todo->description = $this->_params['description']; $todo->due_date = $this->_params['due_date']; $todo->is_done = 'false'; //pass the user's username and password to authenticate the user $todo->save($this->_params['username'], $this->_params['userpass']); //return the todo item in array format return $todo->toArray(); } We create todoItem.php in models so that we can create code that implements "Creating a list item". By the way speaking in this example - without DB (on files). Of course you can not be limited.
<?php class TodoItem { public $todo_id; public $title; public $description; public $due_date; public $is_done; public function save($username, $userpass) { //get the username/password hash $userhash = sha1("{$username}_{$userpass}"); if( is_dir(DATA_PATH."/{$userhash}") === false ) { mkdir(DATA_PATH."/{$userhash}"); } //if the $todo_id isn't set yet, it means we need to create a new todo item if( is_null($this->todo_id) || !is_numeric($this->todo_id) ) { //the todo id is the current time $this->todo_id = time(); } //get the array version of this todo item $todo_item_array = $this->toArray(); //save the serialized array version into a file $success = file_put_contents(DATA_PATH."/{$userhash}/{$this->todo_id}.txt", serialize($todo_item_array)); //if saving was not successful, throw an exception if( $success === false ) { throw new Exception('Failed to save todo item'); } //return the array version return $todo_item_array; } public function toArray() { //return an array version of the todo item return array( 'todo_id' => $this->todo_id, 'title' => $this->title, 'description' => $this->description, 'due_date' => $this->due_date, 'is_done' => $this->is_done ); } } The createAction method calls 2 functions of the todoItem model:
- Save () - saves the todoItem to a file, and also, if necessary, creates a todo_id for todoItem.
- toArray () - returns todoItem as an array, indexed by variables
localhost / simpletodo_api /? controller = todo & action = create & title = test% 20title & description = test% 20description & due_date = 12/08/2011 & username = nikko & userpass = test1234 If everything works, you should see a new folder in the data folder with a text document with this content:
Congratulations! We have successfully created an API server and made an API call.
Step 3. We protect the server API with app id and app secret.
Now our api server accepts all requests. We must restrict access to the server to ensure that only our own clients are able to make API requests. You can also create a system in which users can create their own applications that have access to the API server, just as Facebook and Twtter applications work.
Let's start by creating an id-key pair for clients that will be used by our server. Since this is a demo, we can use a random 32-character string. For an APP ID, let's say 'app001'.
Open index.php and edit it:
<?php // Define path to data folder define('DATA_PATH', realpath(dirname(__FILE__).'/data')); //Define our id-key pairs $applications = array( 'APP001' => '28e336ac6c9423d946ba02d19c6a2632', //randomly generated app key ); //include our models include_once 'models/TodoItem.php'; //wrap the whole thing in a try-catch block to catch any wayward exceptions! try { //*UPDATED* //get the encrypted request $enc_request = $_REQUEST['enc_request']; //get the provided app id $app_id = $_REQUEST['app_id']; //check first if the app id exists in the list of applications if( !isset($applications[$app_id]) ) { throw new Exception('Application does not exist!'); } //decrypt the request $params = json_decode(trim(mcrypt_decrypt(MCRYPT_RIJNDAEL_256, $applications[$app_id], base64_decode($enc_request), MCRYPT_MODE_ECB))); //check if the request is valid by checking if it's an array and looking for the controller and action if( $params == false || isset($params->controller) == false || isset($params->action) == false ) { throw new Exception('Request is not valid'); } //cast it into an array $params = (array) $params; ... ... ... We have made a simple implementation of a very simple way to authenticate users using public-private key authentication. Here's what it looks like:
- The api call is made, it provides $ APP_ID and $ enc_request
- $ enc_request contains API call parameters encrypted with APP KEY. APP KEY is never sent to the server, it is used only to encrypt the request. By the way, the request can be decrypted using APP KEY.
- When the call reaches the server, the server checks its own list of applications for the presence of an APP ID.
- When he finds it, the api server tries to decrypt the request using the key.
- If the decryption is successful, the program continues.
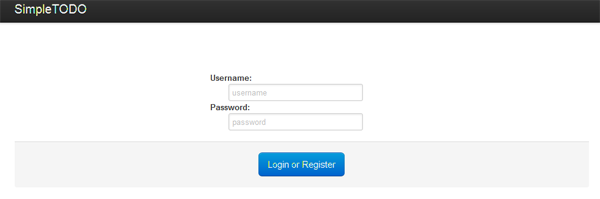
Step 4. Making the front end
Let's create a new directory simpletodo_client_browser.
And index.php:
<!DOCTYPE html> <html> <head> <title>SimpleTODO</title> <link rel="stylesheet" href="css/reset.css" type="text/css" /> <link rel="stylesheet" href="css/bootstrap.min.css" type="text/css" /> <script src="js/jquery.min.js"></script> <script src="js/jquery-ui-1.8.16.custom.min.js"></script> <style> body { padding-top: 40px; } #main { margin-top: 80px; text-align: center; } </style> </head> <body> <div class="topbar"> <div class="fill"> <div class="container"> <a class="brand" href="index.php">SimpleTODO</a> </div> </div> </div> <div id="main" class="container"> <form class="form-stacked" method="POST" action="login.php"> <div class="row"> <div class="span5 offset5"> <label for="login_username">Username:</label> <input type="text" id="login_username" name="login_username" placeholder="username" /> <label for="login_password">Password:</label> <input type="password" id="login_password" name="login_password" placeholder="password" /> </div> </div> <div class="actions"> <button type="submit" name="login_submit" class="btn primary large">Login or Register</button> </div> </form> </div> </body> </html> It should look like this:
By the way, we included 2 js and 1 css files
- bootstrap.min.css is the Twitter Bootstrap
- jquery.min.js is the latest jQuery library
- jquery-ui-1.8.16.custom.min.js latest jQuery UI library
Next, create a login.php to save the login and password within the session:
<?php //get the form values $username = $_POST['login_username']; $userpass = $_POST['login_password']; session_start(); $_SESSION['username'] = $username; $_SESSION['userpass'] = $userpass; header('Location: todo.php'); exit(); Here we simply create a new user session based on the username and password entered. This action is a simple key combination that allows us to access lists stored by TODO. Then redirect to todo.php to start interacting with the api server. Before creating todo.php, let's first define the ApiCaller class, which encapsulates all the API call methods we need, including encrypting requests.
Create apicaller.php:
<?php class ApiCaller { //some variables for the object private $_app_id; private $_app_key; private $_api_url; //construct an ApiCaller object, taking an //APP ID, APP KEY and API URL parameter public function __construct($app_id, $app_key, $api_url) { $this->_app_id = $app_id; $this->_app_key = $app_key; $this->_api_url = $api_url; } //send the request to the API server //also encrypts the request, then checks //if the results are valid public function sendRequest($request_params) { //encrypt the request parameters $enc_request = base64_encode(mcrypt_encrypt(MCRYPT_RIJNDAEL_256, $this->_app_key, json_encode($request_params), MCRYPT_MODE_ECB)); //create the params array, which will //be the POST parameters $params = array(); $params['enc_request'] = $enc_request; $params['app_id'] = $this->_app_id; //initialize and setup the curl handler $ch = curl_init(); curl_setopt($ch, CURLOPT_URL, $this->_api_url); curl_setopt($ch, CURLOPT_RETURNTRANSFER, 1); curl_setopt($ch, CURLOPT_POST, count($params)); curl_setopt($ch, CURLOPT_POSTFIELDS, $params); //execute the request $result = curl_exec($ch); //json_decode the result $result = @json_decode($result); //check if we're able to json_decode the result correctly if( $result == false || isset($result['success']) == false ) { throw new Exception('Request was not correct'); } //if there was an error in the request, throw an exception if( $result['success'] == false ) { throw new Exception($result['errormsg']); } //if everything went great, return the data return $result['data']; } } We will use the ApiCaller class to send requests to our API server. Thus, all the necessary encryption and initialization of CURL will be in one place, and there will be no repetition of the code.
The constructor contains 3 parameters:
- $ app_id - APP ID for the client (APP001)
- $ app_key - APP KEY for the client (28e336ac6c9423d946ba02d19c6a2632)
- $ api_url - API server URL, localhost / simpletodo_api /
And the function sendRequest ():
- encrypts request parameters using the mcrypt library in the same order that the API server decrypts it
- generates $ _POST parameters that will be sent to the api server
- makes an API call via CURL
- checks the result of the call (successful or not)
- returns data when everything has been successfully sent.
Now, let's create todo.php. Namely, create a code that will return a list of todo items for the user anton and the password habr_hello.
<?php session_start(); include_once 'apicaller.php'; $apicaller = new ApiCaller('APP001', '28e336ac6c9423d946ba02d19c6a2632', 'http://localhost/simpletodo_api/'); $todo_items = $apicaller->sendRequest(array( 'controller' => 'todo', 'action' => 'read', 'username' => $_SESSION['username'], 'userpass' => $_SESSION['userpass'] )); echo ''; var_dump($todo_items); Go to the main page and log in as anton and habr_hello and you should see the result of var_dump. Congratulations! You have successfully executed api request to api server. In this code, we:
- created a session
- created an ApiCaller class instance by passing the app id, app key to todo.php.
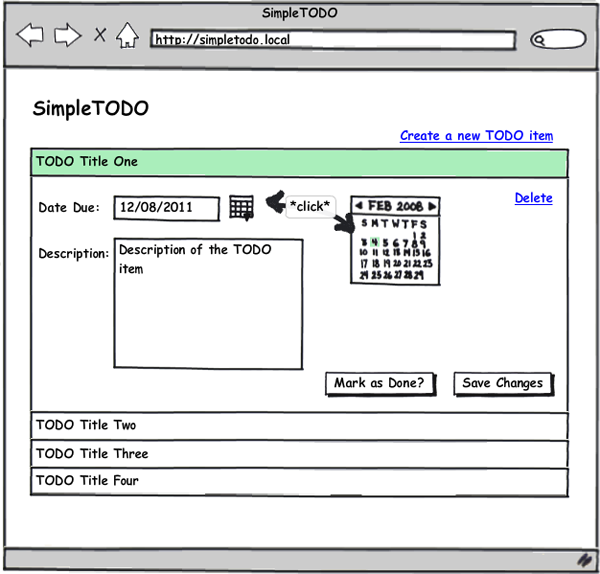
Let's change our page by adding some features.
By the way, do not forget to remove the war dump ^ _ ^.
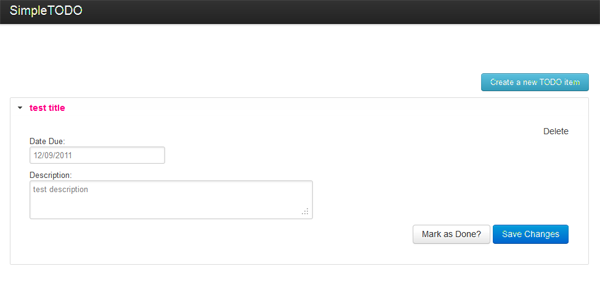
<!DOCTYPE html> <html> <head> <title>SimpleTODO</title> <link rel="stylesheet" href="css/reset.css" type="text/css" /> <link rel="stylesheet" href="css/bootstrap.min.css" type="text/css" /> <link rel="stylesheet" href="css/flick/jquery-ui-1.8.16.custom.css" type="text/css" /> <script src="js/jquery.min.js"></script> <script src="js/jquery-ui-1.8.16.custom.min.js"></script> <style> body { padding-top: 40px; } #main { margin-top: 80px; } .textalignright { text-align: right; } .marginbottom10 { margin-bottom: 10px; } #newtodo_window { text-align: left; display: none; } </style> <script> $(document).ready(function() { $("#todolist").accordion({ collapsible: true }); $(".datepicker").datepicker(); $('#newtodo_window').dialog({ autoOpen: false, height: 'auto', width: 'auto', modal: true }); $('#newtodo').click(function() { $('#newtodo_window').dialog('open'); }); }); </script> </head> <body> <div class="topbar"> <div class="fill"> <div class="container"> <a class="brand" href="index.php">SimpleTODO</a> </div> </div> </div> <div id="main" class="container"> <div class="textalignright marginbottom10"> <span id="newtodo" class="btn info">Create a new TODO item</span> <div id="newtodo_window" title="Create a new TODO item"> <form method="POST" action="new_todo.php"> <p>Title:<br /><input type="text" class="title" name="title" placeholder="TODO title" /></p> <p>Date Due:<br /><input type="text" class="datepicker" name="due_date" placeholder="MM/DD/YYYY" /></p> <p>Description:<br /><textarea class="description" name="description"></textarea></p> <div class="actions"> <input type="submit" value="Create" name="new_submit" class="btn primary" /> </div> </form> </div> </div> <div id="todolist"> <?php foreach($todo_items as $todo): ?> <h3><a href="#"><?php echo $todo->title; ?></a></h3> <div> <form method="POST" action="update_todo.php"> <div class="textalignright"> <a href="delete_todo.php?todo_id=<?php echo $todo->todo_id; ?>">Delete</a> </div> <div> <p>Date Due:<br /><input type="text" id="datepicker_<?php echo $todo->todo_id; ?>" class="datepicker" name="due_date" value="12/09/2011" /></p> <p>Description:<br /><textarea class="span8" id="description_<?php echo $todo->todo_id; ?>" class="description" name="description"><?php echo $todo->description; ?></textarea></p> </div> <div class="textalignright"> <?php if( $todo->is_done == 'false' ): ?> <input type="hidden" value="false" name="is_done" /> <input type="submit" class="btn" value="Mark as Done?" name="markasdone_button" /> <?php else: ?> <input type="hidden" value="true" name="is_done" /> <input type="button" class="btn success" value="Done!" name="done_button" /> <?php endif; ?> <input type="hidden" value="<?php echo $todo->todo_id; ?>" name="todo_id" /> <input type="hidden" value="<?php echo $todo->title; ?>" name="title" /> <input type="submit" class="btn primary" value="Save Changes" name="update_button" /> </div> </form> </div> <?php endforeach; ?> </div> </div> </body> </html> It should look like this:
Looks good, is not it? Now add the same functionality, new_todo.php
That contains the todo / create call, creating a new TODO item element. Creating other pages: (update_todo.php and delete_todo.php) should be simple.
Open new_todo.php:
<?php session_start(); include_once 'apicaller.php'; $apicaller = new ApiCaller('APP001', '28e336ac6c9423d946ba02d19c6a2632', 'http://localhost/simpletodo_api/'); $new_item = $apicaller->sendRequest(array( 'controller' => 'todo', 'action' => 'create', 'title' => $_POST['title'], 'due_date' => $_POST['due_date'], 'description' => $_POST['description'], 'username' => $_SESSION['username'], 'userpass' => $_SESSION['userpass'] )); header('Location: todo.php'); exit(); ?> As you see, new_todo.php uses ApiCaller to send todo / create a request to the server'y API.
- session starts
- initialization of the ApiCaller class
- sending a request using sendRequest ()
- Redirect to todo.php
Congratulations! We have successfully created an API-centric web application.
Conclusion:
There are many advantages in developing applications made with the API. If you want to create an Android version of SimpleTODO, then all the functionality that you may need is already in the API server, so all you need to do is simply create an Android client! Want to reorganize or optimize some classes? No problem - just make sure the output will be the same. Need to add more functionality? You can do this without changing the client code!
The nettuts article served as inspiration.
Write if where you made a mistake, and comments about where it would be better to do
Source: https://habr.com/ru/post/138245/
All Articles