Controller for home brewery Mega Brewery. Part II
Hello!
Much time has passed since the moment when I decided to build my automated brewery. Here is the first post .
Today the controller is completely ready, it remains to make the cooking and filtering device itself. Everything was done with my own hands. Please do not judge strictly, I do not have an engineering education, I am a simple humanitarian! I will tell in order how and from what it was done. Attention, traffic, a lot of pictures! Briefly about the development. Done on the Arduino. Sound, light indication, indication of current and voltage (as a debugging device, I need to monitor these indicators). Emergency shutdown. The whole system on semiconductor relays. The power unit is unleashed with digital. Management of 4 loads 25-40A (scaled), recipe memory for 8 pieces. 8 temperature pauses. Intuitive interface. Fully manual or fully automatic mode. Automatic CIP washing. 2 temperature sensors with an accuracy of 0,1gr. Sensor fluid in the boiler. Liquid sensor during pumping. Performance - from 20l to 1000l. Control of aeration, whirlpool, pump, backup output. Configurable PID, for different capacities (beta), USB for software updates, in the near future - remote control from iPhone / iPad. Now it can be controlled from a computer, from a monitor screen, even through the Internet.
Let's start. At first I chose a case in the store. Prices are very different. I chose an acceptable in size and price, looking ahead, I would say that the stuffing got on the limit, it would not fit in a smaller case:

Difficult work on the layout of control elements. All the stuffing, except the case, wires and contactor, were purchased abroad. In this country, at an intelligible price, do not buy anything.


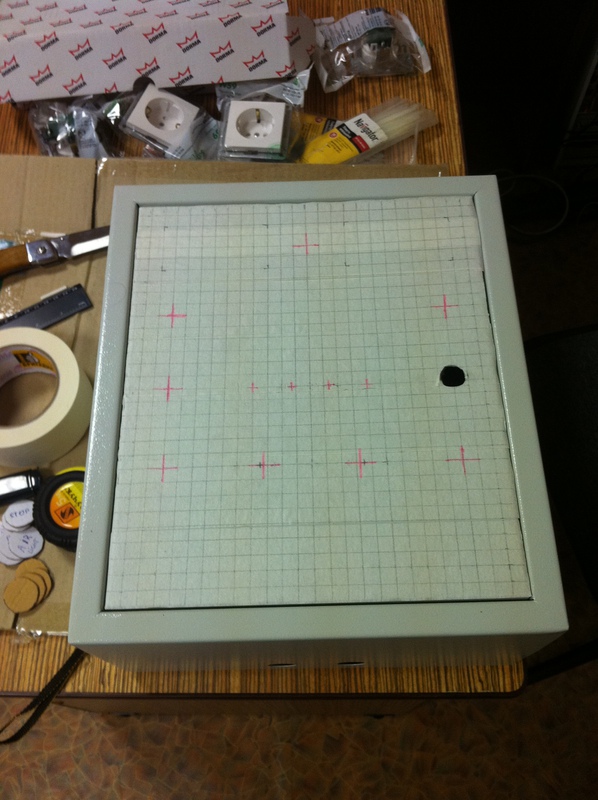
With the configuration decided, the bottom row of buttons is left for the future, under the empowerment:

')
I pasted masking tape and drew a marking with a pencil.
Things are easy. Cut holes. Rectangular made jigsaw, file with the smallest tooth. Round - step-drill-herringbone. Small round - with a drill.

All holes are processed with a file.
And painted. I note, I did it in vain, the paint mercilessly splits off at any contact. Painted on 3-4 layers. The soil did not use.

I waited a day when the paint was dry and placed the elements.


I bought a radiator by ad, it was from a local television center, I was standing on a TV transmitter on a local TV tower, I had to saw off, I gave it to the factory, because jigsaw does not take, it is heavy from an unknown alloy.

On the back side.

Inside


In the collection.

Check electronics.

Sketched a very complex scheme, without a scheme - nowhere!

I connected everything and soldered. Step by step did not take off, it was not before that.
Another view. Each soldering terminal I solder.


Sockets on actuators.
SSR relay. Used two denominations and different manufacturers, so interesting.
That's what happened. Choice buttons put other, more comfortable and green, so, I think it looks prettier, but red too much :)


A little tidied up on the table and on the test! Instead of heating elements, the load and the heating element is a vintage table lamp.

Pasted the plates on the Moment Crystal. Special plates ordered by the company. There are two types of Graverton and Gedacolor, differ in price, quality and durability. What I have, I do not remember. And everything is ready!


In the meantime, a new brain is already waiting on the table with new possibilities for the latest development! :)

The next stage, the selection of components for the cooker and the final construction. But more about that in the next part.

What I would have done differently, I wouldn’t paint, there are numerous chips on the photos. But the unit is designed for wall mounted installation, so the paint will not fight back so. At the moment everything works as expected, it remains to finish the cooker with all the strapping. A matter of time and money.
My wish to novice brewers, do not try to immediately build a machine, it will not work. We must first get into all the details, throw away money and time.
By agreement with the author of the code, the code is not laid out in open access for several reasons: the program is sharpened for my specific development, for a specific cycle, and may later turn into a commercial product. I just set an example.
I apologize for the quality of the photos, everything was done on the phone. Thanks to everyone who read to the end!
For those who are interested in home brewing, I wrote a detailed manual how to do it, with photos and explanations.
You can always ask me and get a prompt response about beer and brewing on my Twitter.
UPD !!! Pictures are dead. The photobag failed, I perezalil photos, as compensation to readers, added more photos.
Much time has passed since the moment when I decided to build my automated brewery. Here is the first post .
Today the controller is completely ready, it remains to make the cooking and filtering device itself. Everything was done with my own hands. Please do not judge strictly, I do not have an engineering education, I am a simple humanitarian! I will tell in order how and from what it was done. Attention, traffic, a lot of pictures!
Briefly about the development. Done on the Arduino. Sound, light indication, indication of current and voltage (as a debugging device, I need to monitor these indicators). Emergency shutdown. The whole system on semiconductor relays. The power unit is unleashed with digital. Management of 4 loads 25-40A (scaled), recipe memory for 8 pieces. 8 temperature pauses. Intuitive interface. Fully manual or fully automatic mode. Automatic CIP washing. 2 temperature sensors with an accuracy of 0,1gr. Sensor fluid in the boiler. Liquid sensor during pumping. Performance - from 20l to 1000l. Control of aeration, whirlpool, pump, backup output. Configurable PID, for different capacities (beta), USB for software updates, in the near future - remote control from iPhone / iPad. Now it can be controlled from a computer, from a monitor screen, even through the Internet.Let's start. At first I chose a case in the store. Prices are very different. I chose an acceptable in size and price, looking ahead, I would say that the stuffing got on the limit, it would not fit in a smaller case:
Difficult work on the layout of control elements. All the stuffing, except the case, wires and contactor, were purchased abroad. In this country, at an intelligible price, do not buy anything.
With the configuration decided, the bottom row of buttons is left for the future, under the empowerment:
')
I pasted masking tape and drew a marking with a pencil.
Things are easy. Cut holes. Rectangular made jigsaw, file with the smallest tooth. Round - step-drill-herringbone. Small round - with a drill.
All holes are processed with a file.
And painted. I note, I did it in vain, the paint mercilessly splits off at any contact. Painted on 3-4 layers. The soil did not use.
I waited a day when the paint was dry and placed the elements.
I bought a radiator by ad, it was from a local television center, I was standing on a TV transmitter on a local TV tower, I had to saw off, I gave it to the factory, because jigsaw does not take, it is heavy from an unknown alloy.
On the back side.
Inside
In the collection.
Check electronics.
Sketched a very complex scheme, without a scheme - nowhere!
I connected everything and soldered. Step by step did not take off, it was not before that.
Another view. Each soldering terminal I solder.
Sockets on actuators.
SSR relay. Used two denominations and different manufacturers, so interesting.
That's what happened. Choice buttons put other, more comfortable and green, so, I think it looks prettier, but red too much :)
A little tidied up on the table and on the test! Instead of heating elements, the load and the heating element is a vintage table lamp.
Pasted the plates on the Moment Crystal. Special plates ordered by the company. There are two types of Graverton and Gedacolor, differ in price, quality and durability. What I have, I do not remember. And everything is ready!
In the meantime, a new brain is already waiting on the table with new possibilities for the latest development! :)
The next stage, the selection of components for the cooker and the final construction. But more about that in the next part.
What I would have done differently, I wouldn’t paint, there are numerous chips on the photos. But the unit is designed for wall mounted installation, so the paint will not fight back so. At the moment everything works as expected, it remains to finish the cooker with all the strapping. A matter of time and money.
My wish to novice brewers, do not try to immediately build a machine, it will not work. We must first get into all the details, throw away money and time.
By agreement with the author of the code, the code is not laid out in open access for several reasons: the program is sharpened for my specific development, for a specific cycle, and may later turn into a commercial product. I just set an example.
I apologize for the quality of the photos, everything was done on the phone. Thanks to everyone who read to the end!
For those who are interested in home brewing, I wrote a detailed manual how to do it, with photos and explanations.
You can always ask me and get a prompt response about beer and brewing on my Twitter.
UPD !!! Pictures are dead. The photobag failed, I perezalil photos, as compensation to readers, added more photos.
Source: https://habr.com/ru/post/138156/
All Articles