The best way to learn Rails
Good day!
I once wanted to get to know Rails better, but I didn’t know where to start until this article caught my eye. Further you will see the translation mixed with own experience and lexical and phraseological turns inherent to me. So let's go.
I have a huge PHP experience behind my back, but now I’m working as a Rails developer. The great difficulty for most people who are trying to learn something new is the learning process itself. When you speak any language or framework and know it up and down, the transition to something new does not seem necessary.
')
However, learning Ruby on Rails is fairly straightforward. This is an incredibly powerful framework that has a huge community pushing it forward. So, we have a question: what is the best way to learn Rails? Here it is - a lesson plan.
This article is a complete plan of the required training in order to get acquainted with Rails and get to work with it as soon as possible. All you need is to follow the points below, which are listed in order.
You might think that learning Ruby is the most important step here, but it’s not. Some of those who begin to study Ruby in detail, stop learning and just have to work with the current language and framework. Do not do this! . Do not be afraid to learn this language (or any other). Ruby is a fun, gorgeous, and easy-to-learn language. Plus, do not forget that you do not need to study it at 100%. You only need to know the basis.

The most recommended tool for diving into Ruby syntax is the TryRuby site. It is an interactive environment that allows you to try the syntax in action. If you dial help , you will be invited to familiarize yourself with the fifteen minute guide, which will teach you the basics. Do not forget that the manual has two chapters, with which you can get acquainted by typing help 2 .
If you work well on these tasks for some time, then you will have a good knowledge base. All I did at first was to study these two manuals. The rest I learned in the process of developing sites on Rails, as well as by googling and exercises with IRB.
If you want to learn Rails, then you will no doubt have to install it on your computer. Here are a few solutions based on what kind of OS you have. If you have a Mac or Linux-based computer, then I recommend that you use RVM. This is a great tool for installing Ruby. Actually, here is the instruction on the installation itself. If you have Windows, then you will have to use RubyInstaller.
The next step is to install Rails itself. To do this, you need to install RubyGems. If you are using RVM, then congratulations - RubyGems is already installed. If you have Windows, I advise you to proceed here. To install Rails, you need to use the gem install rails command and, tada, everything is done!
In this 40-minute screencast, the Jeffrie Way tells you what you need to know in order to use Rails. In it you will find a lot of useful information, including topics such as:
and much more ...
I have always thought that learning by example is the best way to learn a language or framework. A free and incredibly powerful course that you should definitely check out - Rails For Zombies, created by the guys from EnvyLabs. This course is interactive, which means that after watching each video you will work on useful and interesting exercises.

Until that time, I told you about interactive and free tools.The time for freebies has passed! Now you should get a book called Agile Web Development with Rails . It is designed to teach you how to use Rails by building a website from scratch. It goes through the basics, such as controllers, models, scaffolding, functional testing, and a bit of AJAX. Get at least the latest edition.
I know that this sounds pretty boring (at least for me), but this is a great example that is used everywhere because it is quite simple and quick to write. Going this way, you will contribute to the consolidation of your knowledge and skills. But I suggest you not to do copy-paste (you will not achieve anything, except 10 minutes of unnecessary waste of electricity), but try to write it gradually, from memory, sometimes just peeping into a book then to see how this or that method works.

Next, add the ability to add comments to your blog.
Sumptuously! You still built your own blog. Still, it does not have a full-fledged functional, but only presents the basic functions inherent in each blog. Well, let's do a little bit of work and add an authentication system.
In fact, I don’t want to force you to do anything complicated now, because you have already done a fair amount of work. As an authentication system, you can use some ready-made gem (Omniauth, for example). At the same time and with the implementation of gems in your project will understand.
I also advise you to watch this screencast from Ryan Bates, which describes the creation of a simple authentication system from scratch. After the implementation of the system, you should add the ability to delete / edit posts, if you have not already done so. If the task has already been completed, then it's time to move on to the next item.
At this stage, it’s time for you to become more creative and think about creating a service (for example, photo hosting). Do not dwell on the design of your second web site. Take something ready. For example, Twitter Bootstrap . This way you can focus entirely on creating your web application.
Yes. In fact, studying something is a never ending process that flows over time and allows us to improve. Here, for example, a list of the most interesting and influential twitter users in the Rails field:
And, of course, some useful references:
That's all. The lesson plan is over. But, before I say goodbye to you, I want to say that I left links to English-language resources, because he is that which must be studied. Unfortunately, such Russian-speaking resources are quite a small amount, so you have to read and watch, produced "over the hill".
I wish you success! See you again!
Foreword
I once wanted to get to know Rails better, but I didn’t know where to start until this article caught my eye. Further you will see the translation mixed with own experience and lexical and phraseological turns inherent to me. So let's go.
Introduction
I have a huge PHP experience behind my back, but now I’m working as a Rails developer. The great difficulty for most people who are trying to learn something new is the learning process itself. When you speak any language or framework and know it up and down, the transition to something new does not seem necessary.
')
However, learning Ruby on Rails is fairly straightforward. This is an incredibly powerful framework that has a huge community pushing it forward. So, we have a question: what is the best way to learn Rails? Here it is - a lesson plan.
This article is a complete plan of the required training in order to get acquainted with Rails and get to work with it as soon as possible. All you need is to follow the points below, which are listed in order.
Point 1: work with exercises in “Try Ruby”
You might think that learning Ruby is the most important step here, but it’s not. Some of those who begin to study Ruby in detail, stop learning and just have to work with the current language and framework. Do not do this! . Do not be afraid to learn this language (or any other). Ruby is a fun, gorgeous, and easy-to-learn language. Plus, do not forget that you do not need to study it at 100%. You only need to know the basis.
The most recommended tool for diving into Ruby syntax is the TryRuby site. It is an interactive environment that allows you to try the syntax in action. If you dial help , you will be invited to familiarize yourself with the fifteen minute guide, which will teach you the basics. Do not forget that the manual has two chapters, with which you can get acquainted by typing help 2 .
If you work well on these tasks for some time, then you will have a good knowledge base. All I did at first was to study these two manuals. The rest I learned in the process of developing sites on Rails, as well as by googling and exercises with IRB.
Point 2: Install Ruby and Ruby on Rails
If you want to learn Rails, then you will no doubt have to install it on your computer. Here are a few solutions based on what kind of OS you have. If you have a Mac or Linux-based computer, then I recommend that you use RVM. This is a great tool for installing Ruby. Actually, here is the instruction on the installation itself. If you have Windows, then you will have to use RubyInstaller.
The next step is to install Rails itself. To do this, you need to install RubyGems. If you are using RVM, then congratulations - RubyGems is already installed. If you have Windows, I advise you to proceed here. To install Rails, you need to use the gem install rails command and, tada, everything is done!
Point 3: Introduction to the Jeffrey Way Rails Introduction
In this 40-minute screencast, the Jeffrie Way tells you what you need to know in order to use Rails. In it you will find a lot of useful information, including topics such as:
- Models and generators
- Test-driven development (TDD)
- ActiveRecord
- RSpec and Capybara
- Partials
and much more ...
Point 4: Learn Rails For Zombies Course
I have always thought that learning by example is the best way to learn a language or framework. A free and incredibly powerful course that you should definitely check out - Rails For Zombies, created by the guys from EnvyLabs. This course is interactive, which means that after watching each video you will work on useful and interesting exercises.
Point 5: Read Rails Books
Until that time, I told you about interactive and free tools.
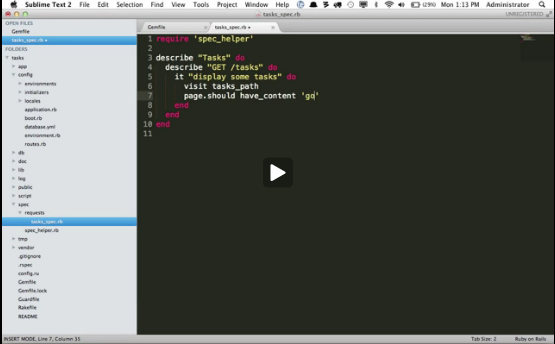
Point 6: build a simple blog
I know that this sounds pretty boring (at least for me), but this is a great example that is used everywhere because it is quite simple and quick to write. Going this way, you will contribute to the consolidation of your knowledge and skills. But I suggest you not to do copy-paste (you will not achieve anything, except 10 minutes of unnecessary waste of electricity), but try to write it gradually, from memory, sometimes just peeping into a book then to see how this or that method works.
Next, add the ability to add comments to your blog.
Point 7: Add new features to your blog.
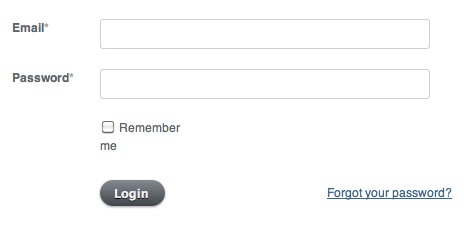
Sumptuously! You still built your own blog. Still, it does not have a full-fledged functional, but only presents the basic functions inherent in each blog. Well, let's do a little bit of work and add an authentication system.
In fact, I don’t want to force you to do anything complicated now, because you have already done a fair amount of work. As an authentication system, you can use some ready-made gem (Omniauth, for example). At the same time and with the implementation of gems in your project will understand.
I also advise you to watch this screencast from Ryan Bates, which describes the creation of a simple authentication system from scratch. After the implementation of the system, you should add the ability to delete / edit posts, if you have not already done so. If the task has already been completed, then it's time to move on to the next item.
Item 8: making something of your own
At this stage, it’s time for you to become more creative and think about creating a service (for example, photo hosting). Do not dwell on the design of your second web site. Take something ready. For example, Twitter Bootstrap . This way you can focus entirely on creating your web application.
Point 9: something else?
Yes. In fact, studying something is a never ending process that flows over time and allows us to improve. Here, for example, a list of the most interesting and influential twitter users in the Rails field:
- @dhh is the creator of Ruby on Rails. You can usually watch tweets about new versions of Rails and some tips.
- @rbates is the creator of Railscasts. Speaks for itself.
- @rails is the official framework account. Follow it and get information about fresh
cookiesreleases in real time. - @rails_apps - they will post examples of various examples of Rails applications, often very useful.
And, of course, some useful references:
- Raislcasts - MUST HAVE !!! . Matchless screencasts about Ruby in Rails, tips, new gems, and more.
- Asciicasts - if you do not want or can not watch video tutorials for any reason, then you are at the address. Here you can familiarize yourself with the content of the lessons in text format.
- Nettuts + is a resource where tips and articles about Ruby and Ruby on Rails are sometimes published.
- The Rails Way is a cool blog with some pretty interesting articles and tutorials.
- Riding Rails is the official Ruby on Rails blog. They do not post quite a lot, but I report on fresh releases of the framework.
- Planet Ruby on Rails is a fairly good resource, where together collected articles from various sites on this topic.
Conclusion
That's all. The lesson plan is over. But, before I say goodbye to you, I want to say that I left links to English-language resources, because he is that which must be studied. Unfortunately, such Russian-speaking resources are quite a small amount, so you have to read and watch, produced "over the hill".
I wish you success! See you again!
Source: https://habr.com/ru/post/138101/
All Articles