We write MVC application on Ext JS 4 with the possibility of offline work

Until recently, if it was necessary to allow the user to work offline, that is, without an active Internet connection, they had to develop fat clients. With this approach, the user enters data into the application, which is stored locally, then, sticking the net lace, presses the Sync magic button and, satisfied with himself, goes to drink tea.
The described scheme has all the disadvantages of a fat client. This is the need to develop a separate application to work from browsers (which is a normal requirement in the modern world), the need to install additional software, the problem of updating it, and the general need to hire desktop application development specialists. Agree to us, as web developers, the problem of working offline has always been a bone in the throat.
Today this issue is solved elegantly - using HTML5 with its local storage (local storage), Ext JS 4 with the ability to work transparently with this storage, and HTML5 application cache (Application Cache). The combination of these technologies makes it possible to implement the following scheme: if there is a network, static files (HTML / CSS / JS code and pictures) are downloaded from the site and we work with a server-based centralized database, in the absence of a network, static is loaded from Application Cache and we work with local storage, which is stored in the server database when access to the Internet. At the same time, without an active connection to the URL of the page, the browser displays not a network access error, but a functional system working with local storage. Explanations and a working example (yes my vds will not fall under the hardware effect) - under the cut. The article turned out to be rather big, but, I hope, very informative.
')
HTML5
If you are familiar with HTML 5, feel free to skip this chapter , if not, here you will find a brief description of the technologies used.
Application cache
Application Cache - application cache, allows you to save locally static files and use them without connecting to the network. The list of files to be cached is in the manifest file, the address of which is indicated in the html tag, for example:
<html manifest="http://site.ru/names.appcache">…</html> The mime-type of the manifest file must be set to text / cache-manifest. For Apache web server, for example, add to the configuration file:
AddType text/cache-manifest .appcache For Java, add to web.xml:
<mime-mapping> <extension>appcache</extension> <mime-type>text/cache-manifest</mime-type> </mime-mapping> An example of the simplest manifest file:
CACHE MANIFEST index.html stylesheet.css images/logo.png scripts/main.js The first line (CACHE MANIFEST) is required. If you want to add resources that always require a network, add them after the NETWORK line:
CACHE MANIFEST index.html NETWORK: login.php Take a closer look at the manifest file format here. Application Cache can be updated in three ways: it can be forcibly deleted by the user in the browser, the cache will be updated when the manifest file is updated, and finally the cache can be forcedly updated from JavaScript.
Browser support: Chrome 4+, Firefox 4+, Safari 4+, Opera 11+, IE 10, iOS 5+, Android 3+.
Local storage
Local storage in HTML5 allows you to save data locally, the recommended size limit is 5 Mb, however, in a number of browsers it can be increased. Data does not disappear after closing the page or browser.
The storage is one domain, that is, the same data is available from different pages of your site. Moreover, you can track changes in data in the repository from all pages open simultaneously. For example, one of the pages may cause a repository change that will lead to changes on another page that is open in the adjacent tab. Cool, is not it?
Working with local storage is simple - this is just a key-value structure:
localStorage.setItem('name', 'Hello World!'); localStorage.getItem('name'); localStorage.removeItem('name'); Supported browsers: Chrome 5+, Firefox 3.6+, Opera 10+, Safari 4+, IE 8+.
Local storage in Ext JS 4
The fourth Ext JS allows you to work with local storage transparently, providing a separate proxy for it. Thus, you simply change the proxy type from ajax to localstorage - and all the Ext JS data of the store (store) is downloaded not from the server, but from the local store of the browser.
Drove?
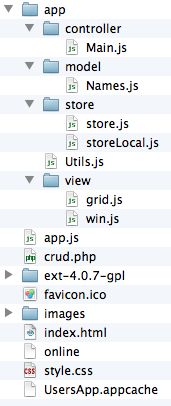 Let's write an application that allows you to maintain a list of people - a screenshot of which you observed in the title of the article. In the absence of a network, the ability to enter new persons should remain, when a network appears, the data previously entered into the local storage should automatically be loaded into the server database.
The file structure is shown in the screenshot, the index.html, /app.js files and the / app / directory are actually important for us.
The fourth version of Ext JS suggests using the MVC model for interface development, we will follow it:
- / app / model / - directory of models. Model in this case is a description of the storage fields, that is, a data structure (similar to Record in the third version of the framework) and, if necessary, a description of the proxy. A proxy describes how to get data - Ajax, JSON-P, local storage, etc. A proxy can be tied to a model or repository using this model.
- / app / view / - directory mappings. View - visual elements (widgets)
- / app / controller / - controllers directory. Controller - display logic, instantiation of models, etc., that is, everything that connects models, storages and widgets
The application will consist of two widgets - a window (window) with a table (grid) inside. The table, depending on the Internet connection, will use server or local storage.
So everything, of course, begins with HTML:
<!-- - Application Cache --> <html manifest="UsersApp.appcache"> <head> <link rel="stylesheet" type="text/css" href="ext-4.0.7-gpl/resources/css/ext-all.css" /> <link rel="stylesheet" type="text/css" href="style.css" /> <script src="ext-4.0.7-gpl/ext-dev.js" type="text/javascript" charset="utf-8"></script> <script src="app.js" type="text/javascript" charset="utf-8"></script> </head> <body style="padding: 25px;"><div id="console"><h2> </h2></div></body> </html> There is nothing special here - the manifest file is specified with the resources required for caching, the framework styles and custom styles are connected, the Ext JS kernel and the entry point of the app.js. application are loaded. In Ext JS 4, a dynamic loading mechanism is implemented, which allows you to include the necessary JS files on the fly - thus, only one JS file of the app.js application is written directly to html.
The input javascript file is simple:
// JS Ext.Loader.setConfig({ enabled: true, disableCaching: false, paths: {UsersApp: 'app', Ext: 'ext-4.0.7-gpl/src'} }); // , Ext.require(["UsersApp.view.win"]); Ext.application({ name: 'UsersApp', launch: function(){ Ext.create("UsersApp.view.win").show(); }, controllers: ["Main"] }); The Ext.require () construct is intended to indicate dependencies, that is, objects that must be loaded beforehand - before launching the application by calling the launch () method. Generally speaking, if such dependencies are not specified - when the Ext.Loader boot loader is configured, they will load automatically during execution, but this may slow down somewhat and is not kosher at all, Ext.Loader will display a message in the JS browser in the course of such non-optimal loading appropriateness of using Ext.require ().
Note that the actual names of the objects correspond to the paths in which these objects are stored. For example, the UsersApp.store.storeLocal object is stored in the /app/store/storeLocal.js directory, while the mapping of the name of the UsersApp application to the name of the app's physical directory is specified in the Ext.Loader bootloader settings.
Note: the dynamic loading mechanism is convenient at the development stage, in a production system it is better to collect all JS code into one file using Sencha SDK Tools ( example ) to avoid downloading a large number of files with code, generating unnecessary requests to the server, etc.
So, our application creates the UsersApp.view.win widget and uses the Main controller. The controller is always called before the launch () method is called; it performs all the necessary preparatory work for linking the system components.
The code of the UsersApp.view.win window is simple (hereinafter the main configuration parameters are shown, visual configs such as height-width and other unimportant moments can be viewed in the source code at the link at the end of the article):
Ext.define('UsersApp.view.win', { extend: 'Ext.Window', requires: ['UsersApp.view.grid'], itemId: 'usersWindow', layout: 'fit', items: [ { xtype: 'NamesGridPanel', itemId: 'NamesGrid' } ] }); Here we define the UsersApp.view.win class, which extends the standard Ext.Window class, and requires the UsersApp.view.grid load. Table code:
Ext.define('UsersApp.view.grid', { extend: 'Ext.grid.Panel', alias: 'widget.NamesGridPanel', requires: ['Ext.grid.plugin.CellEditing', 'Ext.form.field.*'], itemId: 'usersGrid', // - initComponent : function() { // // , // CellEditing this.cellEditing = Ext.create('Ext.grid.plugin.CellEditing', { clicksToEdit: 2 }); this.plugins = this.cellEditing; this.columns = this.columnsGet(); this.tbar = this.tbarGet(); // this.callParent(); }, tbarGet: function(){ return[ { text: '', iconCls: 'add', handler: this._onUserAddClick }, { text: '', iconCls: 'delete', handler: this._onUserDelClick } ] }, columnsGet: function(){ return [ { text: '', field: 'textfield', dataIndex: 'firstName' }, { text : '', field: 'textfield', dataIndex: 'secondName' } ] }, _onUserAddClick: function(button){ // }, _onUserDelClick: function(button){ // } }) Nothing new here - a table class is created, columns are set up, a Toolbar is added with add / delete records buttons (the implementation of these methods is hidden for better readability of the code). Please note that the table is not yet attached storage, it will be done in the controller.
It's time to create two repositories - server and local. Both of these storages will have the same model (as they actually contain data of the same structure), but different proxies. The model is described by the UsersApp.model.Names class:
Ext.define('UsersApp.model.Names', { fields: [{name: 'id', type: 'int', useNull: true}, {name: 'firstName'}, {name: 'secondName'}], extend: 'Ext.data.Model', // , validations: [{ type: 'length', field: 'firstName', min: 1 },{ type: 'length', field: 'secondName', min: 1 } ] }); The model consists of three fields - the identifier of a person, his name and surname. For the identifier, an integer type is specified and the useNull parameter is used, setting the value to null if it cannot be recognized as an integer (otherwise it will be equal to 0). Also, validators are specified for the model - the name and surname of the person must be no shorter than 1 character.
Create a repository with server data loading:
Ext.define('UsersApp.store.store', { extend: 'Ext.data.Store', requires : ['UsersApp.model.Names', 'Ext.data.proxy.Ajax'], model: 'UsersApp.model.Names', proxy: { type: 'ajax', api: { read: 'crud.php?act=read', update: 'crud.php?act=update', create: 'crud.php?act=create', destroy: 'crud.php?act=delete' }, reader: { type: 'json', root: 'names', idProperty: 'id' }, writer: { type: 'json', writeAllFields: false, root: 'names' } } }); So, the server-loaded model uses the created model that describes the data structure, and the Ajax proxy with the reader configured and the writer written to read and write data, respectively. The api parameter specifies the URL of addresses to which Ext JS will access for read, update, add, and delete operations.
Local Storage Code:
Ext.define('UsersApp.store.storeLocal', { extend: 'Ext.data.Store', requires : ['UsersApp.model.Names', 'Ext.data.proxy.LocalStorage'], model: "UsersApp.model.Names", proxy: { type: 'localstorage', id : 'Names' } }); We specify localstorage as a proxy - all data will be loaded from the local storage. As id, specify the unique proxy identifier used to create names in the key-value local storage.
Let's sum up. We have a window containing a table with customized columns, but not connected storage, there are two storages - server and local - with one model. You need to tie all this stuff into a working application! The controller will do this:
Ext.define("UsersApp.controller.Main", { extend: 'Ext.app.Controller', requires: [ // - "" 'UsersApp.Utils', 'UsersApp.store.storeLocal', 'UsersApp.store.store' ], init: function(){ // getStore , // - var storeLocal = this.getStore("storeLocal"); var store = this.getStore("store"); // , // __ storeLocal.addListener('load', function(){ // - // , . UsersApp.Utils.ping // callback UsersApp.Utils.ping({ success: this._onPingSuccess, // failure: this._onPingFailure // }, this); }, this); // storeLocal.load(); }, _onPingSuccess: function(){ // var win = Ext.ComponentQuery.query('#usersWindow')[0]; var storeLocal = this.getStore('storeLocal'); var store = this.getStore('store'); var grid = win.getComponent('NamesGrid'); win.setTitle(", ") // localCnt = storeLocal.getCount(); // , // , if (localCnt > 0){ // , // // for (i = 0; i < localCnt; i++){ var localRecord = storeLocal.getAt(i); var deletedId = localRecord.data.id; delete localRecord.data.id; store.add(localRecord.data); localRecord.data.id = deletedId; } // store.sync(); // for (i = 0; i < localCnt; i++){ storeLocal.removeAt(0); } } store.load(); // grid.reconfigure(store); grid.store.autoSync = true; }, _onPingFailure: function(){ // , var win = Ext.ComponentQuery.query('#usersWindow')[0]; var storeLocal = this.getStore('storeLocal'); var store = this.getStore('store'); var grid = win.getComponent('NamesGrid'); win.setTitle(", ") // grid.reconfigure(storeLocal); grid.store.autoSync = true; } }); Lots of code? Let's go in order. First of all, the controller needs to specify the dependencies it needs - in our case these are the internal utilities of UsersApp.Utils and our two repositories. The init method will be called when the controller is initialized, that is, before starting the application, all preparatory actions must be performed in it. We create storage instances and load the local storage (it works regardless of network access), having previously specified the callback - after loading we check the network availability by calling the UsersApp.Utils.ping method. The ping function sends an Ajax request to a file on the server, and if successful, calls the callback function success, otherwise failure is called.
So, if there is a network, records of the local storage are added to the server storage, after which the table storage is installed on the server storage. If there is no network, the table storage is simply installed on the local one.
An example of the work can be found here . Sources (as a server part of PHP, I also wrote in Java - if anyone needs it, I’ll post it) here .
Ps. Connoisseurs with the new album of Rustaveli - and warm winter programmer evenings to you :)
Source: https://habr.com/ru/post/138054/
All Articles