Networks for the smallest. Part two. Switching
All issues
8. Networks for the smallest. Part Eight BGP and IP SLA
7. Networks for the smallest. Part Seven. VPN
6. Networks for the smallest. Part six. Dynamic routing
5. Networks for the smallest: Part Five. NAT and ACL
4. Networks for the smallest: Part Four. STP
3. Networks for the smallest: Part Three. Static routing
2. Networks for the smallest. Part two. Switching
1. Networks for the smallest. Part one. Connection to the equipment cisco
0. Networks for the smallest. Part zero. Planning
After a boring story about connecting to cats, we proceed to the network configuration. This time the topics will be complicated for beginners, beaten for old people. However, network aksakals hardly manage to learn something new from this cycle. So today:
a) gently absorb the theory of switches, the levels of the network model, the concept of encapsulation and headers (do not worry - it's not time),
b) we collect the network planned in the zero part of the cycle,
c) configure VLANs, deal with access and trunk ports and tagged Ethernet frames,
d) correlate current knowledge with the TCP / IP protocol stack and the OSI model (yes, we will finally touch it).
')
Before you turn to practice, we strongly recommend that you read the zero part, where we have planned and recorded everything.
Theory
First you need to determine the definitions and determine the terminology. At the beginning of this journey there may be difficulties, despite the mountains of Wikipedia and the breaking of technical articles.
Consider the most common terms, because what is a switch and a router, you, first of all, imagine, secondly, along the way more than once we will touch them. So, moved:
SKS - structured cable system - you will find this definition in any Yandex. In fact, these are all wires, sockets, patch panels and patch cords, that is, roughly speaking, this is the physics of your network in a narrow sense, broadly it is a combination of networks: LAN, telephone networks, video surveillance systems and so on. This is a separate, very large and sometimes complex layer of knowledge and technology, which has no intersection with the setting at all, so we will not turn to it anymore. We have introduced this term for the most part so that the reader feels different from the following.
LAN = Local Computing Network = LAN = Local Area Network. The relevance of the word “Computational” can now be questioned, just as in the word computer. Still, speaking of modern networks and devices, we no longer keep in mind the term “computations”, despite the fact that the deep essence has remained unchanged. In this regard, the term bourgeois is more universal and gives a simpler idea of its meaning.
So, the local network - as a first approximation - is the network of your organization. Here, for example, we serve the network of the company “Lift mi Ap” with two offices, and so the networks of these two offices will be the local network.
In the second approximation, a local network is a network that is managed by a single network administrator. That is, for example, you are responsible for the regional segment of the provider's network, in this case, your regional network with all subnets will be local, while the superior network and networks of other areas no longer exist, since other people are already responsible for them. Generally speaking, this is already the MAN - Metropolian Area Network - a city level network. But to some extent the concept of LAN and even more so VLAN can be applied to it.
From the point of view of me, as a subscriber of this provider, my local network is all that is up to my home router. Intuitively, probably, everyone understands what is being said.
It is with local area networks that we will deal in the next issues.
And the last thing I would like to note in connection with the LAN is IP addressing.
You all know that when you turn on a home Wi-Fi router on your network, it usually gives you an IP address, like 192.168.1.x. Why exactly 192.168 at the beginning?
The fact is that all IP addresses are divided into private (private, it’s internal, “gray”, local), and public. Public ones are used on the Internet, each address is unique, their distribution is controlled by the Internet Assigned Numbers Authority ( IANA) organization.
Private are used to address the hosts (well, strictly speaking, not the hosts, but the interfaces) within the LAN, no one controls their distribution. Three ranges of addresses were assigned to them (one from each class):
10.0.0.0 - 10.255.255.255
172.16.0.0 - 172.31.255.255
192.168.0.0 - 192.168.255.255
An important point with regards to the "address classes", this was somehow written on Habré: the address classes no longer exist. Later we will talk about addressing in detail, but for now the recommendation is this: forget about the existence of address classes, so as not to be confused at the interview or in the conversation.
These are the addresses you can use on your private network. They can easily be repeated (and repeated) in different local networks, and they do not go beyond it. The private address is private, therefore any packet with an address from the ranges indicated above that reached the provider will be discarded.
If you go back to our old scheme, you will see that for our network we have selected private addresses from the range 172.16.0.0 - 172.31.255.255.
You can read about IP addresses in detail here and here .
All providers and in the internal network of any large organization use these gray subnets. Unless you are a state university, which once had a network of several thousand public addresses: Kemerovo State University, for example, is not perplexed by NAT and other nonsense - white IP are distributed to all computers of the university network.
Broadcast domain is a network area in which broadcast messages are exchanged, and devices can send each other messages directly, without the involvement of the router.
What are we talking about here? Well, for example, sent your computer a broadcast request to the network in search of a DHCP server. This frame (the same frame ) is addressed to all devices and has the recipient's MAC address FF: FF: FF: FF: FF: FF. First, it gets to the switch, from which its copies are sent to all ports. Then a part gets to other computers, a part goes to neighboring switches, someone comes to the router, and one copy is received by a DHCP server. And here is the part of the network within which these frames can live and is called the broadcast domain. And they end their lives on end hosts (computers, servers) or on routers that drop them if they are not intended for them:

If there are VLANs on the switch, they also share broadcast domains, because the packet between them must pass through the router, which will discard the broadcast messages. Thus, a single VLAN is one broadcast domain.
Once again: we have three ways to distinguish between broadcast domains:
1) Put the router and spread the hosts on different subnets,
2) Divide the network with VLANs,
3) Break the cable.
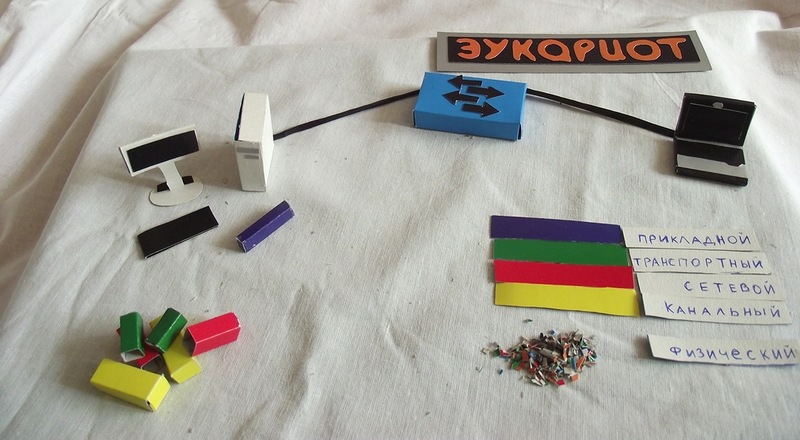
Well, the very tin, which is often avoided by beginners: OSI . Open System Interconnection. Generally in a nutshell, so that the brain does not litter in one session. This model is called the reference, because in the real world it did not come to implementation. But she is perfect, so engineers and administrators screw this word everywhere.
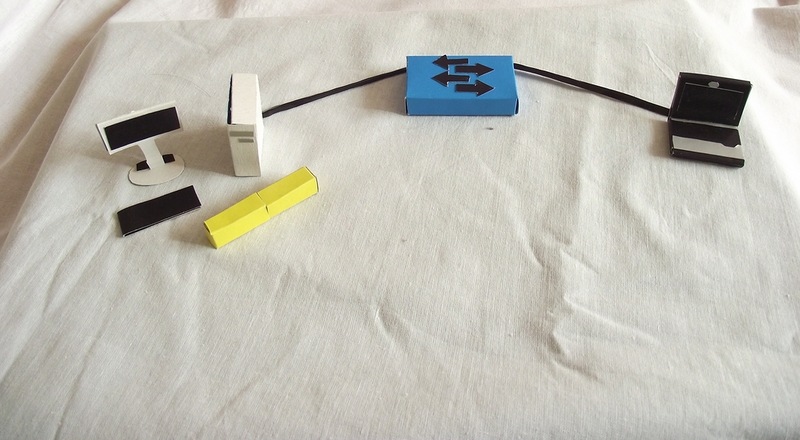
It is based on 7 whales of the network hierarchy: 7 levels. Today we’ll touch the bottom two: the first - the physical - is the presentation of information in the form of signals, frankly, bits. The task of this level is to generate an electrical, optical or radio signal, transmit it on Wednesday and receive it. This includes all physics: interfaces, cables, antennas, media converters (media converters), repeaters, old hubs. In general, low-level work. This is the first level of the OSI model and TCP / IP stack.
The second channel . Switches work at this level. The device ID here is the MAC address . Each node (computer, router, laptop, IP phone, any Wi-Fi client) has this unique address that uniquely identifies the device on the local network. In theory, MAC addresses should not be repeated at all, but in practice, however, this happens and within one broadcast domain can lead to problems that are difficult to detect.
The most famous protocol of this layer is Ethernet. Data at this level is transmitted in chunks, each of which is called an Ethernet frame (it is also an Ethernet frame, it is a data link layer PDU ). What is he like?

* , * Payload is payload - network layer data that is embedded ( encapsulated ) in a frame. MAC Header (Header) - this service information channel (second) level. The most important elements for us so far are the source MAC-address (the address of the sender of the frame) and the Destination MAC-address (the address of the receiver of the frame).
The third level - network (IP, ARP)
Fourth - transport (TCP, UDP, ICMP)
From the fifth to the seventh, session, view, and application (in the TCP / IP stack they do not differ and are simply called application. Protocols such as HTTP, FTP, telnet, and many others work on it)
The English Wikipedia states that ICMP refers to level 3, which is a controversial point.
Today we focus on the 1st and 2nd levels, especially on the second. We will touch the third and fourth in the following releases.
Now let's trace the hard path of the frame.
The network quiescent state is utopia.

You are trying to ping, for example, the address of a neighboring computer with the ping 192.168.1.118 command. The data of this application is shown in purple box.

ICMP is responsible for this. Information from the application is encapsulated in it - this means that a header with service information of the 4th level is added to the data of the 5th level.

Its data is packed (encapsulated) into IP packets, where the header contains the IP address of the recipient (192.168.1.118) and the IP address of the sender — logical addresses.

And then all this is encapsulated into Ethernet frames with the MAC addresses of the sender and receiver, the physical addresses.

When framing in the header, the source MAC address is the address of your computer, and the destination address (destinantion) will be the MAC address of the computer that owns the IP address 192.168.1.118 (let's talk about the mechanisms of this conversion next time). That is, if you could photograph a frame, then you would see all this data in a section, so to speak.
Actually, there is nothing simpler: you start some kind of traffic analyzer, for example, the wonderful Wireshark and Ethereal , on your computer and ping another host. Here is a picture you can contemplate:
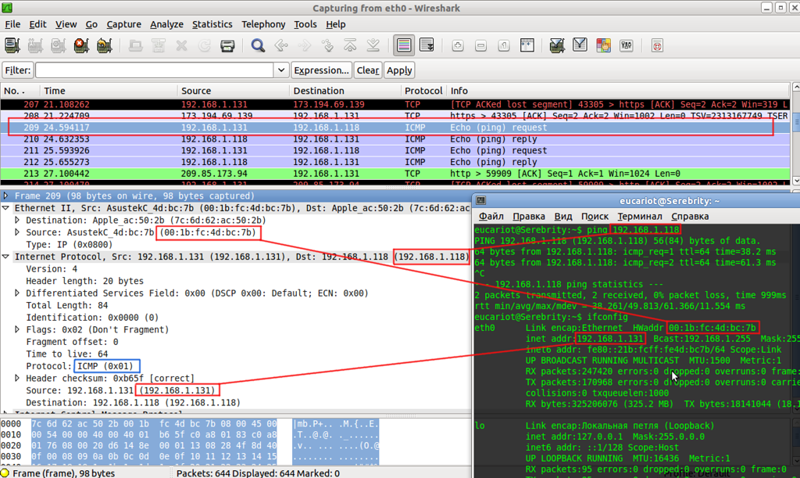
You can do this right now by reading these lines, simply by installing and running a traffic analyzer.
Lastly, your computer's network card splits the frame into bits and sends them to the cable.
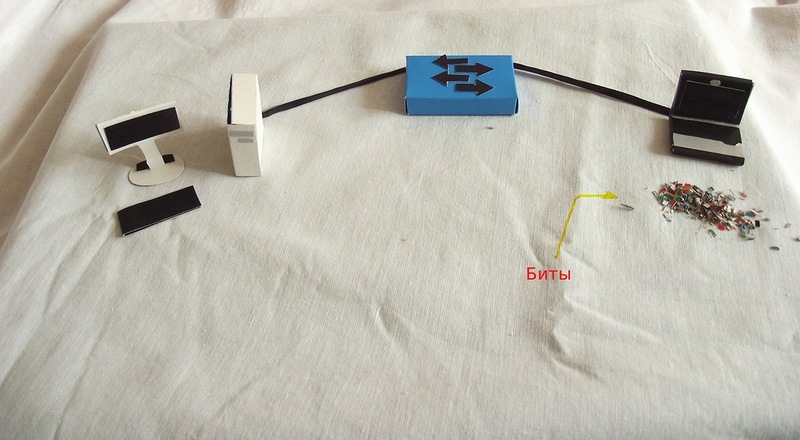

The switch from the incoming bits collects the initial frame
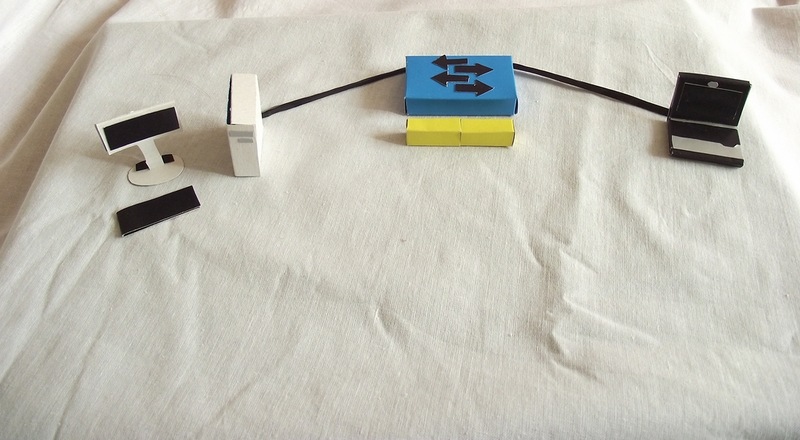
Then the intellectual work begins: the recipient's address is extracted from the header, the MAC address table is shaken for a match, and as soon as it is found, the frame is sent to the specified port without any changes. If there is no address yet or the broadcast frame has arrived, then it is sent to all ports, except where it came from.
If the address of the sender in the table has not yet been, then at this moment the switch will add it.
Naturally, the frame is again transmitted in the form of bits - this is the law of electronics, and you should just always keep this in mind.

The final host, receiving a stream of bits, collects a frame from them, still assuming that it is intended for it.
Next, it compares the recipient's MAC address with its own and, if they match, the second-level header is discarded, and the IP data is transmitted to the higher-level protocol for processing. If the addresses do not match, then the frame is discarded along with all the contents.

Next, compare the IP address of the recipient and this device. If they match, the network layer header is discarded, and data is transmitted to the transport layer (ICMP).


The final host processed the ICMP request (echo-request) and is ready to send an ICMP reply (echo-reply) to your computer with the address 192.168.1.131 and then steps 1-3 are repeated for the new frame
What we have written so far is the principle of operation of any switch. So do even simple longs for 300 rubles.
VLAN
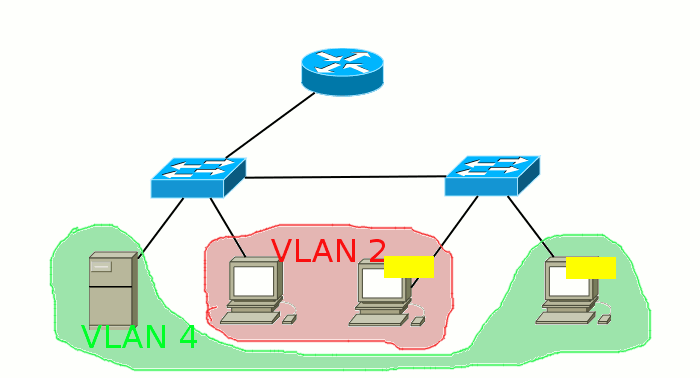
And now, colleagues, give us a final breakthrough: add more VLANs here.
Only managed switches are already working with them.
Recall that vlans are needed to separate networks. Accordingly, a certain identifier appears, which marks the traffic of different subnets on the switch.
Speaking of VLANs, they often use the 802.1q spell. This is a standard that describes how a frame is labeled / tagged. You should not be afraid of this cipher. Also, for example, Wi-Fi is described by the 802.11n standard, and the authentication protocol is 802.1x. We have to face this in the future, so put it in your non-volatile memory.
What exactly happens in the switching kitchen?
Another field is added to the frame after the Source MAC address, very roughly speaking, containing the VLAN number. The length allocated for the Vlan number is 12 bits, which means that the maximum number of Vlans is 4096. We want to draw the attention of young engineers to such details. The fact is that in our cycle, due to objective reasons, we cannot tell everything, but such questions, firstly, are often asked at interviews, and secondly, you just need to know.
 The frames of the first vlan are usually not tagged - he is a native vlan.
Each switch now makes a decision based on this tag (or its absence).
Another column with the VLAN'a number is added to the MAC address table, and when searching for the MAC address / port pair, the frame tag will now be compared with the VLAN number in the table.
There are two types of ports:
1. Access port - access port - end nodes are connected to it, as a rule. The traffic between this port and the device is untagged. Each access port is assigned a specific VLAN, sometimes this parameter is called a PVID. All traffic coming to this port from the end device receives the label of this vlan, and outgoing traffic leaves without a label.
2. Trunk port . This port has two main uses - a line between two switches or from the switch to the router. Inside such a line, popularly called, which is logical, a trunk, the traffic of several vlans is transmitted. Of course, here the traffic is already tagged, so that the receiving party can distinguish the frame that goes to the accounting department from the frame intended for the IT department. A whole range of vlans is attached to the trunk port.
In addition, there is the aforementioned native vlan . The traffic of this vlan is not tagged even on a trunk, by default it is the 1st vlan and by default it is allowed. You can override these parameters.
It is needed for compatibility with devices unfamiliar with 802.1q encapsulation. For example, you need to transfer 3 vlans via a Wi-Fi bridge, and one of them is a management vlan. If Wi-Fi-modules do not understand the 802.1q standard, then you can manage them only if you configure this vlan as native vlan on both sides.
What happens on the network with vlans?
1) So, from your computer with an IP address, for example, 192.168.1.131, a packet is sent to another computer on your network. This packet is encapsulated in a frame, and so far no one knows anything about vlans, so the frame leaves, as it is, to the nearest switch.
2) On the switch, this port is marked as a member, for example, the 2nd VLAN by the command
Switch0#interface fa0/1 Switch0(config)#description “I am using simple frames” Switch0(config-if)#switchport mode access Switch0(config-if)#switchport access vlan 2 This means that any frame that arrives on this interface is automatically tagged: a ribbon with a VLAN number is hung on it. In this case with number 2.
Next, the switch searches in its MAC address table among the ports that belong to the 2nd vlan, the port to which the device with the destination MAC address is connected.
3) If the recipient is connected to the same access port, the ribbon is unlinked from the frame, and the frame is sent to this same port as it was originally. That is, the recipient also does not need to know about the existence of vlans.
4) If the required port is a trunk port, then the ribbon remains on it.
Switch(config)#interface fa0/2 Switch(config-if)#description “I am using tagged frames” Switch(config-if)#switchport mode trunk Let's try to draw an analogy with the real world. You and a friend, for example, tourist packages, and fly to rest savages plane Ethernet Airlines Airlines. But on the way you quarreled, and therefore, when at the airport of destination, you are asked which hotel to take you to, you answer “Horns”, and your friend says “Hoof”. And right after that, you are encapsulated in different car-shots: you are in a taxi with the tag “Taxi Park“ On Horns ”, and your friend with his cargo in KAMAZ with the tag“ Transport company “In the hoof”. Now you can’t go to the bus lanes, but to your friend under signs prohibiting the passage of trucks.
So, two hotels are the MAC address of destination, and the route restrictions are the ports of other vlans.
Wandering along the streets, you have nothing to worry about as an IP packet - the frame-car will take you to your destination, and, roughly speaking, depending on the tag, at each intersection you will decide how to go further.
FAQ:
Q: What happens if a tagged frame arrives at the access port?
A: He will be dropped.
Q: What happens if an untagged frame arrives on the trunk port?
A: It will be placed in the Native VLAN. By default it is the 1st VLAN. But you can change it with the command switchport trunk native vlan 2
In this case, all frames marked with the 2nd vlan will go untagged to this port, and untagged frames coming to this interface will be marked with the second vlan.
Frames tagged with other vlans will remain unchanged, passing through such a port.
Q: Can end nodes (computers, laptops, tablets, phones) send tagged frames and connect them to trunk ports accordingly?
A: Yes, you can. If the network card and software support the 802.1q standard, then the node can work with tagged frames.
Q: What will happen to tagged frames if they fall on a regular unmanaged switch or other device that does not understand the 802.1q standard?
A: Since when adding a tag, the frame header does not change, all devices of the second level without the support of this standard cope with the switching of such a frame. Therefore, for example, if you want to organize a channel through a Wi-Fi bridge, this will not prevent you from forwarding several vlans in a trunk through it.
Practice. Network configuration “Elevator mi Up”
Well, finally turn to the setting. Viva la praktis!
We will have such a network:
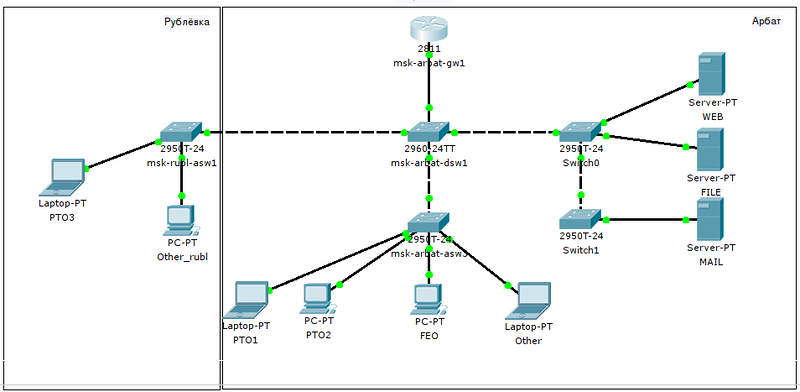
Recall how we planned it:
We advise you to open them on an additional tab, because we will go there periodically.
We could now rush to immediately set up everything in order: completely one device, then another. But it will not be, perhaps, an understanding of the meaning of processes.
Access ports (access)
Therefore, let's start with a simple one: configure two ports on msk-arbat-asw3 as access for vlan 101 (PTW):
msk-arbat-asw3(config)#interface FastEthernet0/1 msk-arbat-asw3(config-if)#description PTO msk-arbat-asw3(config-if)#switchport mode access msk-arbat-asw3(config-if)#switchport access vlan 101 % Access VLAN does not exist. Creating vlan 101 msk-arbat-asw3(config)#interface FastEthernet0/2 msk-arbat-asw3(config-if)#description PTO msk-arbat-asw3(config-if)#switchport access vlan 101 msk-arbat-asw3(config-if)switchport mode access All settings are done immediately in accordance with the plan.
Notice that the switch swears at the lack of a vlan? Here you have to be careful. Some software versions work somewhat illogical.
Even if you do not create it, the settings will be applied and at debugging at first glance everything will be fine, but there will be no connection. And the cunning is that the phrase Creating vlan 101 does not mean that this same vlan will be created. Therefore, we go to the global configuration mode and create it (and at the same time all other Vlans needed on this switch):
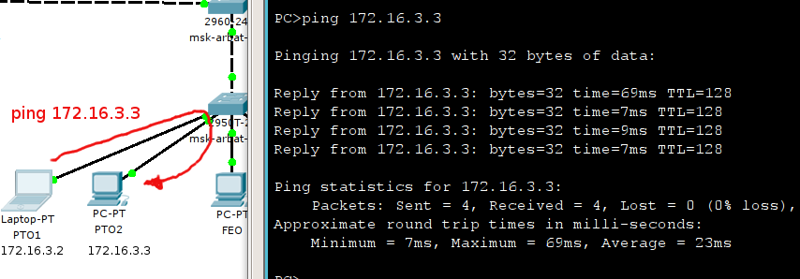
msk-arbat-asw3>enable msk-arbat-asw3#configure terminal msk-arbat-asw3(config)#vlan 2 msk-arbat-asw3(config-vlan)#name Management msk-arbat-asw3(config-vlan)#vlan 3 msk-arbat-asw3(config-vlan)#name Servers msk-arbat-asw3(config-vlan)#vlan 101 msk-arbat-asw3(config-vlan)#name PTO msk-arbat-asw3(config-vlan)#vlan 102 msk-arbat-asw3(config-vlan)#name FEO msk-arbat-asw3(config-vlan)#vlan 103 msk-arbat-asw3(config-vlan)#name Accounting msk-arbat-asw3(config-vlan)#vlan 104 msk-arbat-asw3(config-vlan)#name Other Now connect the computers to ports FE0 / 1 and FE0 / 2, configure the addresses 172.16.3.2 and 172.16.3.3 with the subnet mask 255.255.255.0 and the gateway 172.16.3.1 and check the connection:
After this happens, we configure the port FE0 / 16 as access for the 104th vlan (network of other users):
msk-arbat-asw3(config)#interface FastEthernet0/16 msk-arbat-asw3(config-if)#description Other msk-arbat-asw3(config-if)#switchport access vlan 104 msk-arbat-asw3(config-if)switchport mode access Connect a computer to it and configure the address from the same subnet as the VET, for example, 172.16.3.5 with the mask 255.255.255.0.
If you now try to ping this address, then you should not get it - the computers are in different vlans and are isolated from each other:

That is, again what is happening? From your computer comes to the 1st port a broadcast request: “Who is 172.16.3.5”, because the computer itself does not yet know the recipient's MAC address. The frame that carries this request is marked as belonging to the 101st VLAN in accordance with the port on which it arrived. And further, to find out where the computer is located 172.16.3.5, the frame is sent to all member ports of the 101st VLAN. And among them there is no FE0 / 16 port, therefore, naturally, this address is considered unreachable, which leads to the “Request timed out” response.
Attention! If a device with that IP is still in this VLAN, then it will not be the same Other laptop and at the same time they will not conflict with each other, since they are logically in different broadcast domains.
Trunk ports (trunk)
So, the gates have opened for you, now you have to create a corridor - a trunk between three switches: msk-arbat-asw3, msk-arbat-dsw1 and msk-rubl-asw1.
The uplink port on msk-arbat-asw3 is GE1 / 1. Well, since we still need to forward all the vlans, we will do it now, that is, in addition to 101 and 104, we will write 2, 102 and 103:
msk-arbat-asw3(config)#interface GigabitEthernet1/1 msk-arbat-asw3(config-if)#description msk-arbat-dsw1 msk-arbat-asw3(config-if)#switchport trunk allowed vlan 2,101-104 msk-arbat-asw3(config-if)#switchport mode trunk In fact, on the interface, the #switchport mode trunk command is enough to have tagged frames of all vlans go through this port, because by default the trunk port lets everything through. But we are engineers, not enikeyschiki. Where have you seen that unlimited running behind our back? Therefore, only what we allow passes through us. As soon as you give the switchport trunk allowed vlan 101 command, no vlan will pass through the port, except for 101 (VLAN 1 runs by default and untagged).
Attention! If you want to add another vlan to the trunk port, then you need to use the following command syntax:
msk-arbat-dsw1(config-if)#switchport trunk allowed vlan add 105 Otherwise (by writing switchport trunk allowed vlan 105 ) you will erase all the old permissions and add the new 105th vlan. And it’s good if you don’t lose access to this switch. But for a simple connection, you still get the fifth number)
Go to msk-arbat-dsw1. On it it is necessary to create all the ports and configure two ports:
GE1 / 2 towards msk-arbat-asw3
FE0 / 1 towards msk-rubl-asw1:
msk-arbat-dsw1(config)#interface GigabitEthernet1/2 msk-arbat-dsw1(config-if)#description msk-arbat-asw3 msk-arbat-dsw1(config-if)#switchport trunk allowed vlan 2,101-104 msk-arbat-dsw1(config-if)#switchport mode trunk msk-arbat-dsw1(config)#interface FastEthernet0/1 msk-arbat-dsw1(config-if)#description msk-rubl-asw1 msk-arbat-dsw1(config-if)#switchport trunk allowed vlan 2,101,104 msk-arbat-dsw1(config-if)#switchport mode trunk Well, let's configure, of course, the ports on msk-rubl-asw1:
msk-rubl-asw1(config)interface FastEthernet0/24 msk-rubl-asw1(config-if)switchport trunk allowed vlan 2,101,104 msk-rubl-asw1(config-if)switchport mode trunk msk-rubl-asw1(config)#int FastEthernet0/1 msk-rubl-asw1(config-if)#description PTO msk-rubl-asw1(config-if)#switchport mode access msk-rubl-asw1(config-if)#switchport access vlan 101 % Access VLAN does not exist. Creating vlan 101 Again, you need to configure Vlana. And note that there are no messages when configuring trunk ports.
If you have configured everything correctly (which is not in doubt), then from the first port, msk-rubl-asw1, you will see the PTO computers connected to msk-arbat-asw3.

For confidence, we will also check the 104th vlan. Through the trunk, we have already delivered it here.
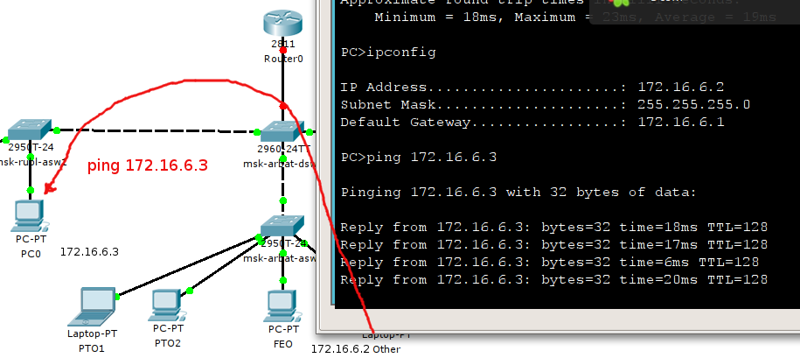
msk-rubl-asw1(config)#interface FastEthernet 0/16 msk-rubl-asw1(config-if)#switchport mode access msk-rubl-asw1(config-if)#switchport access vlan 104 We connect the computer to the 16th port and configure the IP address 172.16.6.3 with the mask 255.255.255.0 and the gateway 172.16.6.1 on it. And change the IP address of the laptop on the Arbat to 172.16.6.2 with the same mask and gateway.
Control network
Configure the IP address to manage.
In our labs they will not be needed, because we configure the device through the RT window. But in real life it is vital for you.
To do this, we create a virtual interface and specify the number of the vlan of interest to us. And further we work with it, as with the most usual physical interface.
msk-arbat-dsw1:
msk-arbat-dsw1(config)#interface vlan 2 msk-arbat-dsw1(config-if)#description Management msk-arbat-dsw1(config-if)#ip address 172.16.1.2 255.255.255.0 msk-arbat-asw3:
msk-arbat-asw3(config)#interface vlan 2 msk-arbat-asw3(config-if)#description Management msk-arbat-asw3(config-if)#ip address 172.16.1.5 255.255.255.0 With msk-arbat-asw3, we launch ping to msk-arbat-dsw1:
msk-arbat-asw3#ping 172.16.1.2 Type escape sequence to abort. Sending 5, 100-byte ICMP Echos to 172.16.1.2, timeout is 2 seconds: ..!!! Success rate is 60 percent (3/5), round-trip min/avg/max = 4/4/4 ms The first couple of packets can be lost to the work of the ARP protocol: determining the correspondence IP address - MAC address. At the same time, the MAC address, port and Vlan number are added to the switch table.
Independently configure the management network IP addresses on the other switches and check their availability
Actually, that's all the magic. Often the whole setup is reduced to this kind of action, if you are not working in a provider. On the other hand, if you work in an ISP, you probably don’t need to explain such things.
If you want to know more about this, read: VTP , QinQ , reserved VLAN numbers
Another small tool that can slightly increase the usability: banner. This is the announcement that the tsiska will show before authorization to the device.
Switch(config)#banner motd q Enter TEXT message. End with the character 'q'. It is just banner. q Switch(config)# After motd, you specify the character that will signal that the line is finished. In this example, we put “q”.
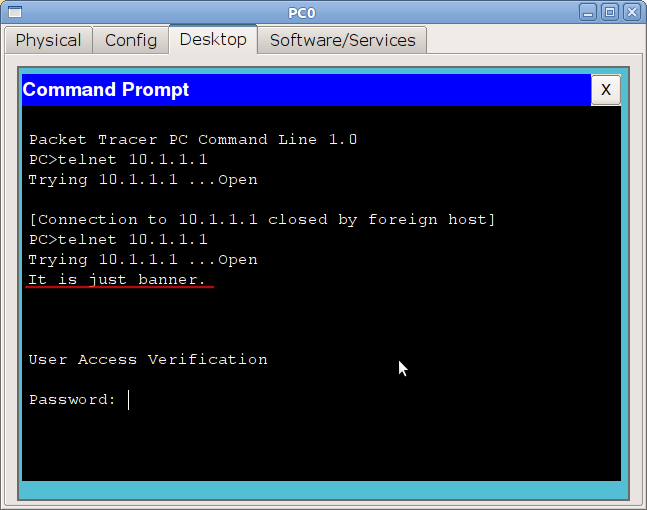
Regarding the content of the banner. There is such a legend: the hacker broke into the network, broke something \ stole it, was caught, and was acquitted and released at the court. Why? But because on the border router (between the Internet and the internal network), the word “Welcome” was written in the banner. “Well, if they ask, I went in”)). Therefore, it is considered good practice to write something like “Access denied!” In the banner.
To organize knowledge of the items will analyze what you need to do:
1) Configure the hostname. This will help you in the future on a real network to quickly navigate where you are.
Switch(config)#hostname HOSTNAME 2) Create all vlana and give them a name
Switch(config)#vlan VLAN-NUMBER Switch(config-vlan)#name NAME-OF-VLAN 3) Configure all access ports and give them a name
Switch(config-if)#description DESCRIPTION-OF-INTERFACE Switch(config-if)#switchport mode access Switch(config-if)#switchport access vlan VLAN-NUMBER It is sometimes convenient to configure interfaces in batches:
msk-arbat-asw3(config)#interface range fastEthernet 0/6 — 10 msk-arbat-asw3(config-if-range)#description FEO msk-arbat-asw3(config-if-range)#switchport mode access msk-arbat-asw3(config-if-range)#switchport access vlan 102 4) Configure all trunk ports and give them a name:
Switch(config-if)#description DESCRIPTION-OF-INTERFACE Switch(config-if)#switchport mode trunk Switch(config-if)#switchport trunk allowed vlan VLAN-NUMBERS 5) Do not forget to persist:
Switch#copy running-config startup-config Total: what have we achieved? All devices on the same subnet see each other, but do not see devices from the other. In the next issue we are dealing with this issue, and also turn to static routing and L3 switches.
In general, this lesson can be completed. In the video you can once again see how the vlans are configured. As a homework set up vlany on switches for servers.
Here you can download the configuration of all devices:
Lift-me-Up_Configuration.zip
And our project RT:
Lift-me-UP_v2-VLANs.pkt
PS
: , native vlan . cisco .
, msk-rubl-asw1 101- .
, , , cisco , STP . 101- , , 101- msk-rubl-asw1.
Once again we want to note that with all our desire we will not be able to cover all the nuances and subtleties, therefore we do not set ourselves such a task. Things like the principle of constructing a MAC address, the values of the Ether Type field, or why you need a CRC at the end of the frame, you have to study yourself.
Thanks to the co-author of this cycle, hagravchaninin thegluck .
For the provision of additional materials I want to thank Natasha Samoylenko
Readers who do not have a register for Habré, but having questions, as before, can concentrate them in LiveJournal .
Source: https://habr.com/ru/post/138043/
All Articles