Organize your audio library. Practical advice
Introduction
In general, I am a perfectionist in many matters. If you have, you need to be perfect (sometimes it has a negative effect, but now it’s not about that). I also used to keep my audio collection clean. But over time, with the replenishment, many small troubles began to accumulate. Here are some of them:
- Different patterns for file names: 4 - Star | 04 - Star | 04. Star
- Different artists names in tags: Chizh & Co | Chizh and co. | Mylene Farmer | Mylène farmer
- No artists are listed for the album (which leads to a complete mess in compiled albums)
- Not quite correct information about albums consisting of several discs.
- Confusion in the years of publications and reprints (remastered, etc.)
Often users have a collection of several thousand, and sometimes several tens of thousands of entries. So, to shovel everything manually is long and inefficient.
This manual is intended to bring the audio collection to the most orderly form with minimal expenses. In contrast to publicly available information that can be found on the Internet, my personal experience (both positive and negative) is also present here. As a result, we get a completely re-sorted collection. All of the following can be applied to any collections, but the best option is if the collection mostly consists of full official albums, with a minimum of fragmented tracks.
Stage 1. Pre-cleaning
At once I will make a reservation that the descriptions of all stages are mostly of a recommendatory nature, and you need to use them step by step only if you want to remake everything from scratch and organize it to the maximum.
')
First we need to go through all the files and folders and quickly clean them. Throw away all the excess that you do not listen and are unlikely to be. For example, I had a lot of reprints (i.e. actually duplicates), bootlegs, all sorts of Live-rarities, which I have never even listened to, but just kept for the collection ... In general, delete at your discretion, if possible, leave only full and official albums. This is not a critical, but rather an important stage. Subsequently, thanks to this, you can save great time.
Stage 2. Recognition of albums and tracks
This stage is the most important. Here is the recognition and sorting of songs. For this we need the program MusicBrainz Picard .
In order not to do the same work twice, at this and all subsequent stages, be sure to carefully review the settings of all programs.
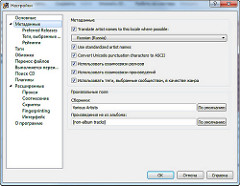 I recommend to start everything from scratch. To do this, in the settings of MusicBrainz we enable file transfer and specify the destination folder. I would also recommend clearing all old information in tags.
A slight digression about ID3 tags. Version 2.4 is more advanced, but not all programs can work with it correctly. In particular, Windows Explorer and Windows Media Player (up to version 12 inclusive) do not understand the encoding. So if you want compatibility - include 2.3. If you want a more progressive format with UTF-8 type buns and an extended set of tags, use 2.4. I used version 2.4 in all programs (running ahead of time - foobar2000 and Google Music understand without problems; Winamp should, too).
The program recognizes two types of albums: regular and compilations. Compilations are when the album has more than one artist. Various collections and the collection “The Best of Classics” were found in my collections. Collections are thrown into one folder (usually called Various Artists ), which can be sorted afterwards.
Pay attention to the “File transfer” settings item, it configures renaming and sorting by folders. It uses a small scripting language (the same as in foobar2000), with its help you can customize templates as you like. The default settings are quite universal, but for myself I corrected them a bit:
$if2(%albumartist%,%artist%)/$if2($left(%originaldate%,4),$left(%date%,4)) - %album%/$if($gt(%totaldiscs%,1),%discnumber%-,)$num(%tracknumber%,2) - %title% $if2(%albumartist%,%artist%)/$if2($left(%originaldate%,4),$left(%date%,4)) - %album%/$if($gt(%totaldiscs%,1),%discnumber%-,)$num(%tracknumber%,2) - %artist% - %title% The first line is for albums, the second is for compilations. Note that here the variable % date% indicates the date of publication (or reissue), not the release date of the album.
These templates generate names like these:
  Music \ Splin \ 2002 - Acoustics \ 2-05 - My heart.mp3
 Music \ Various Artists \ 2001 - Fellini Tour \ 14 - Splin - My Heart.mp3
After we made sure that all the settings are set correctly, you can feed your entire collection and go and drink coffee. Well or sleep, depending on the size of the collection. The program works rather slowly, about 20 files are processed per minute. The more information you can extract from tags and names - the faster the processing will take place.
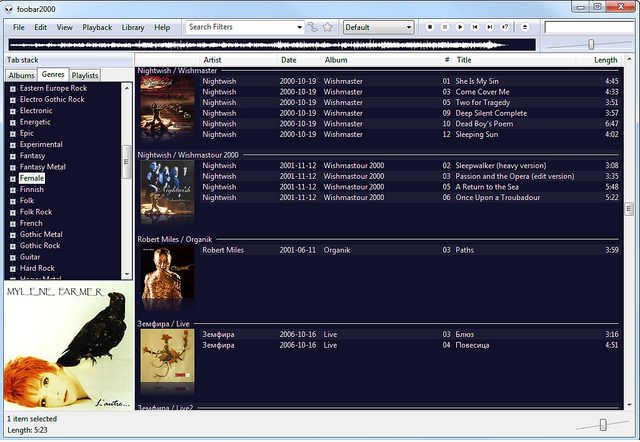
For the article, I conducted testing in the "extreme" -mode: I took several dozen tracks, removed all the tags from them, and renamed them randomly. The result is visible in the screenshot.
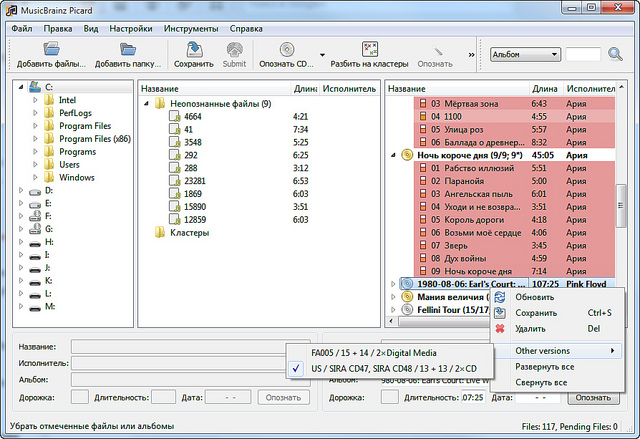
On the right, the identified tracks are grouped into albums. But sometimes you need to help the program to recognize the tracks. The file may not be recognized, or several files may be included in the “candidates” on the album track. In this case, you will have to choose manually. The level of coincidence is indicated by color - from green to red. The check compares some tags and track fingerprints.
The album is marked as gold (in the sense, yellow :)), if it contains all the tracks, and there are no multiple interpretations. Our goal is to achieve the maximum number of gold albums. Also note that the content of the album may vary depending on the issuing studio, sometimes manual editing will help achieve a more accurate match. Processed albums periodically save to the destination folder.
Stage 3a. Manual revision of names
If the world were perfect, then apart from the second stage, we would no longer need anything. But alas, MusicBrainz can do quite a lot of the work, but not all. Some of your albums may be missing from its database. In this case, you will have a part of the unsorted music in the source folder.
The stages of manual revision are fairly standard, so take it written as nothing more than a recommendation. But I will still describe them in more detail, for the integrity of the whole complex of actions. The purpose of this stage is to bring the structure of files and directories into a form that 1) would be correct, and 2) would satisfy your requirements.
Start your favorite file manager, go to the folder with the remaining unsorted music, and start. First, we must bring the structure and names to a single form. If you have identified part of the albums of the group Black Coffee , check if you have the same group name everywhere. If you have in the sorted music the template name NN - Trackname.mp3 - rename all the remaining files accordingly. To facilitate group renaming, you can use Mp3tag . How to use it, I will not explain. We must achieve a perfect correspondence of the structure of both folders, so that after their merging it would be impossible to say what it was from.
After that, you can merge two folders into one. In principle, this can be finished. But many will want to further refine the file structure. For example, by default collections are thrown into the Various Artists folder, but often they are more related to a single artist. So all the contents of the various Artists can be easily scattered in other directories. It also happens that the albums are too detailed by the performers: Siskin, Siskin & Co, Siskin and Various People, Siskin and Pasha, Chernetsky and Siskin, ... Often there is only one album there. It did not quite suit me, so I merged all similar groups of folders into one.
Stage 3b. Manual revision of tags
After all the necessary music was in the right place and became properly named, we can do the polishing of tags. Now we need Mp3tag necessarily. Actually, all operations are similar to those that were at the previous stage, only relative to the tags. First you need to bring the tags to a single mind, and then - to finalize, as you like.
Unfortunately - the only way to do this is to walk manually through all the albums and tracks. Fortunately - most of the tracks are ready, and we work only with the unsorted part.
As for the refinement of details. It all depends on your requirements. You can even skip this part altogether. Personally, I did the following manipulations:
- Poured composite albums into one by writing the disc number in tags
- Concretized all album artists (where Various Artists were)
- Corrected file names, where service characters were replaced by underscores
A couple of words tag Album Artist . Take, for example, the album "Picnic - Tribute". The album has 18 tracks, they are performed by 18 different groups. But you can safely register “Picnic” in the artist tag of the albums, and it will appear in its entirety among the Picnic albums. This concept is used very often, and the Album Artist tag has a higher priority than the Artist tag when sorting.
I also want to say that Mp3tag has basic scripting capabilities, which allows you to manipulate tags and names within fairly wide limits. Additionally, see the Actions window and its help. It took me to fix some nezabberichu with dates made by stupidity.
Step 4. Genre definition
After processing, the Genre tag will be blank. And although in MusicBrainz there was an option to automatically fill in genres, but for some reason it did not work for me. So, it is necessary to look for other means. However, this item can be skipped if you are not interested in information about genres.
As it turned out, with the automatic definition of the genre everything is tight. And with genres for Russian songs - even worse. But I tried to choose the best of the worst, and stopped at the MediaMonkey combine. By the way, there is a portable installation option. To search for genres to it there is a script called Genre Finder . As far as I understand, this script uses the Last.fm API, so you need to be very careful about the settings: there are not many of them, but the final result depends on them very much. It is likely that you will want to make several test passes with different options for customization.
The first thing I want to advise is, yes, you can make a multiple definition of genres, but always limit their number from above. Believe me, it's better to skip some kind of genre, than to clean out the hardcore type “THE BEST EVER SONG IN MY LIFE !!!! 11” or “Kill me I cant hear it!”. Also note the possibility of installing whitelists / blacklists. I neglected this, and then lost time during manual cleaning. Ready whitelists can be found on the forum at the link above.
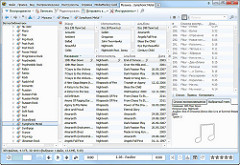 I recommend first defining 2-3 genres in the album search mode. You can then add a couple more genres, but already in the search mode for individual tracks. Here, in MediaMonkey, you can simultaneously watch and grind the resulting list of genres.
It is worth making a small clarification regarding foobar2000: it turned out that it does not recognize multiple values in a single tag, separated by a semicolon (as MediaMonkey writes them). With other players, there are no such problems. But the problem is solved with the help of the same foobar. Highlight your entire list of songs, press Alt + Enter (Properties command), click on the Genre tag, and then select Tools - Selection - Split values .... This command splits the values from one tag into “correct” multiple tags.
Stage 5. Album covers
Well, the last stage - cover arts. Here everything is much better than with the previous paragraph. There are many programs that can search for covers. Some of them allow you to embed thumbnails of covers directly into the tags of the file (although I am pretty cool about this feature). But, in my humble opinion, Album Art Downloader has the widest possibilities.
 In the settings, I would recommend raising the minimum cover size (at least up to 50 px), and enable the “Automatically close after saving” option.
We will need to do two passes (set experimentally; no other sources, including iTunes, give the best result). First, turn off all sources (area on the right), except Last.fm , and scan all our music. After the search and analysis process, we will see the Queue Manager window, where there will be a list of all found albums. At this stage, you can safely run the automatic mode (link at the bottom of the Queue Manager window) and wait for completion.
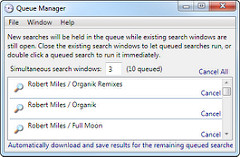 If you have left unrecognized albums after the first pass, change the source from Last.fm to Google Images , and start processing the remaining albums. Here I would recommend to be more careful and check each album manually. Personally, I had these two passes; the other sources were completely inadequate for me, but you can try - each of them has its own specifics.
Well, it seems to be all. But there is still a little nuance. The fact is that some of the albums have a PNG cover. As it turned out, Google Music understands only JPEG, and indeed, this format is more common. So if you want, you can convert everything to JPEG.
Only I was unable to quickly find a free utility that would simply recursively find all PNG files and rename them to JPEG. If you know one, use it. You can do batch processing in Photoshop. You can call for help advanced file manager. I’ll just leave the PowerShell script here, which does just that - select all PNGs recursively and convert them. The original files remain, you can then delete them manually.
function ConvertTo-Jpg { [cmdletbinding()] param([Parameter(Mandatory=$true, ValueFromPipeline = $true)] $Path) process{ if ($Path -is [string]) { $Path = get-childitem $Path } $Path | foreach { $image = [System.Drawing.Image]::FromFile($($_.FullName)) $FilePath = "{0}\{1}.jpg" -f $($_.DirectoryName), $($_.BaseName) $image.Save($FilePath, [System.Drawing.Imaging.ImageFormat]::Jpeg) } } } cd "D:\Music\" Get-ChildItem -Filter *.png -Recurse | ConvertTo-Jpg Total
That's all. Such a short manual turned out :)
In general, yes, the process is non-trivial, and with a large collection can be lengthy; There is no “Make It Right” button. But, firstly, in any case, the rules, tastes and preferences of each are different, respectively, and the settings will also be different for everyone. Secondly, throughout the process we were helped by powerful programs that largely automated the work. Well, and thirdly, it is not necessary to repeat with accuracy all stages; I think everyone can find the best way for themselves.
But in the end we get:
- Unified ordered file system structure
- ID3 tags completely filled (up to the composer) according to the same rules
- Ability to sort by genres and other labels
- Covers for all albums
- Aesthetic pleasure from the realization of the fact that you have almost perfect order :)
Now in this form, the collection happily eats any media combine or Google Music.
All the above applications are free, all coincidences are random, and of course, use this information only for good purposes :)
Source: https://habr.com/ru/post/137933/
All Articles