How to make an electric motor in 15 minutes
It is always interesting to observe changing phenomena, especially if you yourself are involved in the creation of these phenomena. Now we will assemble the simplest (but really working) electric motor consisting of a power source, a magnet and a small coil of wire, which we ourselves will do.
There is a secret that will make this set of items become an electric motor; a secret that is both smart and amazingly simple. Here is what we need:
- 1.5V battery or battery.
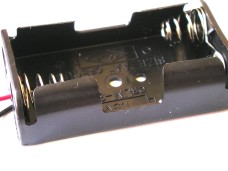
- The holder with contacts for the battery.
')
- Magnet.
- 1 meter of wire with enamel insulation (diameter 0.8-1 mm).
- 0.3 meter uninsulated wire (diameter 0.8-1 mm).


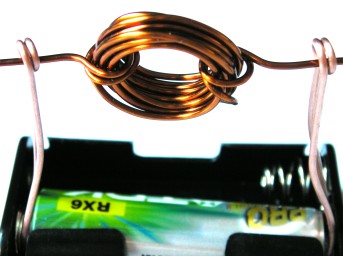
We start with the winding of the coil, the part of the electric motor that will rotate. To make the coil sufficiently flat and round, we wind it on a suitable cylindrical frame, for example, on an AA-size battery.
Leaving 5 cm of wire at each end free, we wind 15-20 turns on a cylindrical frame.
Do not try to wind the coil especially tightly and evenly; a small degree of freedom will help the coil to better maintain its shape.
Now carefully remove the coil from the frame, trying to keep the resulting shape.
Then wrap the loose ends of the wire several times around the coils to preserve the shape, making sure that the new fastening coils are exactly opposite each other.
The coil should look like this:


Now is the time for the secret, the feature that will make the engine work. This is a secret because it is an elegant and non-obvious technique, and it is very difficult to detect it when the engine is running. Even people who know a lot about engine performance may be surprised by the ability of the engine to work until they discover this subtlety.
Holding the coil vertically, place one of the free ends of the coil on the edge of the table. Using a sharp knife, remove the upper half of the insulation, leaving the lower half in enamel insulation.
Do the same with the second end of the coil, making sure that the uninsulated ends of the wire are directed upwards at the two free ends of the coil.
What is the meaning of this technique? The coil will rest on two holders made of bare wire. These holders will be connected to different ends of the battery, so that an electric current can flow from one holder through the coil to another holder. But this will only happen when uninsulated halves of the wire are lowered down, touching holders.
Now you need to make support for the coil. These are simply turns of wire that support the coil and allow it to rotate. They are made of uninsulated wire, because in addition to supporting the coil, they must deliver electric current to it.
Just wrap each piece of bare wire around a small nail - and get the right part of our engine.
The base of our first electric motor will be the battery holder. This will be a suitable base, because when the battery is installed, it will be heavy enough so that the electric motor does not tremble.
Assemble the five parts together, as shown in the photo (initially without a magnet). Put a magnet on top of the battery and gently push the coil ...

If done correctly, the COIL WILL BEGIN TO ROTATE FAST! We hope that with you, as in our experiment, everything will work the first time.
If the motor still does not work, carefully check all electrical connections. Does the coil rotate freely? Is the magnet close enough (if not enough, install additional magnets or trim wire holders)?
When the motor starts working, the only thing you need to pay attention to is that the battery does not overheat, since the current is large enough. Just remove the coil - and the chain will be broken.
Let's find out exactly how our simplest electric motor works. When an electric current flows through the wire of any coil, the coil becomes an electromagnet. The electromagnet acts like a normal magnet. It has a north and south pole and can attract and repel other magnets.
Our coil becomes an electromagnet when the uninsulated half of the protruding wire of the coil touches the uninsulated holder. At that moment, a current begins to flow along the coil, a north pole arises at the coil, which is attracted to the south pole of the permanent magnet, and a south pole that pushes away from the south pole of the permanent magnet.
We removed the insulation from the top of the wire when the coil was standing vertically, so the poles of the electromagnet will be directed to the right and left. And this means that the poles will move in order to be located in the same plane with the poles of the lying magnet, directed up and down. Therefore, the coil will turn to a magnet. But at the same time the isolated part of the coil wire will touch the holder, the current will be interrupted, and the coil will no longer be an electromagnet. It rotates further by inertia, again touches the non-insulated part of the holder and the process is repeated again and again until the current runs out in the batteries.
How can I make an electric motor spin faster?
One way is to add another magnet to the top.
Lift the magnet during the rotation of the coil, and one of two things will happen: either the motor stops or starts rotating faster. The choice of one of the two options will depend on which pole of the new magnet will be directed to the coil. Just do not forget to hold the bottom magnet, and then the magnets will jump to each other and destroy the fragile structure!
Another way is to put small glass beads on the axis of the coil, which will reduce the friction of the coil on the holders, and it will also better balance the electric motor.
There are many more ways to improve this simple design, but we have achieved the main goal - you have collected and fully understood how the simplest electric motor works.
There is a secret that will make this set of items become an electric motor; a secret that is both smart and amazingly simple. Here is what we need:
- 1.5V battery or battery.
- The holder with contacts for the battery.
')
- Magnet.
- 1 meter of wire with enamel insulation (diameter 0.8-1 mm).
- 0.3 meter uninsulated wire (diameter 0.8-1 mm).
We start with the winding of the coil, the part of the electric motor that will rotate. To make the coil sufficiently flat and round, we wind it on a suitable cylindrical frame, for example, on an AA-size battery.
Leaving 5 cm of wire at each end free, we wind 15-20 turns on a cylindrical frame.
Do not try to wind the coil especially tightly and evenly; a small degree of freedom will help the coil to better maintain its shape.
Now carefully remove the coil from the frame, trying to keep the resulting shape.
Then wrap the loose ends of the wire several times around the coils to preserve the shape, making sure that the new fastening coils are exactly opposite each other.
The coil should look like this:
Now is the time for the secret, the feature that will make the engine work. This is a secret because it is an elegant and non-obvious technique, and it is very difficult to detect it when the engine is running. Even people who know a lot about engine performance may be surprised by the ability of the engine to work until they discover this subtlety.
Holding the coil vertically, place one of the free ends of the coil on the edge of the table. Using a sharp knife, remove the upper half of the insulation, leaving the lower half in enamel insulation.
Do the same with the second end of the coil, making sure that the uninsulated ends of the wire are directed upwards at the two free ends of the coil.
What is the meaning of this technique? The coil will rest on two holders made of bare wire. These holders will be connected to different ends of the battery, so that an electric current can flow from one holder through the coil to another holder. But this will only happen when uninsulated halves of the wire are lowered down, touching holders.
Now you need to make support for the coil. These are simply turns of wire that support the coil and allow it to rotate. They are made of uninsulated wire, because in addition to supporting the coil, they must deliver electric current to it.
Just wrap each piece of bare wire around a small nail - and get the right part of our engine.
The base of our first electric motor will be the battery holder. This will be a suitable base, because when the battery is installed, it will be heavy enough so that the electric motor does not tremble.
Assemble the five parts together, as shown in the photo (initially without a magnet). Put a magnet on top of the battery and gently push the coil ...
If done correctly, the COIL WILL BEGIN TO ROTATE FAST! We hope that with you, as in our experiment, everything will work the first time.
If the motor still does not work, carefully check all electrical connections. Does the coil rotate freely? Is the magnet close enough (if not enough, install additional magnets or trim wire holders)?
When the motor starts working, the only thing you need to pay attention to is that the battery does not overheat, since the current is large enough. Just remove the coil - and the chain will be broken.
Let's find out exactly how our simplest electric motor works. When an electric current flows through the wire of any coil, the coil becomes an electromagnet. The electromagnet acts like a normal magnet. It has a north and south pole and can attract and repel other magnets.
Our coil becomes an electromagnet when the uninsulated half of the protruding wire of the coil touches the uninsulated holder. At that moment, a current begins to flow along the coil, a north pole arises at the coil, which is attracted to the south pole of the permanent magnet, and a south pole that pushes away from the south pole of the permanent magnet.
We removed the insulation from the top of the wire when the coil was standing vertically, so the poles of the electromagnet will be directed to the right and left. And this means that the poles will move in order to be located in the same plane with the poles of the lying magnet, directed up and down. Therefore, the coil will turn to a magnet. But at the same time the isolated part of the coil wire will touch the holder, the current will be interrupted, and the coil will no longer be an electromagnet. It rotates further by inertia, again touches the non-insulated part of the holder and the process is repeated again and again until the current runs out in the batteries.
How can I make an electric motor spin faster?
One way is to add another magnet to the top.
Lift the magnet during the rotation of the coil, and one of two things will happen: either the motor stops or starts rotating faster. The choice of one of the two options will depend on which pole of the new magnet will be directed to the coil. Just do not forget to hold the bottom magnet, and then the magnets will jump to each other and destroy the fragile structure!
Another way is to put small glass beads on the axis of the coil, which will reduce the friction of the coil on the holders, and it will also better balance the electric motor.
There are many more ways to improve this simple design, but we have achieved the main goal - you have collected and fully understood how the simplest electric motor works.
Source: https://habr.com/ru/post/137472/
All Articles