Facebook timeline
Facebook Timeline makes a big revolution in the world of social networks, gives a new look for user profiles. Today, let's see how easy it is to implement this project using jQuery and CSS.

')
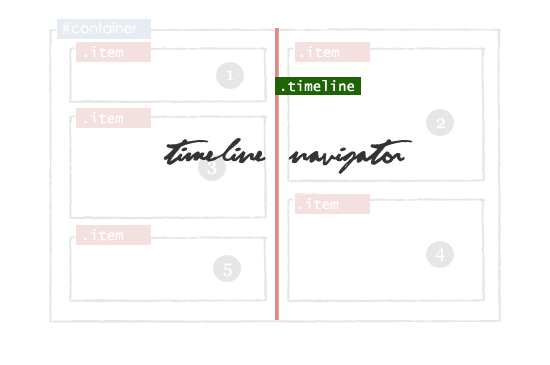
First create a DIV element with id = "container" . In it we will create some more DIV elements with id = "item"

Some simple CSS:
Use the jQuery Masonry plugin to customize the use of free space.
After applying the plugin.

Now create a DIV element - timeline_container in the container block. This block will contain two divas with ID timeline and plus .
For the created blocks, add JavaScript and CSS.
This is the most interesting part, $ ('# container'). Find ('. Item') - finding blocks that need arrows, if position = 0px, then rightCorner , otherwise leftCornet .

Now let's add some CSS:
Now in each item block, add a tag with a class - deletebox
Now revive the removal of elements with javascript.
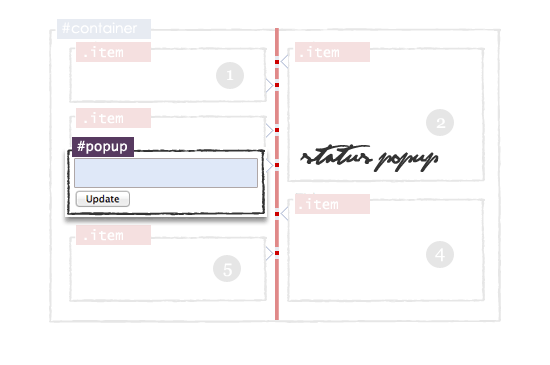
Create an element with id = "popup" inside the div container. This layer contains a textarea text field with id = "update" and input with id = "update_button" .
Animate:
Download
Demo
')
Step 1 - HTML Layout
First create a DIV element with id = "container" . In it we will create some more DIV elements with id = "item"
<div id="container"> <div class="item">1</div> <div class="item">2</div> <div class="item">3</div> <div class="item">4</div> </div> Some simple CSS:
#container{ width:860px; margin: 0 auto; } .item { width: 408px; margin: 20px 10px 10px 10px; float: left; background-color:#ffffff; border:solid 1px #B4BBCD; min-height:50px; text-align:justify; word-wrap:break-word; } Step 2 - Avoid Free Space
Use the jQuery Masonry plugin to customize the use of free space.
<script type="text/javascript" src="http://ajax.googleapis.com/ajax/libs/jquery/1.5/jquery.min.js"></script> <script type="text/javascript" src="jquery.masonry.min.js"/> <script type="text/javascript" > $(function() { // masonry $('#container').masonry({itemSelector : '.item',}); }); </script> After applying the plugin.
Step 3 - Timeline Navigation
Now create a DIV element - timeline_container in the container block. This block will contain two divas with ID timeline and plus .
<div id="container"> // Timeline <div class="timeline_container"> <div class="timeline"> <div class="plus"></div> </div> </div> <div class="item">1</div> -------- -------- </div> For the created blocks, add JavaScript and CSS.
$('.timeline_container').mousemove(function(e) { // , () var topdiv=$("#containertop").height(); var pag= e.pageY - topdiv-26; // $('.plus').css({"top":pag +"px", "background":"url('images/plus.png')","margin-left":"1px"}); }).mouseout(function(){ // - $('.plus').css({"background":"url('')"}); }); .timeline_container{ width: 16px; text-align: center; margin: 0 auto; cursor:pointer; display: block; } .timeline{ margin: 0 auto; background-color:#e08989; display: block; float: left; height: 100%; left: 428px; margin-top: 10px; position: absolute; width: 4px; } .timeline:hover{ cursor: pointer; margin: 0 auto; } .timeline div.plus{ width: 14px; height: 14px; position: relative; left: -6px; } Step 4 - Displaying Arrows
This is the most interesting part, $ ('# container'). Find ('. Item') - finding blocks that need arrows, if position = 0px, then rightCorner , otherwise leftCornet .
function Arrow_Points() { var s = $('#container').find('.item'); $.each(s,function(i,obj){ var posLeft = $(obj).css("left"); $(obj).addClass('borderclass'); if(posLeft == "0px") { html = "<span class='rightCorner'></span>"; $(obj).prepend(html); } else { html = "<span class='leftCorner'></span>"; $(obj).prepend(html); } }); } Now let's add some CSS:
.rightCorner { background-image: url("images/right.png"); display: block; height: 15px; margin-left: 408px; margin-top: 8px; padding: 0; vertical-align: top; width: 13px; z-index:2; position: absolute; } .leftCorner{ background-image: url("images/left.png"); display: block; height: 15px; width: 13px; margin-left: -13px; margin-top: 8px; position: absolute; z-index:2; } Step 5 - Remove Blocks
Now in each item block, add a tag with a class - deletebox
<div id="container"> <div class="item"> <a href='#' class='deletebox'>X</a> 1 </div> <div class="item"> <a href='#' class='deletebox'>X</a> 2 </div> ----------- ----------- ----------- </div> Now revive the removal of elements with javascript.
$(".deletebox").live('click',function() { if(confirm("Are your sure?")) { $(this).parent().fadeOut('slow'); // item $('#container').masonry( 'remove', $(this).parent() ); // masonry $('#container').masonry( 'reload' ); // $('.rightCorner').hide(); $('.leftCorner').hide(); // Arrow_Points(); } return false; }); Step 6 - Adding an Event
Create an element with id = "popup" inside the div container. This layer contains a textarea text field with id = "update" and input with id = "update_button" .
<div id="container"> <div class="item">1</div> -------- -------- <div id="popup" class='shade'> <div class="Popup_rightCorner" > </div> What's Up? <textarea id='update'></textarea> <input type='submit' value=' Update ' id='update_button'/> </div> </div> Animate:
// $(".timeline_container").click(function(e) { var topdiv=$("#containertop").height(); // $("#popup").css({'top':(e.pageY-topdiv-33)+'px'}); $("#popup").fadeIn(); //Popup block show // $("#update").focus(); }); // $("#popup").mouseup(function() {return false}); $(document).mouseup(function(){$('#popup').hide();}); // Update $("#update_button").live('click',function() { // var x=$("#update").val(); //Ajax $("#container").prepend('<div class="item"><a href="#" class="deletebox">X</a>'+x+'</div>'); // masonry $('#container').masonry( 'reload' ); // $('.rightCorner').hide(); $('.leftCorner').hide(); // Arrow_Points(); // $("#update").val(''); // $("#popup").hide(); return false; }); #popup{ display: block;width: 408px; float: left;margin-top:10px; background-color:#ffffff; border:solid 1px #A9B6D2; min-height:60px;display:none; position:absolute;margin:10px; } Download
Demo
Source: https://habr.com/ru/post/137436/
All Articles