Meet wxPython. Part one. The first steps
Good day!

I once told you about a Ruby / Tk bundle. Today I am going to continue acquaintance with "fast interfaces". This time I will tell you about wxPython , and we will write in Python .
In fact, wxPython is only a wrapper for the wxWidgets library , which in turn represents a graphic toolkit that allows you to write cross-platform applications.
')
wxWidgets (previously known as wxWindows ) is an open-source, cross-platform library of tools for developing cross-platform, source-level applications, in particular for building graphical user interface (GUI).
It is designed not only to create GUIs. It also has a set of classes for working with graphic images, HTML, XML documents, archives, file systems, processes, printing subsystems, multimedia, networks, classes for organizing multithreading, debugging, sending dumps and many other tools.
Well, let's start. And we will start in order - we will write Hello, World in order to understand the basic principles of building an application using wxPython . Here it is, before you, sovereign :
You can download the source code .
First, let's run the application and see what happened. No sooner said than done.

Well, now it's time to figure out what this code does.Porridge, sir!
There is more than obvious. Here we import the package for working with wxPython .
Here is the creation of an instance of our program, which later will be launched.
I think that here we should stop a bit and look at the code. Actually, here we create an instance of our form (in the wxWidgets terminology, this window).
Let's look at the given parameters.
Here we point out that our window should become visible.
And finally, run our program. That's all…
It is assumed that you have already read the Classes Reference and know which GUI elements are available in wxPython . I suggest we take and write something holistic and working. Good. Let's write with you a miniature text editor.
As you know, the text field in wxPython is represented by the TextCtrl class. By default, the text field that we create is single-line, i.e. text will be written in one line.
Let's fix this and add a style attribute with the value TE_MULTILINE to the TextCtrl object. The code of our first text editor will look like this:
You can download the source code .
Let's run our program and make sure everything works.
Note : completely forgot. I wanted to add that I assume that you are familiar with OOP in Python, because I am not going to explain what self or class Window is (wx.Frame) .
Our editor with you looks a bit dry, right? Of course, it does not even have a menu. Let's fix the situation and create a menu. There is nothing complicated about it.
You can download the source code .
And here is our menu editor:
But what is it? We click "Exit", but the program does not end. Well, it's time to go to a rather important stage - to teach the program to handle events. There are several ways to achieve this. For example, like this:
This expression means that if we click the “About” item, then our program will call the OnAbout function.
Ok, let's declare this function. It will look like this:
That's all. Now, when we click on “About”, we’ll see this message:

I will not give the full code, but I will only say that ...
You can download the source code .
Let's not forget that we are writing a text editor. Therefore, we need to organize the process of opening / closing files.Chip and Dale FileDialog come to the rescue. To begin with, we need to create the “Open” item in the menu where the file open dialog will be called ( OnOpen function).
Now we need to create a FileDialog instance with some parameters. Now see everything:
You can download the source code .
That's all. Let's run our creation. And, attention ... Drum roll ... Click on the "Open" and see ...

And open the file ...

That's all for the moment. Today we met with a great toolkit called wxPython , which allows you to write great applications with minimal effort.
wxWidgets - Wikipedia .
Getting Started - wxPyWiki .
The official wxPython site .
wxPython on Zetcode .
To be continued!
Introduction
I once told you about a Ruby / Tk bundle. Today I am going to continue acquaintance with "fast interfaces". This time I will tell you about wxPython , and we will write in Python .
In fact, wxPython is only a wrapper for the wxWidgets library , which in turn represents a graphic toolkit that allows you to write cross-platform applications.
')
What is xWidgets
wxWidgets (previously known as wxWindows ) is an open-source, cross-platform library of tools for developing cross-platform, source-level applications, in particular for building graphical user interface (GUI).
It is designed not only to create GUIs. It also has a set of classes for working with graphic images, HTML, XML documents, archives, file systems, processes, printing subsystems, multimedia, networks, classes for organizing multithreading, debugging, sending dumps and many other tools.
So let's get started
Well, let's start. And we will start in order - we will write Hello, World in order to understand the basic principles of building an application using wxPython . Here it is, before you
import wx app = wx.App() wnd = wx.Frame(None, wx.ID_ANY, "I'm the title") wnd.Show(True) app.MainLoop() You can download the source code .
First, let's run the application and see what happened. No sooner said than done.
Debriefing
Well, now it's time to figure out what this code does.
import wx There is more than obvious. Here we import the package for working with wxPython .
app = wx.App() Here is the creation of an instance of our program, which later will be launched.
wnd = wx.Frame(None, wx.ID_ANY, "I'm the title") I think that here we should stop a bit and look at the code. Actually, here we create an instance of our form (in the wxWidgets terminology, this window).
Let's look at the given parameters.
- Parent is our first parameter. At the moment, he points out that this is the main window of our program and it is not inherited from any other.
- Id is an identifier that is nothing but the sequence number of the window. Here we don’t have to put the numbers manually; you just need to specify wx.ID_ANY , who will take care of everything himself.
- Title - no comment ...
This is the title of our window.
wnd.Show(True) Here we point out that our window should become visible.
app.MainLoop() And finally, run our program. That's all…
We start to build
It is assumed that you have already read the Classes Reference and know which GUI elements are available in wxPython . I suggest we take and write something holistic and working. Good. Let's write with you a miniature text editor.
Add a text field
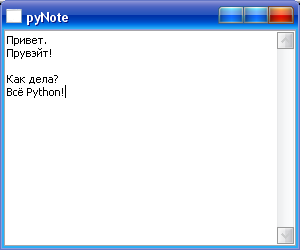
As you know, the text field in wxPython is represented by the TextCtrl class. By default, the text field that we create is single-line, i.e. text will be written in one line.
Let's fix this and add a style attribute with the value TE_MULTILINE to the TextCtrl object. The code of our first text editor will look like this:
import wx class Window(wx.Frame): def __init__(self, parent, title): wx.Frame.__init__(self, parent, title = title, size = (300,250)) self.control = wx.TextCtrl(self, style = wx.TE_MULTILINE) self.Show(True) app = wx.App() wnd = Window(None, "pyNote") app.MainLoop() You can download the source code .
Let's run our program and make sure everything works.
Note : completely forgot. I wanted to add that I assume that you are familiar with OOP in Python, because I am not going to explain what self or class Window is (wx.Frame) .
Waiter menu please
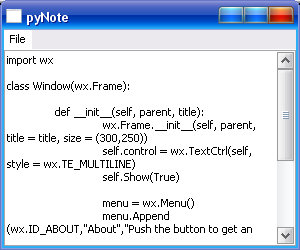
Our editor with you looks a bit dry, right? Of course, it does not even have a menu. Let's fix the situation and create a menu. There is nothing complicated about it.
import wx class Window(wx.Frame): def __init__(self, parent, title): wx.Frame.__init__(self, parent, title = title, size = (300,250)) self.control = wx.TextCtrl(self, style = wx.TE_MULTILINE) # self.Show(True) menu = wx.Menu() # menu.Append(wx.ID_ABOUT,"About","Push the button to get an information about this application") # menu.Append(wx.ID_EXIT,"Exit","Push the button to leave this application") # ? bar = wx.MenuBar() # bar.Append(menu,"File") # self.SetMenuBar(bar) # , app = wx.App() wnd = Window(None, "pyNote") app.MainLoop() You can download the source code .
And here is our menu editor:
Event handling
But what is it? We click "Exit", but the program does not end. Well, it's time to go to a rather important stage - to teach the program to handle events. There are several ways to achieve this. For example, like this:
def __init__(self, parent, title): self.Bind(wx.EVT_MENU, self.OnAbout, aboutItem) This expression means that if we click the “About” item, then our program will call the OnAbout function.
Ok, let's declare this function. It will look like this:
def OnAbout(self, e): dlg = wx.MessageDialog(self, "This is a mini editor keeping your text","About pyNote", wx.OK) # dlg.ShowModal() # That's all. Now, when we click on “About”, we’ll see this message:
I will not give the full code, but I will only say that ...
You can download the source code .
Monologue? No, dialogue!
Let's not forget that we are writing a text editor. Therefore, we need to organize the process of opening / closing files.
Now we need to create a FileDialog instance with some parameters. Now see everything:
import wx import os class Window(wx.Frame): def __init__(self, parent, title): wx.Frame.__init__(self, parent, title = title, size = (300,250)) self.control = wx.TextCtrl(self, style = wx.TE_MULTILINE) self.Show(True) menu = wx.Menu() openItem = menu.Append(wx.ID_ANY, "Open", "Push the button to open the file") aboutItem = menu.Append(wx.ID_ABOUT,"About","Push the button to get an information about this application") exitItem = menu.Append(wx.ID_EXIT,"Exit","Push the button to leave this application") bar = wx.MenuBar() bar.Append(menu,"File") self.SetMenuBar(bar) self.Bind(wx.EVT_MENU, self.OnOpen, openItem) self.Bind(wx.EVT_MENU, self.OnAbout, aboutItem) self.Bind(wx.EVT_MENU, self.OnExit, exitItem) def OnAbout(self, e): aboutDlg = wx.MessageDialog(self, "This is a mini editor keeping your text","About pyNote", wx.OK) aboutDlg.ShowModal() def OnOpen(self, e): self.dirname = " " openDlg = wx.FileDialog(self, "Choose a file to open", self.dirname, " ", "*.*", wx.OPEN) # if openDlg.ShowModal() == wx.ID_OK: # self.filename = openDlg.GetFilename() # self.dirname = openDlg.GetDirectory() # , f = open(os.path.join(self.dirname,self.filename), "r") # self.control.SetValue(f.read()) # f.close() wnd.SetTitle(self.filename + " - pyNote") # app = wx.App() wnd = Window(None, "pyNote") app.MainLoop() You can download the source code .
That's all. Let's run our creation. And, attention ... Drum roll ... Click on the "Open" and see ...
And open the file ...
Conclusion
That's all for the moment. Today we met with a great toolkit called wxPython , which allows you to write great applications with minimal effort.
What to read
wxWidgets - Wikipedia .
Getting Started - wxPyWiki .
The official wxPython site .
wxPython on Zetcode .
To be continued!
Source: https://habr.com/ru/post/137369/
All Articles