Managing Arduino from your phone
Good day!
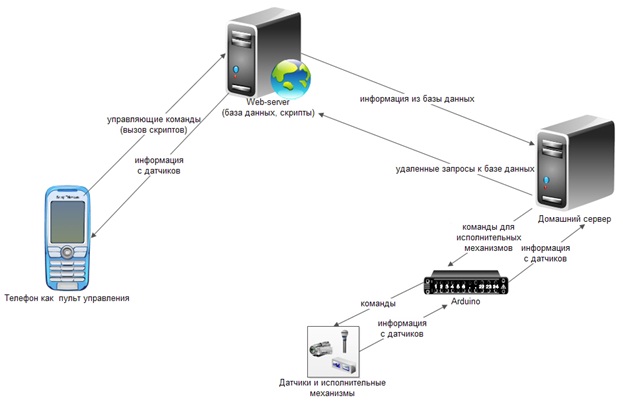
Recently I became interested in the idea of creating a “smart home”. Since the necessary components at my disposal so far there are only arduino and the phone on the android, it was decided to start by creating a control panel and connect it with the rest of the system.
My vision of the system looks like this:
')
I think it is worthwhile to combine home and web servers by purchasing a static IP address, but for the first time it will come down like that. Let's start with a simple - learn how to remotely control the LED and LCD-display.
On the web server we create a database with two tables - leds and texts. The leds table contains 2 fields - id and status. It contains one entry with the current status of the LED. The texts table contains 2 fields - id and text. It also contains one entry with the text currently displayed on the LCD.
Now we will write a couple of scripts that we will call from the phone and transmit information for the database. We write on php.
Script led.php (LED control):
Script msg.php (LCD control):
I think from the comments it is clear how these scripts work. This is all that is on the web server. We now turn to the home server (or, more simply, to the computer to which the Arduino is connected).
It will constantly run the program (you can even call it a demon), sending requests to the database and when the information there is changed, it sends the corresponding command to the COM port from arduino. The program will write in the language Processing:
I will not explain this code either, everything is clear.
Another important point. In order for a program from our computer to access a database located on a remote server, this must be allowed. Enter our ip in the list of allowed:

Further according to the plan - an application for the phone.
I have an Android phone, and we write for it. I will not go into much detail (it’s very good about how to set up the programming environment and about writing the first application here in this article - link ).
The appearance of the application looks quite modest, but in this case it is not important:

I will cite only excerpts of the program code for Android. The function that calls the script that controls the LED:
The function that sends the text to display on the LCD-display:
Well, the main function, in which event handlers are bound to buttons:
And one more important point - add permission to the application to access the Internet. To do this, add the line to the AndroidManifest.xml file (it is located in the directory of our android application):
We export our application to the APK file and install it on the phone. Remote control smart home ready!
And finally, last but not least, connecting the Arduino and its firmware. The connection scheme of the LCD screen and the LED to the Arduino Uno is as follows:

The resistor is taken at 220 ohms. You can read more about connecting the LCD screen here - link
And this is how it all looks in reality:
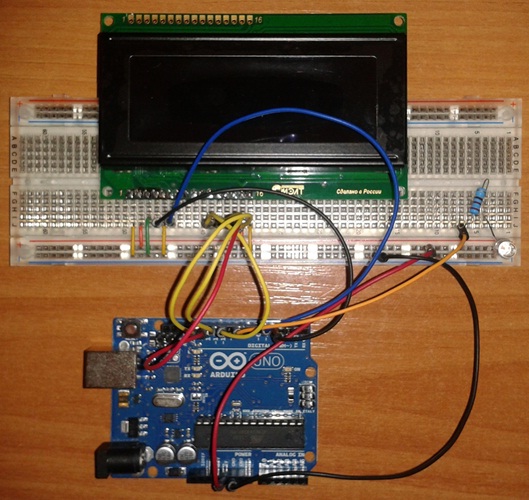
Is it really beautiful?
The task of the arduino is to listen to what the daemon program on the home server sends to the COM port to which the arduino is connected (although in fact the connection is via a USB cable, but the computer recognizes it as a serial port). After receiving any data from the computer, the controller recognizes the command code by the first symbol of the transmitted information (i.e., what should be controlled now - LCD display or LED). Further, depending on the code and the information following it, either the on / off of the LED is performed or the transmitted message is displayed. So, here's the actual code:
I think he does not require explanations, since I have written everything in great detail in the comments. The only thing that is worth noting is some restrictions on the lines transmitted for display. They should not contain spaces (this limitation is imposed by the imperfections of my algorithm) and should not contain Cyrillic (because it is not supported by all displays, and if supported, it requires the transmission of character codes in its own encoding, to convert characters into which there is no desires).
Well that's all. It turned out that it is quite simple.
Video of how it works:
And finally, I will provide links to resources that I used:
Very good lessons on Arduino - link
Link to the Processing Environment - link
Once again, the link to the article on creating the first Android application - link
Successes all!
Recently I became interested in the idea of creating a “smart home”. Since the necessary components at my disposal so far there are only arduino and the phone on the android, it was decided to start by creating a control panel and connect it with the rest of the system.
My vision of the system looks like this:
')
I think it is worthwhile to combine home and web servers by purchasing a static IP address, but for the first time it will come down like that. Let's start with a simple - learn how to remotely control the LED and LCD-display.
Web server
On the web server we create a database with two tables - leds and texts. The leds table contains 2 fields - id and status. It contains one entry with the current status of the LED. The texts table contains 2 fields - id and text. It also contains one entry with the text currently displayed on the LCD.
Now we will write a couple of scripts that we will call from the phone and transmit information for the database. We write on php.
Script led.php (LED control):
<?php $hostname = "localhost"; $username = "_"; $password = ""; $database = "_"; $connect_DB = mysql_connect($hostname, $username, $password); // if (!$connect_DB) { // exit; // } mysql_select_db($database); // changeLED(); // , mysql_close($connect_DB); // function changeLED() // { $query = "SELECT `status` FROM leds WHERE `id` = '1'"; // leds (id = 1 - ) $result = mysql_query($query); while ($_row = mysql_fetch_array($result,MYSQL_NUM)) // { // $st = (int)$_row[0]; if ($st == 0) $st = 1; else $st = 0; } $query = "UPDATE leds SET `status` = '$st' WHERE `id` = '1'"; // $result = mysql_query($query); } ?> Script msg.php (LCD control):
<?php $hostname = "localhost"; $username = "_"; $password = ""; $database = "_"; $connect_DB = mysql_connect($hostname, $username, $password); // if (!$connect_DB) { // exit; // } mysql_select_db($database); // changeText(); // , , LCD- mysql_close($connect_DB); // function changeText() { $st= $_GET["msg"]; //GET- msg , $query = "UPDATE texts SET `text` = '$st' WHERE `id` = '1'"; // texts id = 1 ( LCD-) $result = mysql_query($query); } ?> I think from the comments it is clear how these scripts work. This is all that is on the web server. We now turn to the home server (or, more simply, to the computer to which the Arduino is connected).
Home server
It will constantly run the program (you can even call it a demon), sending requests to the database and when the information there is changed, it sends the corresponding command to the COM port from arduino. The program will write in the language Processing:
import processing.serial.*; // COM- import de.bezier.data.sql.*; // MySQL Serial port; MySQL dbconnection; int prevLEDState = 0; // String prevS = ""; // , LCD- void setup() { port = new Serial(this, "COM4", 9600); // COM- 4 ( ), - 9600 port.bufferUntil('\n'); String user = "_"; String pass = ""; String database = "_"; dbconnection = new MySQL( this, "_.ru", database, user, pass ); // dbconnection.connect(); } void draw() { // dbconnection.query( "SELECT * FROM leds WHERE id = '1'" ); // leds while (dbconnection.next()) // { int n = dbconnection.getInt("status"); // status if (n != prevLEDState) // "" , COM- { prevLEDState = n; port.write('1'); // : 1 - , 2 - LCD- port.write(n); } } // LCD- dbconnection.query( "SELECT * FROM texts WHERE id = '1'" ); // texts while (dbconnection.next())// { String s = dbconnection.getString("text"); // text if (s != prevS) { prevS = s; port.write('2'); port.write(s); } } delay(50); // 50 , } I will not explain this code either, everything is clear.
Another important point. In order for a program from our computer to access a database located on a remote server, this must be allowed. Enter our ip in the list of allowed:
Further according to the plan - an application for the phone.
Phone application
I have an Android phone, and we write for it. I will not go into much detail (it’s very good about how to set up the programming environment and about writing the first application here in this article - link ).
The appearance of the application looks quite modest, but in this case it is not important:
I will cite only excerpts of the program code for Android. The function that calls the script that controls the LED:
public void changeLED() { try { URL url1 = new URL("http://_.ru/led.php"); HttpURLConnection urlConnection = (HttpURLConnection) url1.openConnection(); try { InputStream in = new BufferedInputStream(urlConnection.getInputStream()); } finally { urlConnection.disconnect(); } } catch (Exception e) { } } The function that sends the text to display on the LCD-display:
public void submitMsg() { final EditText tt = (EditText) findViewById(R.id.editText1); try { URL url1 = new URL("http://_.ru/msg.php?msg="+tt.getText()); HttpURLConnection urlConnection = (HttpURLConnection) url1.openConnection(); try { InputStream in = new BufferedInputStream(urlConnection.getInputStream()); } finally { urlConnection.disconnect(); } } catch (Exception e) { } } Well, the main function, in which event handlers are bound to buttons:
public void onCreate(Bundle savedInstanceState) { super.onCreate(savedInstanceState); setContentView(R.layout.main); final Button btn1 = (Button) findViewById(R.id.button1); btn1.setOnClickListener(new Button.OnClickListener() { public void onClick(View v) // { changeLED(); } }); final Button btn2 = (Button) findViewById(R.id.button2); btn2.setOnClickListener(new Button.OnClickListener() { public void onClick(View v) // { submitMsg(); } }); } And one more important point - add permission to the application to access the Internet. To do this, add the line to the AndroidManifest.xml file (it is located in the directory of our android application):
<uses-permission android:name="android.permission.INTERNET"/> We export our application to the APK file and install it on the phone. Remote control smart home ready!
Arduino
And finally, last but not least, connecting the Arduino and its firmware. The connection scheme of the LCD screen and the LED to the Arduino Uno is as follows:
The resistor is taken at 220 ohms. You can read more about connecting the LCD screen here - link
And this is how it all looks in reality:
Is it really beautiful?
The task of the arduino is to listen to what the daemon program on the home server sends to the COM port to which the arduino is connected (although in fact the connection is via a USB cable, but the computer recognizes it as a serial port). After receiving any data from the computer, the controller recognizes the command code by the first symbol of the transmitted information (i.e., what should be controlled now - LCD display or LED). Further, depending on the code and the information following it, either the on / off of the LED is performed or the transmitted message is displayed. So, here's the actual code:
#include <LiquidCrystal.h> // LCD- boolean isExecuting = false; //, , - //C , . "" loop COM- . // . ( ) // (1 2 ). ( ), // . LiquidCrystal lcd(4,5,10,11,12,13); // int ledPin = 8; // , int prevLEDStatus = 0; // (/) int newLEDStatus = 0; // int cmd = 0; // void setup() { Serial.begin(9600); // COM- (9600 - ) pinMode(ledPin,OUTPUT); // 8- lcd.begin(20,4); // LCD- (4 20 ) } void loop() { if (Serial.available() > 0) // COM- - { if (isExecuting == false) // { cmd = Serial.read() - '0'; // isExecuting = true; // , } if (cmd == 1) // { newLEDStatus = (int) Serial.read(); // if (newLEDStatus != prevLEDStatus) // , { digitalWrite(ledPin,newLEDStatus); prevLEDStatus = newLEDStatus; } } else // { if (isExecuting == false) // { lcd.clear(); // } else { lcd.print((char)Serial.read()); // } } } else // COM- { delay(50); // 50 if (Serial.available() <= 0) // - isExecuting = false; //, } } I think he does not require explanations, since I have written everything in great detail in the comments. The only thing that is worth noting is some restrictions on the lines transmitted for display. They should not contain spaces (this limitation is imposed by the imperfections of my algorithm) and should not contain Cyrillic (because it is not supported by all displays, and if supported, it requires the transmission of character codes in its own encoding, to convert characters into which there is no desires).
Conclusion
Well that's all. It turned out that it is quite simple.
Video of how it works:
And finally, I will provide links to resources that I used:
Very good lessons on Arduino - link
Link to the Processing Environment - link
Once again, the link to the article on creating the first Android application - link
Successes all!
Source: https://habr.com/ru/post/137155/
All Articles