Meet PayPal Standard Checkout
PayPal Standard Checkout Connection
This guide consistently describes my experience in implementing PayPal Standard Checkout using the Java language on the Google App Engine. This article is intended for people who already have experience with the GAE cloud platform.
Task
It took me to integrate PayPal payment system on the site of my own project, which will provide a subscription service. Having started working with PayPal Express Checkout API after some time, it came to the realization that the payment acceptance system becomes too cumbersome, while the standard Standard Checkout buttons lack the necessary flexibility that is required if the site is integrated with other payment systems.
The solution was found in the use of Standard Checkout tools that PayPal provides developers with third-party “baskets” for the site.
')
Change account type
In order to start accepting payments using PayPal, we first need to change the account type. When you first register with PayPal, we are given a standard account type - “Personal”, you can only pay for goods and services. To automate payment acceptance, you need a Premier or Business account type. What is the difference between account types can be found in the comparison table . In general, the difference is that the “Business” account provides for the use of an account by different users. Since this feature is necessary only in large enterprises, we select the type “Premier”. Account type is indicated in the upper left corner under the words “Welcome ...”
Notification of incoming payment
There are two payment notification methods - Payment Data Transfer (PDT) and Instant Payment Notification (IPN). Since IPN has such advantages as asynchronous operation, we choose this method. More information is in the Order Management Integration Guide
Disable PDT:
“PayPal” - “Profile” - “My sales tools” - “Website settings” - “Transfer payment information (optional)” - Off
IPN activation:
“PayPal” - “Profile” - “My Sales Tools” - “Instant Payment Notifications” - “Change Settings” - “” Accept IPN Messages (Enabled) ”and add“ Notification URL ”” ”
Returning the buyer to the seller’s website
After paying for the purchase in PayPal merchant, the buyer is recommended to be automatically sent to the page of notification of a successful payment or the seller’s website. “PayPal” - “Profile” - “My Sales Tools” - “Website Settings”.
“Auto Return” - On and specify “return url”.
Creating PayPal accounts in the sandbox
To test the process of receiving payments, there is a so-called sandbox - sandbox. There are no real funds behind operations in the sandbox, we operate with numbers on the virtual test accounts we created. After registering for PayPal Sandbox, go to the “Test accounts” section and create two “Preconfigured” accounts - one is the Buyer (Buyer), the other is the Seller (Seller). When creating the Seller account, its default type is “Business”. In testing, there is no difference between Premier and Business. When creating an account it is recommended to enter any amount in the currency of the account to be opened. This amount will be spent or added depending on the operations between the created accounts. It is recommended to record the automatically created email and password as these details are access to the sandbox accounts at www.sandbox.paypal.com
Specify Encoding Type
We work with data in UTF-8 encoding. To change podivki go to the address https://www.sandbox.paypal.com/cgi-bin/webscr?cmd=_profile-language-encoding Next, select the language of the website, save it, go back and after clicking "Advanced Features" ( "More Options") select the desired encoding.
Getting documentation
Working with PayPal Merchant is possible in two ways:
Using PayPal Express Checkout API and using Standard Checkout.
The latter is simpler and best suited for receiving payments for a small set of fixed goods or services. and choose it. For more detailed acquaintance with this method, it is advisable to download the Standard Checkout Integration Guide
In addition, absolutely all documentation in PDF and HTML format is located by reference.
Receipt of payment
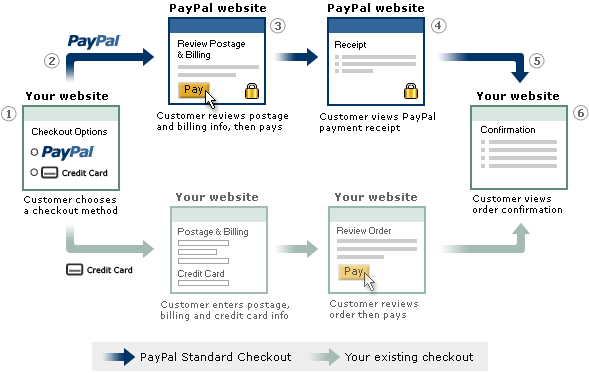
How PayPal Standard Chechout Works is illustrated in the image.

- On the JSP page, there is a POST request form with an indication with at least four parameters:
- amount_1 - the price of one item
- business - email address of the seller’s PayPal account (Seller sandbox account)
- item_name_1 - product name
- upload - notification that this “basket” was created by a third-party supplier
- After clicking on the form button, the buyer goes to the PayPal sandbox site at https://www.sandbox.paypal.com/cgi-bin/webscr where he needs to familiarize himself with the invoice and authorize (Buyer account in the sandbox)
- The buyer is invited to pay the bill by clicking on the appropriate button.
- The buyer automatically goes to the seller’s website using the url specified in the seller’s profile or the url specified in the POST form’s return parameter
- Merchant PayPal sends IPN POST request to the url specified in the profile
Received Payment Notifications (IPN)
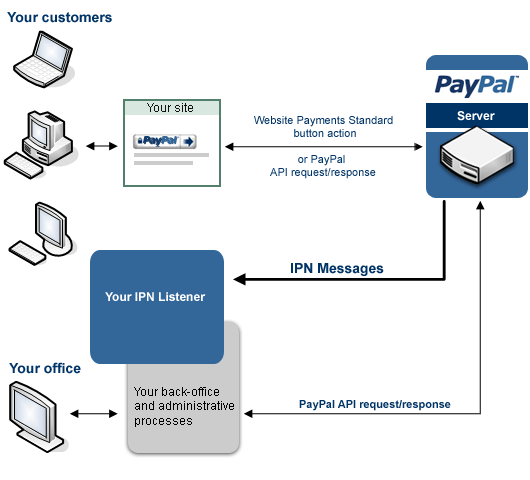
IPN principle of operation is illustrated in the image.

- Waiting for POST request from PayPal merchant
- We create a request to PayPal which contains exactly the same IPN variables with the received values by adding the header cmd = _notify-validate to the request
- Send a request to sandbox.paypal.com
- PayPal Merchant should reply with a VERIFIED or INVALID message.
- Check the status of the response which should be a code 200
- If the answer is the word VERIFIED we do the following checks:
- If the verified response from the PayPal merchant has passed all the checks, we process the action based on the value of the txn_type variable if it exists. Otherwise, we process the action based on the value of the variable reason_code. Values that can accept these variables are specified in the Order Management Integration Guide
- If the answer is an INVALID or the response code is not 200, we save the message for further investigation.
Work with GAE
JSP code for order.jsp page:
<%@ page contentType="text/html; charset=UTF-8" language="java" %> // information about values of parameters please see at url // https://www.paypal.com/en_US/pdf/PP_WebsitePaymentsStandard_IntegrationGuide.pdf <% // final String strMerchantUrl = "https://www.paypal.com/cgi-bin/webscr"; final String strMerchantUrl = "https://www.sandbox.paypal.com/cgi-bin/webscr"; final String strEmail = "email_of_seller"; final String strDescription = "my item description"; final String strAmount = "1.3"; final String strCurrencyCode = "USD"; // your counter of invoice String strInvoice = "234234234"; final String returnUrl = "site_of_seller"; %> <form action=<%= strMerchantUrl %> method="post" accept-charset="UTF-8"> <input type="hidden" name="cmd" value="_cart" /> <input type="hidden" name="upload" value="1" /> <input type="hidden" name="business" value="<%= strEmail %>" /> <input type="hidden" name="item_name_1" value="<%= strDescription %>" /> <input type="hidden" name="amount_1" value="<%= strAmount %>" /> <input type="hidden" name="currency_code" value="<%= strCurrencyCode %>" /> <input type="hidden" name="no_shipping" value="1" /> <input type="hidden" name="invoice" value="<%= strInvoice %>" /> <input type="hidden" name="return" value="<%= returnUrl %>" /> <input type="image" value="PayPal" src="https://www.paypal.com/en_US/i/btn/btn_xpressCheckout.gif" alt="Submit button" align="left" style="margin-right:7px;" /> </form> IPN Handler Code for payment.paypal.Ipn.java
package payment.paypal; import java.io.IOException; import java.io.OutputStreamWriter; import java.io.BufferedReader; import java.io.InputStreamReader; import java.util.logging.Logger; import java.util.Enumeration; import java.net.URLEncoder; import java.net.URL; import java.net.URLConnection; import javax.servlet.http.HttpServlet; import javax.servlet.http.HttpServletRequest; import javax.servlet.http.HttpServletResponse; @SuppressWarnings("serial") public class Ipn extends HttpServlet { private static final Logger log = Logger.getLogger(Ipn.class.getName()); public void doPost(HttpServletRequest req, HttpServletResponse resp) throws IOException { try { // read post from PayPal system and add 'cmd' Enumeration<?> en = req.getParameterNames(); String str = "cmd=_notify-validate"; while (en.hasMoreElements()) { String paramName = (String) en.nextElement(); String paramValue = req.getParameter(paramName); str = str + "&" + paramName + "=" + URLEncoder.encode(paramValue, "UTF-8"); } // test log IPN string log.info("[Paypal IPN string] " + str); // post back to PayPal system to validate // URL url = new URL("https://www.paypal.com/cgi-bin/webscr"); URL url = new URL("https://www.sandbox.paypal.com/cgi-bin/webscr"); URLConnection conn = url.openConnection(); conn.setDoOutput(true); conn.setRequestProperty("Content-Type", "application/x-www-form-urlencoded"); OutputStreamWriter wr = new OutputStreamWriter( conn.getOutputStream()); wr.write(str); wr.flush(); // response from PayPal - VERIFIED or INVALID BufferedReader br = new BufferedReader(new InputStreamReader( conn.getInputStream())); String line = br.readLine(); // test log check string log.info("[PayPal check string] " + line); wr.close(); br.close(); // assign posted variables to local variables String itemName = req.getParameter("item_name"); String itemNumber = req.getParameter("item_number"); String paymentStatus = req.getParameter("payment_status"); String paymentAmount = req.getParameter("mc_gross"); String paymentCurrency = req.getParameter("mc_currency"); String txnId = req.getParameter("txn_id"); String receiverEmail = req.getParameter("receiver_email"); String payerEmail = req.getParameter("payer_email"); // check notification validation if (line.equals("VERIFIED")) { // check that txnId has not been previously processed // check that receiverEmail is your Primary PayPal email // check that paymentAmount/paymentCurrency are correct // process payment } else if (line.equals("INVALID")) { // log for investigation log.warning(line); } else { // error } } catch (Exception e) { log.warning("[ipn] " + e); } } } Mapping paths in the file /war/WEB-INF/web.xml
<!-- payment paypal --> <servlet> <servlet-name>Ipn</servlet-name> <servlet-class>payment.paypal.Ipn</servlet-class> </servlet> <!-- --> <!-- payment paypal mapping --> <servlet-mapping> <servlet-name>Ipn</servlet-name> <url-pattern>/payment/paypal/ipn</url-pattern> </servlet-mapping> <!-- --> Create a log configuration in the file /war/WEB-INF/appengine-web.xml
<!-- Configure java.util.logging --> <system-properties> <property name="java.util.logging.config.file" value="WEB-INF/logging.properties"/> </system-properties> The article was written based on the topic http://habrahabr.ru/blogs/php/128198/ , as well as after a long search on the Internet for a simple and convenient way to receive payment using PayPal. Of course, not all information is covered, for example, the code does not verify the amount of payment. Without this verification, a malicious user can save the form's html page, edit the price downwards and get, say, a digital product or a subscription at a price lower than the purchased one. Checks depend on the implementation of the service and require an individual approach when integrating the payment system on the seller’s website.
We used Java / JSP sample code provided by PayPal.
This method can be used to pay for services, sell subscriptions to services, goods, as well as to replenish the balance of a user account on the site.
upd: encoding indication, thanks for the thought of winbackgo
Source: https://habr.com/ru/post/137080/
All Articles