Using Amazon Cloudfront cdn in wordpress in pictures

Once, in the icy summertime, I decided to fasten to the blog the return of files from the Amazon CloudFront cdn. Infa, as always, was not enough and did everything with the method of fast scientific spear.
The article is replete with a large number of explanations and pictures.
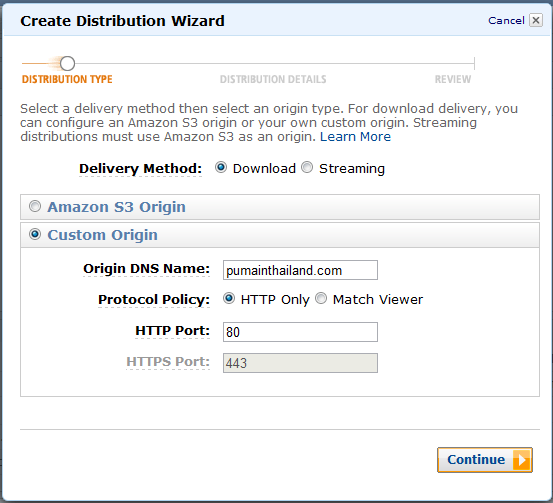
To get started, go to the aws console in the CloudFront section and click the Create Distribution button (create content distribution distribution). You will see the choice of the Delivery Method between download and streaming. In the download you can simply give files with http and https, you can stream to streaming via rtmp. I note that streaming only works with Amazon S3 Origin and cannot stream files directly from your server.
Next comes the selection of Amazon S3 Origin and Custom Origin. In the case of Amazon S3 Origin, you must select S3 Bucket where you will add the files yourself and CloudFront will already distribute them via your links from the cdn site. Simple for a site with pictures when a user uploads a picture, you will need to use the S3 api to put a picture on S3 and on the site issue the link
http:// cdndomain.com/pathpictureIn the Custom Origin version, you don’t have to put anything anywhere and just change the links on the site. For example, the user again uploaded the picture to the site along the way
yourdomain.com/pathpicture yourdomain.com/pathpicture , you change the link on the site to http:// cdndomain.com/pathpicture , when a random user visits your site and requests a picture http:// cdndomain.com/pathpicture CloudFront checks for images in its cache and if it's not there, then the most interesting thing happens, CloudFront itself calls your website along the way yourdomain.com/pathpicture yourdomain.com/pathpicture loads the image into your cache and gives it to the user. This is a very convenient mode because it does not require a change only on the way to the pictures and does not require global addition of the code to the site.Now I will tell just about the use of Custom Origin.
The first screen of the creation of Distribution, choose download (video on rtmp I do not stream) and Custom Origin, enter the DNS Name of Origin in the Domain Name, select in the Protocol Policy http (all files will be taken over the http protocol, choose the Match Viewer if the files are on http and you have different https).
')
Fill in the details, allow files to be picked up via http and https, enter cname for your cdn (you can use a domain from Amazon, but then your links will be
.com/pathpicture .com/pathpicture ), I don’t enter the Root object (this file will be given if the user accesses the cdn root of the domain for example http:// cdndomain.com/ it’s fashionable to write 404.jpg and put a nice picture), I don’t use logging Distribution status set to Enable. Click Continue-> Create.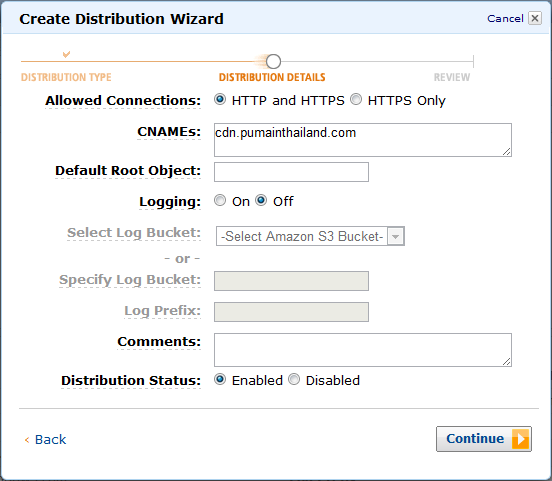
All our first Distribution is created, now it remains to copy the dns name of your distribution

And dns manager create a CNAME record with the name cdn in the name of your distribution.

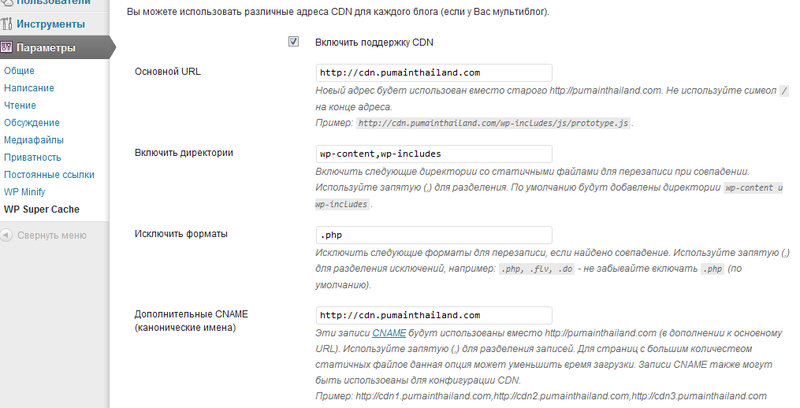
We go to the wordpress console, install the WP Super Cache plugin, select the CDN Settings tab in its settings, check the Enable CDN checkbox, prescribe the new URL? We keep the changes and, in theory, everything should work for you.
We test by debugger in chrome

Questions, suggestions, suggestions?
Traffic with CloudFront is included in the 15 gigabyte free monthly limit for new users in the first year.
The cost of 1 gigabyte of traffic for the United States for the first 10 TB is 12 cents, then cheaper. Prices for different regions and volumes can be found here.
aws.amazon.com/cloudfront/pricing
Source: https://habr.com/ru/post/136933/
All Articles