Learning to use Glade
Last time I promised that I would write about the Glade program.
Glade is an application for the visual creation of graphical interfaces on GTK +. It is open source and distributed free of charge.
Remember how we tried to draw a window through the code? After reading this topic, you can create at least thousands of such windows by simply moving the widgets from the palette.
')
Download and install Glade . If you are using GNU / Linux, then this program must be in your repositories.
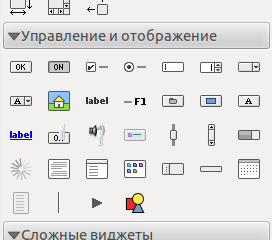
Open Glade and create a new interface file (File -> New). However, the first window will be created. So far there is nothing in it, but look at how many widgets are available to us in the left panel!
Let's put a vertical GtkBox container on the form. Select icon and click on the gray space on the form. A dialog should appear where you will be asked how many cells you want. Good should be a little bit, so instead of three, enter 2.
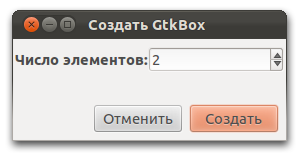
The window is divided into two equal parts. Remember that in a window there can be only one widget? Now the user will think that you fit two widgets.
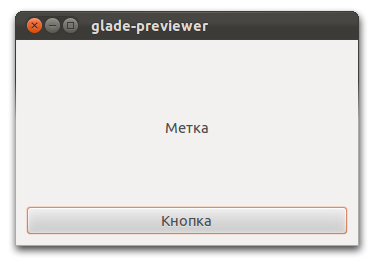
Place something in both parts to continue your introduction to the GTK packaging method. I placed a label and a button:

These two widgets look strangely strange to them closely. Let's see what can be done.
To start, look at the settings of the container itself. Select it and find the properties panel on the right.

Here we can specify the distance between the widgets, the orientation of the container (vertical or horizontal) and much more.
If something becomes incomprehensible to you, then just bring the cursor to the name of the property and a prompt will appear.
Please also note that the parameters you change are in bold.
Now select the label and go to the “Packaging” tab - it contains properties that allow you to customize the packaging of the widget in our GtkBox container.

Turn on “Expandability” and our form will take on a slightly different look: the label will try to occupy all the available space, and the button will have the smallest possible size.
You can also change the frame of the window (see previous topic) - I set the border to 10 pixels.
To view the result, click on the preview button ( ).
).
Now let's make it so that when you click on the button, the label in the label changes.
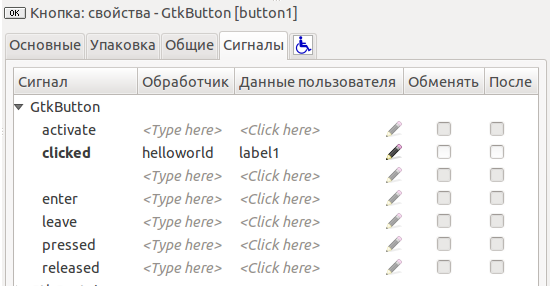
Select the button and in the properties go to the tab "Signals".
Find the event “clicked” and enter the name of the handler “helloworld”, and specify our tag as the data.
In general, that's all. Next, let's move on to programming.
We still have to write some code.
First, let's take a template that will try to open the file with the interface “habrahabr.ui”.
Now let's make a signal handler that we call “helloworld”:
Everything!


Glade is an application for the visual creation of graphical interfaces on GTK +. It is open source and distributed free of charge.
Remember how we tried to draw a window through the code? After reading this topic, you can create at least thousands of such windows by simply moving the widgets from the palette.
')
Getting started with Glade
Download and install Glade . If you are using GNU / Linux, then this program must be in your repositories.
Open Glade and create a new interface file (File -> New). However, the first window will be created. So far there is nothing in it, but look at how many widgets are available to us in the left panel!
Let's put a vertical GtkBox container on the form. Select icon
and click on the gray space on the form. A dialog should appear where you will be asked how many cells you want. Good should be a little bit, so instead of three, enter 2.The window is divided into two equal parts. Remember that in a window there can be only one widget? Now the user will think that you fit two widgets.
Place something in both parts to continue your introduction to the GTK packaging method. I placed a label and a button:
These two widgets look strangely strange to them closely. Let's see what can be done.
To start, look at the settings of the container itself. Select it and find the properties panel on the right.
Here we can specify the distance between the widgets, the orientation of the container (vertical or horizontal) and much more.
If something becomes incomprehensible to you, then just bring the cursor to the name of the property and a prompt will appear.
Please also note that the parameters you change are in bold.
Now select the label and go to the “Packaging” tab - it contains properties that allow you to customize the packaging of the widget in our GtkBox container.
Turn on “Expandability” and our form will take on a slightly different look: the label will try to occupy all the available space, and the button will have the smallest possible size.
You can also change the frame of the window (see previous topic) - I set the border to 10 pixels.
To view the result, click on the preview button (
).Signals
Now let's make it so that when you click on the button, the label in the label changes.
Select the button and in the properties go to the tab "Signals".
Find the event “clicked” and enter the name of the handler “helloworld”, and specify our tag as the data.
In general, that's all. Next, let's move on to programming.
Programming
We still have to write some code.
First, let's take a template that will try to open the file with the interface “habrahabr.ui”.
/* , :-) , . */ #include <gtk/gtk.h> /* */ static GtkWidget* create_window (void) { /* */ GtkWidget *window; /* , */ GtkBuilder *builder; /* */ GError* error = NULL; /* */ builder = gtk_builder_new (); if (!gtk_builder_add_from_file (builder, "habrahabr.ui", &error)) { /* */ g_critical (" : %s", error->message); g_error_free (error); } /* , ? ! */ gtk_builder_connect_signals (builder, NULL); /* , */ window = GTK_WIDGET (gtk_builder_get_object (builder, "window")); if (!window) { /* - , , */ g_critical (" "); } g_object_unref (builder); return window; } /* , */ int main (int argc, char *argv[]) { /* */ GtkWidget *window; /* GTK+ */ gtk_init (&argc, &argv); /* */ window = create_window (); gtk_widget_show (window); /* GTK+ */ gtk_main (); return 0; } Now let's make a signal handler that we call “helloworld”:
/* */ static void helloworld (GtkButton *button, gpointer label) { /* */ gtk_label_set_text (label, ", !"); } Everything!
Source: https://habr.com/ru/post/136922/
All Articles