LESS: programmable style language
 I do not like CSS. It is simple and straightforward. It is the driving force of the Internet, but it is too limited and difficult to manage. It is time to put this language in order and make it more useful using dynamic CSS with LESS.
I will explain my position by example. Why instead of using # FF9F94 to get a dark peach color, just not store the value of this color in a variable for its subsequent use? To repaint the site will be enough to change the value of the variable in just one place and that's it.
In other words: it will be very elegant if we use some programming and logic in CSS to make it a more powerful tool. It is good that all this is possible using LESS .
What is LESS?
LESS is an add-on to CSS. This means that any CSS code is a valid LESS, but additional LESS elements will not work in plain CSS. This is great because the existing CSS is already operational LESS code, which reduces the threshold for entering a new technology.
LESS adds a lot of the necessary dynamic properties in CSS. It introduces variables, operations, function-like elements and impurities. The ability to write style sheets modularly saves you a lot of trouble.
How to use LESS
There are two ways to use LESS. You can create a LESS file and convert it using Javascript on the fly or compile it in advance and use the resulting CSS file. Do not be afraid of the word "compile" (I use it all the time), it is very simple.
Use LESS and Javascript file
First you need to download a file from the LESS Javascript site and link it to a page like any other js script.
')
<script src="less.js" type="text/javascript"></script> Then create a file with the .less extension and anchor it with the following code:
<link rel="stylesheet/less" type="text/css" href="style.less"> Make sure you attach the LESS file in front of the JS.
Now the LESS file will work just like regular CSS.
Compile the LESS file
Although this method is a bit tedious, sometimes it is more preferable. In order not to convert the code each time the page loads, you can use the resulting CSS file. Converters: for Windows - Winless and LESS.app for Mac.
Tame the power of LESS
Finally, let's have some fun - write down the LESS code. As you will see, the code is very easy to read and understand, since it uses a syntax similar to CSS.
Variables
Variables in LESS work in the same way as in PHP, JS, and in most other programming languages. You can use them to store values, and then use variables instead of the value itself whenever you need it.
@header-font: Georgia; h1, h2, h3, h4 { font-family: @header-font; } .large { font-family:@header-font; } In the example above, we declare the @ header-font variable and write the value “Georgia” there. Now we can use this variable whenever we want to set the Georgia font. If we decide that Trebuchet MS is better suited for our headers, then we will not need to look through the entire file, we just change the value of the variable.
I found an excellent use of variables in determining the colors of a site. In the good old days (which were not so long ago) I used something like this:
/* Colors for my Website #ff9900 - Orange - used for links and highlighted items #cccccc - Light Gray - used for borders #333333 - Dark Black - Used for dark backgrounds and heading text color #454545 - Mid Black - Used for general text color */ body { background: #333333; color: #454545; } a { color:#ff9900; } h1, h2, h3, h4, h5, h6 { color: #333333; } There is nothing wrong with documenting your colors as well as here, this is good practice, the problem is that the documentation has nothing to do with the functionality of your styles. If you decide to change colors after 2000 lines of code, and then change your mind on line 3567, it will be extremely difficult to fix all the colors and documentation.
With LESS, we can modify and simultaneously document our workflow.
/* Colors for my Website */ @color-orange: #ff9900; @color-gray_light: #cccccc; @color-black_dark: #333333; @color-black_medium: #454545; body { background: @color-black_dark; color: @color-black_medium; } a { color:@color-orange; } h1, h2, h3, h4, h5, h6 { color: @color-black_dark; } Variable scope
The scope of variables describes the places where they are available. If you define a variable at the very beginning of the LESS file, it will be available for any code written after.
You can also define a variable inside the CSS rules. In this case, the variables will not be available outside of this rule, they can be used locally.
a { @color: #ff9900; color:@color; } button { background: @color; } In this example, LESS will not be converted due to an error, color is not defined for use inside the button element. If a variable is declared outside the element and inside another element, then it will be available only locally.
@color: #222222; a { @color: #ffffff; color:@color; } button { background: @color; } Here the link will be colored white, and the button will have a black background.
Variables in variables
If you code in PHP, then you know that you can declare the name of a variable in another variable.
@color-chirstmas_red: #941f1f; @name-of-color: "color-chirstmas_red"; color: @@name-of-color; Personally, I almost don't use it, since variables in variables are almost useless without closures, but I am sure that there will be clever examples of using this.
Constants and Variables
It is important to note that, contrary to what you just read, variables in LESS look more like constants. This means that they, unlike variables, can only be defined once.
Operations
You can achieve incredibly precise control using LESS operations. The idea is simple:
.button{ @unit: 3px; border:@unit solid #ddd; padding: @unit * 3; margin: @unit * 2; } The code above sets the unit variable to 3px. Then we set this value to the width of the frame, the indents are three times the width, and the margins to two.
You can use the operations of multiplication, division, addition and subtraction. To create a block with a frame that increases the width of the sides clockwise, you can use the following code:
.box{ @base_unit: 1px; border: @base_unit @base_unit + 1 @base_unit + 2 @base_unit + 3 } Color management
My favorite feature of LESS is color management. You can use operations to mix colors and several special functions for working with color.
Color operations
If you want to change the color value, you can do it by subtracting or adding another color.
@color: #941f1f; button { background: #941f1f + #222222; border: #941f1f - #111111; } The above background operation will increase each HEX value by 2. The result will be “B64141 ″ - a lighter version of the original color. A frame operation will reduce each HEX value by 1 and produce a darker color: “830E0E”.
In practice, there are many cases when we start with a base color and need a slightly darkened or lightened version of it.
@color-button: #d24444; input.submit { color:#fff; background:@color-button; border:1px solid @color-button - #222; padding:5px 12px; } This code creates a red button with a slightly darkened frame. This is a common situation and the definition of only one color is a big help.
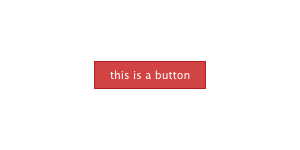
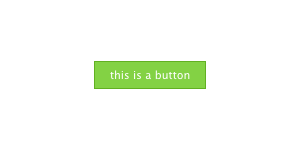
The power of variables is more apparent as follows. If you want to change the color of the button, changing the @ color-button value to green will change not only the background color, but also replace the stroke with a darker version of green.
Another great application of this is the creation of gradients. I usually choose an average color and declare a gradient based on it. I make the beginning a little bit lighter and the end a bit darker. The result will be a pleasant transition, something like this:
@color: #faa51a; .button { background: -webkit-gradient(linear, left top, left bottom, from(@color + #151515), to(@color - #151515)); background: -moz-linear-gradient(top, @color + #151515, @color - #151515); } 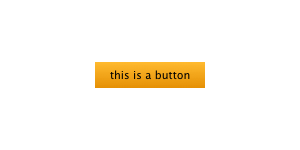
Color functions
There are much more possibilities for working with color; LESS allows you to manipulate them on the channel level. You can lighten, darken, saturate, discolor and rotate colors. Take a look at the following examples with pictures to see what each one does.
@color: #3d82d1; .left_box { background:lighten(@color, 20%); } .right_box { background:darken(@color, 20%); } 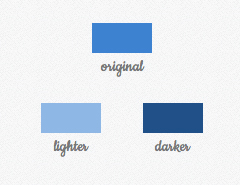
@color: #3d82d1;.left_box { background: desaturate(@color, 18%); } .middle_box { background: @color; } .right_box { background: saturate(@color, 18%); } 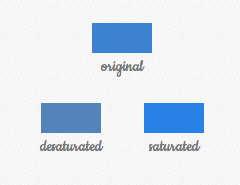
@color: #3d82d1;.left_box { background: spin(@color, 25%); } .middle_box { background: @color; } .right_box { background: spin(@color, -25%); } 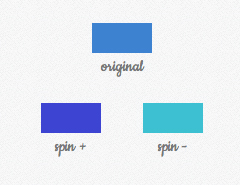
Retrieving Color Information
Each color in LESS is converted to HSL (hue, saturation, lightness) to give you control over channel levels. Thanks to this, you can manipulate colors more subtly, as well as get color information directly.
@color = #167e8a; hue(@color); saturation(@color); lightness(@color); This may seem too petty - why do we need this information when we can simply enter a HEX value? If you are a normal person, you will not be able to decipher HEX color on the go. HEX values represent the RGB spectrum: the first two characters control the amount of red; the next two, the amount of green; and the last two, the amount of blue.
Obviously enough, # ff0000 is red, as it is RGB (255,0,0). Tones of red, no green and blue. However, if you see # 1f6b2d, it will be difficult to decode that it is dark green. In the HSL representation, hue (tone) controls everything, you could just name the color, the rest just sets the tone (this is not quite true, but everything happens that way).
With this in mind, if you find a good purple color like # e147d4, you can very easily find different colors with the exact same shade. Let's say you want to create a creamy, more pastel version of # e147d4, here's what you can do:
@color: #c480bd; .class { background-color: desaturate(spin(@color, 18), 12%);} The new color will have the same tone, but different saturation and brightness. The result will be # c480bf, which is much more difficult to switch from # e147d4 using only HEX.
Combination of functions
LESS allows you to use functions inside functions, so if you need to discolor and flip (spin) a color, you can simply do this:
@color: #c480bd; .class { background-color: desaturate(spin(@color, 18), 12%);} Nesting
While writing CSS, we use cascading styles. To change the fields in a paragraph only inside the article, you can use the following code:
article.post p{ margin: 0 0 12px 0; } There is nothing wrong with this approach, but if we also need to change the style of links, quotes, headings, etc. only inside the article, you will need to use the “article.post” prefix for each element. This makes writing code more boring and makes it harder to read.
We can put these rules into LESS, which will give us a shorter and more logical version of our styles. For example:
article.post { p{ margin: 0 0 12px 0; } a { color: red; } a:hover { color: blue; } img { float:left; } } Indenting is not necessary, but it makes the code more readable. Nesting levels are not limited.
a { color:red; } p { margin:0px; } article { a { color: green; } p { color: #555; a { color:blue; } } } Impurities (mixins)
Impurities in LESS will save you from typing unnecessary code. Have you ever had to create a rounded frame in which only the upper corners are rounded?
.tab { -webkit-border-top-left-radius: 6px; -webkit-border-top-right-radius: 6px; -moz-border-radius-topleft: 6px; -moz-border-radius-topright: 6px; border-top-left-radius: 6px; border-top-right-radius: 6px; } And so every time ... With LESS, all this can be changed by creating an impurity. Impurities are reusable elements that can be added to any element as a rule. And do not even need to learn the new syntax.
.rounded_top { -webkit-border-top-left-radius: 6px; -webkit-border-top-right-radius: 6px; -moz-border-radius-topleft: 6px; -moz-border-radius-topright: 6px; border-top-left-radius: 6px; border-top-right-radius: 6px; } .tab { background: #333; color:#fff; .rounded_top; } .submit { .rounded_top; } In the above code, we defined a .rounded_top element to round the top corners. When we add it to any other element as an admixture (see .tab), we essentially import the rules we created for it. Thanks to this syntax, we can use any element as an impurity.
.rounded_top { -webkit-border-top-left-radius: 6px; -webkit-border-top-right-radius: 6px; -moz-border-radius-topleft: 6px; -moz-border-radius-topright: 6px; border-top-left-radius: 6px; border-top-right-radius: 6px; } .tab { background: #333; color:#fff; .rounded_top; } .submit { .tab; background: red; } The styles of the .submit element are rounded corners at the top, white color and red background (value # 333 is redefined).
Impurities with parameters
Impurities with parameters sound complicated, they solve the problem in a very simple way. In the examples above, you saw how we can define an element with a radius of 6px in the upper corners. And if we want to create an element with a radius of 3px? Should we declare different impurities for all pixel values? Of course, the answer is no, we must use impurities with parameters!
They are similar to functions, because by calling them you can change values. Let's rewrite the border-radius example to see how this works.
.rounded_top(@radius) { -webkit-border-top-left-radius: @radius; -webkit-border-top-right-radius: @radius; -moz-border-radius-topleft: @radius; -moz-border-radius-topright: @radius; border-top-left-radius: @radius; border-top-right-radius: @radius; } .tab { background: #333; color:#fff; .rounded_top(6px); } .submit { .rounded_top(3px); } In the above code, the radius of .tab is 6px, and the .submit element will get the value 3px.
Standard values
If you usually use the same border-radius, but sometimes you need a different one, you need to set the default impurities.
.rounded_top(@radius:6px) { -webkit-border-top-left-radius: @radius; -webkit-border-top-right-radius: @radius; -moz-border-radius-topleft: @radius; -moz-border-radius-topright: @radius; border-top-left-radius: @radius; border-top-right-radius: @radius; } .tab { background: #333; color:#fff; .rounded_top; } .submit { .rounded_top(3px); } In this example, .tab will get the default value of 6px, and .submit will get 3px.
Multiple parameters
You can also use multiple parameters to define more complex impurities.
.radius(@radius:6px) { -webkit-border-radius: @radius; -moz-border-radius: @radius; border-radius: @radius; } .button(@radius:3px, @background: #e7ba64, @padding: 4px) { .radius(@radius); background:@background; border: 1px solid @background - #222; padding: @padding; } .read_more { .button(0px); } In this example, the class .read_more is indented 4px, background color # e7ba64, and with border-radius dubbed 0px.
Use all arguments at once.
Another option when using arguments is to combine them. Abbreviated properties in CSS have multiple values written one after another.
div { border:1px solid #bbb; } To give all the necessary elements a gray border, you can use the following function:
.gray_border(@width: 1px, @type: solid, @color: #bbb){ border:@arguments; } div { .gray_border(2px, dashed); } @arguments is a special keyword that displays all the parameters one by one in the specified order. The result of the above LESS code will be:
div { border:2px dashed #bbb; } Parametric impurities without parameters
You can also use parametric impurities without parameters. This is used when you do not need to display an admixture in CSS, but you want its rules to apply to the element in which it is used.
.alert { background: red; color: white; padding:5px 12px; } .error_message { .alert; margin: 0 0 12px 0; } The CSS for the above code would be:
.alert { background: red; color: white; padding:5px 12px; } .error_message { background: red; color: white; padding:5px 12px; margin: 0 0 12px 0; } To hide the class .alert you need to set an empty parameter.
.alert() { background: red; color: white; padding:5px 12px; } .error_message { .alert; margin: 0 0 12px 0; } The finished CSS will be as follows:
.error_message { background: red; color: white; padding:5px 12px; margin: 0 0 12px 0; } This is mainly used to reduce the size of a CSS file.
Namespace
Namespace in programming languages is usually used to group elements of similar functionality. We can achieve this in LESS by combining our code with impurities.
#my_framework { p { margin: 12px 0; } a { color:blue; text-decoration: none; } .submit { background: red; color: white; padding:5px 12px; } } Starting work on a new site based on your framework, you can add the #my_framework bundle and use it without cluttering up the namespace.
.submit_button { #my_framework > .submit; } It is also a great way to make it possible to quickly change and refine themes. If you are developing several themes for your company, then for changing templates on the fly, you can put them all in one LESS file using bundles.
#fw_1 { p { margin: 12px 0; } a { color:blue; text-decoration: none; } .submit { background: red; color: white; padding:5px 12px; } } #fw_2 { p { margin: 8px 0; } a { color:red; text-decoration: underline; } .submit { background: blue; color: white; padding:8px 20px; } } .submit_button { #fw_2 > .submit; } String interpolation
String interpolation is another fancy word, meaning that this arbitrary string can be stored in a variable and then used in the property value.
@url: "http://mycompany.com/assets/";background-image: url("@{url}/sprite.png"); This can be useful when creating a centralized framework.
Screening
Sometimes you need to use properties or values that are not valid CSS (rules for IE). You may have noticed that in the gradient example I did not take care of the users of Internet Explorer.
If you want to create a gradient in IE, you should do something like this:
filter: progid:DXImageTransform.Microsoft.gradient(startColorstr='#666666', endColorstr='#444444'); This CSS is not valid, so LESS will not compile. In this case, you can escape this value, which will allow LESS to skip it.
.button { background: -webkit-gradient(linear, left top, left bottom, from(#666666), to(#444444)); background: -moz-linear-gradient(top, #666666, @color - #444444); filter: ~"progid:DXImageTransform.Microsoft.gradient(startColorstr='#666666', endColorstr='#444444')";} All you need to do is to enclose the section in quotes and put a tilde in front of it. This section will not pass through the LESS processor and will not be thrown out.
Import
As with regular CSS, you can import files. LESS allows you to import CSS and LESS using the following syntax:
@import "reset.min.css"; @import "framework.less"; @import "widgets"; The first import is pretty obvious. It imports CSS rules defined in reset.min.css without being processed by the LESS parser.
The second import will insert the content of framework.less and process it like any other LESS rules.
The third import works as well as the second. If the extension is not installed, the preprocessor considers it as a LESS file.
Comments
Naturally, multi-line comments are available in LESS in the same way as in CSS. LESS also allows the use of single-line comments like in PHP or Javascript using the double backslash.
/* This is my main LESS file. It governs how most of the site looks. /* body { padding:0px; // This resets the body padding } What is missing?
Despite the fact that LESS is amazing, yet when you start using it, some flaws will be revealed, although they are not very disturbed.
One of the features that I would like to see is pre-pre-processing (I agree, it sounds meaningless). Remember how the lines can be escaped so as not to pass through the analyzer? The current method does not allow the use of gradients with variable colors.
filter: ~"progid:DXImageTransform.Microsoft.gradient(startColorstr='#faa51a', endColorstr='#f47a20')"; This code works great, but the colors must be firmly defined. If the line is shielded, the variables are not processed. It would be nice to have an option in which variables in shielded lines were processed before being sent to the CSS file.
Conclusion
As with any new technology or method, abuse arises. Remember the reflective logos and glass buttons at the dawn of the Web 2.0 era?
You are not required to put all your rules, you do not have to create variables for the whole or an impurity just for the width of the frame.
If you don’t know when not to use the awesome power of LESS, your LESS code will become as unreadable as regular CSS and as difficult to maintain. The trick is to know when to use these functions and methods, and when plain old CSS is better.
In addition, I advise you not to use the LESS file. There is nothing wrong with that, but there is no reason to load the LESS file and process it. Undoubtedly, the script is very fast, but I am sure that without it will be faster. I usually develop all my sites with LESS, take the output file, compress it and use a regular CSS file.
Translation of an article with webdesign.tuts +
Source: https://habr.com/ru/post/136525/
All Articles