We disassemble iPhone Core Data Recipes. Part 2
Introduction
This article is the second and final article in the “Disassembling iPhone Core Data Recipes” series. The first part of the article, you can read here . The purpose of the series of articles is to help a novice iOS developer to understand how to work correctly with a SQLite database using Core Data using the example of iPhone Core Data Recipes. In the final article we will discuss the functionality of adding, editing and deleting records from the database.
Prerequisites
For self-study of the source code of this application, you need a standard set of tools:
- Mac os x
- Xcode
This set will allow you to view, change and run the application on the simulator. In case, if you want to try to run it on a real iPhone, participation in the iOS Developer Program is required.
And also, which is quite important, you need a basic understanding of the structure of the Objective-C language and the application.
')
Links to the materials and tools used are provided in the References section.
How To Create a New Recipe
So, the first thing we need is to create a new recipe. For the creation of a new recipe, in this project, the view controller - RecipeAddViewController is responsible. Consider its contents.
RecipeAddViewController.h
@protocol RecipeAddDelegate; @class Recipe; @interface RecipeAddViewController : UIViewController <UITextFieldDelegate> { @private // Recipe, managedObjectContext Recipe *recipe; // UITextField *nameTextField; id <RecipeAddDelegate> delegate; } @property(nonatomic, retain) Recipe *recipe; @property(nonatomic, retain) IBOutlet UITextField *nameTextField; @property(nonatomic, assign) id <RecipeAddDelegate> delegate; // - (void)save; // - (void)cancel; @end @protocol RecipeAddDelegate <NSObject> // recipe == nil on cancel - (void)recipeAddViewController:(RecipeAddViewController *)recipeAddViewController didAddRecipe:(Recipe *)recipe; @end RecipeAddViewController.m
#import "RecipeAddViewController.h" #import "Recipe.h" @implementation RecipeAddViewController @synthesize recipe; @synthesize nameTextField; @synthesize delegate; - (void)viewDidLoad { // navigation bar self.navigationItem.title = @"Add Recipe"; // Cancel cancel UIBarButtonItem *cancelButtonItem = [[UIBarButtonItem alloc] initWithTitle:@"Cancel" style:UIBarButtonItemStyleBordered target:self action:@selector(cancel)]; self.navigationItem.leftBarButtonItem = cancelButtonItem; [cancelButtonItem release]; // Save save UIBarButtonItem *saveButtonItem = [[UIBarButtonItem alloc] initWithTitle:@"Save" style:UIBarButtonItemStyleDone target:self action:@selector(save)]; self.navigationItem.rightBarButtonItem = saveButtonItem; [saveButtonItem release]; [nameTextField becomeFirstResponder]; } ... // - (void)save { recipe.name = nameTextField.text; NSError *error = nil; if (![recipe.managedObjectContext save:&error]) { NSLog(@"Unresolved error %@, %@", error, [error userInfo]); abort(); } [self.delegate recipeAddViewController:self didAddRecipe:recipe]; } // - (void)cancel { [recipe.managedObjectContext deleteObject:recipe]; NSError *error = nil; if (![recipe.managedObjectContext save:&error]) { NSLog(@"Unresolved error %@, %@", error, [error userInfo]); abort(); } [self.delegate recipeAddViewController:self didAddRecipe:nil]; } //.. ARC, - (void)dealloc { [recipe release]; [nameTextField release]; [super dealloc]; } @end As a result, the form of adding a new recipe, looks like this
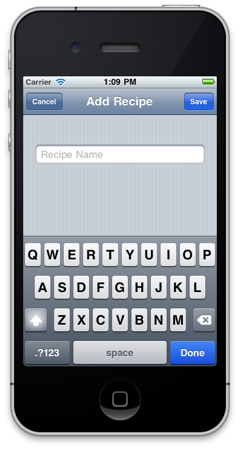
A detailed discussion of the save & cancel action will be below.
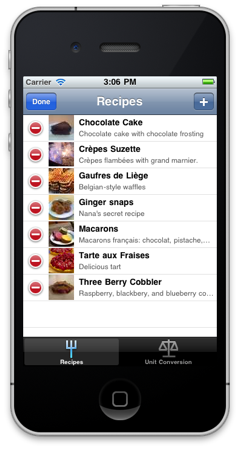
Open the form to create a new recipe
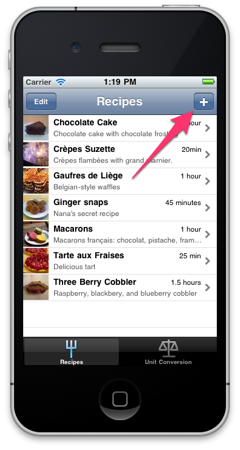
The button for creating a new recipe is located in the main window of our application (see the screenshot above). Let's look at it more.
This button is created in the viewDidLoad method of the RecipeListTableViewController controller.
UIBarButtonItem *addButtonItem = [[UIBarButtonItem alloc] initWithBarButtonSystemItem:UIBarButtonSystemItemAdd target:self action:@selector(add:)]; self.navigationItem.rightBarButtonItem = addButtonItem; [addButtonItem release]; The add action is attached to this button, which is also located in the RecipeListTableViewController controller (see comments in the source code).
- (void)add:(id)sender { // RecipeAddViewController RecipeAddViewController *addController = [[RecipeAddViewController alloc] initWithNibName:@"RecipeAddView" bundle:nil]; // RecipeListTableViewController addController.delegate = self; // managedObjectContext Recipe NSEntityDescription, - Recipe Recipe *newRecipe = [NSEntityDescription insertNewObjectForEntityForName:@"Recipe" inManagedObjectContext:self.managedObjectContext]; // Recipe RecipeAddViewController addController.recipe = newRecipe; // RecipeAddViewController UINavigationController *navigationController = [[UINavigationController alloc] initWithRootViewController:addController]; [self presentModalViewController:navigationController animated:YES]; [navigationController release]; [addController release]; } After performing this action, the form for adding a new recipe discussed above will open. On this form, two actions are available for the user - Save & Cancel.
Save the new recipe
- (void)save { // name Recipe recipe.name = nameTextField.text; NSError *error = nil; // if (![recipe.managedObjectContext save:&error]) { NSLog(@"Unresolved error %@, %@", error, [error userInfo]); abort(); } // RecipeDetailViewController ( . " ") [self.delegate recipeAddViewController:self didAddRecipe:recipe]; } Canceling the preservation of a new recipe
- (void)cancel { // Recipe, , [recipe.managedObjectContext deleteObject:recipe]; NSError *error = nil; if (![recipe.managedObjectContext save:&error]) { NSLog(@"Unresolved error %@, %@", error, [error userInfo]); abort(); } // [self.delegate recipeAddViewController:self didAddRecipe:nil]; } Display the created recipe
- (void)recipeAddViewController:(RecipeAddViewController *)recipeAddViewController didAddRecipe:(Recipe *)recipe { if (recipe) { // Recipe nil - [self showRecipe:recipe animated:NO]; } [self dismissModalViewControllerAnimated:YES]; } - (void)showRecipe:(Recipe *)recipe animated:(BOOL)animated { // , RecipeDetailViewController *detailViewController = [[RecipeDetailViewController alloc] initWithStyle:UITableViewStyleGrouped]; detailViewController.recipe = recipe; [self.navigationController pushViewController:detailViewController animated:animated]; [detailViewController release]; } How To Create a New Ingredient
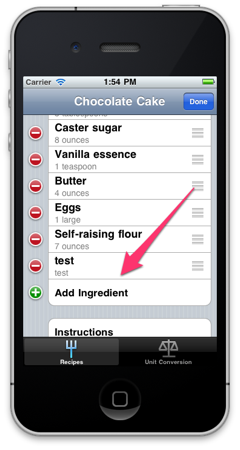
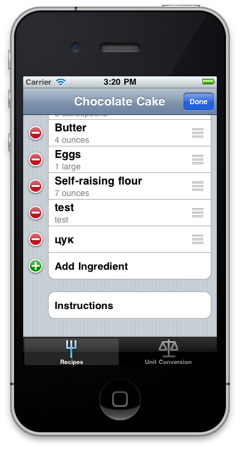
As you can see in the screenshot above, when viewing detailed information about the recipe, in edit mode, the link “Add Ingredient” is available. It is created in the method
- (UITableViewCell *)tableView:(UITableView *)tableView cellForRowAtIndexPath:(NSIndexPath *)indexPath controller RecipeDetailViewController.
static NSString *AddIngredientCellIdentifier = @"AddIngredientCell"; cell = [tableView dequeueReusableCellWithIdentifier:AddIngredientCellIdentifier]; if (cell == nil) { // Create a cell to display "Add Ingredient". cell = [[[UITableViewCell alloc] initWithStyle:UITableViewCellStyleDefault reuseIdentifier:AddIngredientCellIdentifier] autorelease]; cell.accessoryType = UITableViewCellAccessoryDisclosureIndicator; } cell.textLabel.text = @"Add Ingredient"; IngredientDetailViewController is responsible for adding and editing ingredients.
IngredientDetailViewController.h
@class Recipe, Ingredient, EditingTableViewCell; @interface IngredientDetailViewController : UITableViewController { @private Recipe *recipe; Ingredient *ingredient; EditingTableViewCell *editingTableViewCell; } @property (nonatomic, retain) Recipe *recipe; @property (nonatomic, retain) Ingredient *ingredient; @property (nonatomic, assign) IBOutlet EditingTableViewCell *editingTableViewCell; @end IngredientDetailViewController.m
... - (id)initWithStyle:(UITableViewStyle)style { if (self = [super initWithStyle:style]) { UINavigationItem *navigationItem = self.navigationItem; navigationItem.title = @"Ingredient"; UIBarButtonItem *cancelButton = [[UIBarButtonItem alloc] initWithBarButtonSystemItem:UIBarButtonSystemItemCancel target:self action:@selector(cancel:)]; self.navigationItem.leftBarButtonItem = cancelButton; [cancelButton release]; UIBarButtonItem *saveButton = [[UIBarButtonItem alloc] initWithBarButtonSystemItem:UIBarButtonSystemItemSave target:self action:@selector(save:)]; self.navigationItem.rightBarButtonItem = saveButton; [saveButton release]; } return self; } ... - (BOOL)shouldAutorotateToInterfaceOrientation:(UIInterfaceOrientation)interfaceOrientation { return (interfaceOrientation != UIInterfaceOrientationPortraitUpsideDown); } ... - (NSInteger)tableView:(UITableView *)tableView numberOfRowsInSection:(NSInteger)section { // , return 2; } // - (UITableViewCell *)tableView:(UITableView *)tableView cellForRowAtIndexPath:(NSIndexPath *)indexPath { static NSString *IngredientsCellIdentifier = @"IngredientsCell"; EditingTableViewCell *cell = (EditingTableViewCell *)[tableView dequeueReusableCellWithIdentifier:IngredientsCellIdentifier]; if (cell == nil) { [[NSBundle mainBundle] loadNibNamed:@"EditingTableViewCell" owner:self options:nil]; cell = editingTableViewCell; self.editingTableViewCell = nil; } if (indexPath.row == 0) { cell.label.text = @"Ingredient"; cell.textField.text = ingredient.name; cell.textField.placeholder = @"Name"; } else if (indexPath.row == 1) { cell.label.text = @"Amount"; cell.textField.text = ingredient.amount; cell.textField.placeholder = @"Amount"; } return cell; } ... - (void)save:(id)sender { NSManagedObjectContext *context = [recipe managedObjectContext]; /* - */ if (!ingredient) { self.ingredient = [NSEntityDescription insertNewObjectForEntityForName:@"Ingredient" inManagedObjectContext:context]; [recipe addIngredientsObject:ingredient]; ingredient.displayOrder = [NSNumber numberWithInteger:[recipe.ingredients count]]; } /* */ EditingTableViewCell *cell; cell = (EditingTableViewCell *)[self.tableView cellForRowAtIndexPath:[NSIndexPath indexPathForRow:0 inSection:0]]; ingredient.name = cell.textField.text; cell = (EditingTableViewCell *)[self.tableView cellForRowAtIndexPath:[NSIndexPath indexPathForRow:1 inSection:0]]; ingredient.amount = cell.textField.text; /* */ NSError *error = nil; if (![context save:&error]) { NSLog(@"Unresolved error %@, %@", error, [error userInfo]); abort(); } [self.navigationController popViewControllerAnimated:YES]; } ... @end The form of adding the ingredient is as follows
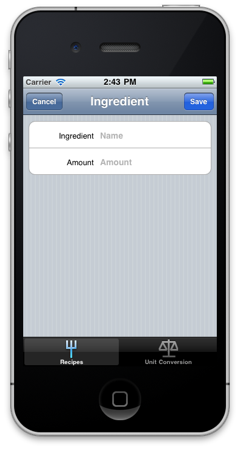
When you click on the Save button, the ingredient will be saved in the database and displayed in the list. Clicking the Cancel button will not save the new ingredient.
How To Remove an Existing Recipe
The RecipeListTableViewController controller contains the following code to support recipe deletion
- (void)viewDidLoad { ... // Edit self.navigationItem.leftBarButtonItem = self.editButtonItem; ... } ... // UITableView - (void)tableView:(UITableView *)tableView commitEditingStyle:(UITableViewCellEditingStyle)editingStyle forRowAtIndexPath:(NSIndexPath *)indexPath { if (editingStyle == UITableViewCellEditingStyleDelete) { // NSManagedObjectContext *context = [fetchedResultsController managedObjectContext]; [context deleteObject:[fetchedResultsController objectAtIndexPath:indexPath]]; // NSError *error; if (![context save:&error]) { NSLog(@"Unresolved error %@, %@", error, [error userInfo]); abort(); } } } Now, when you click the Edit button or make a gesture on a UITableViewCell, the UITableView will go into edit mode, which will allow you to delete the recipe (see screenshots below).
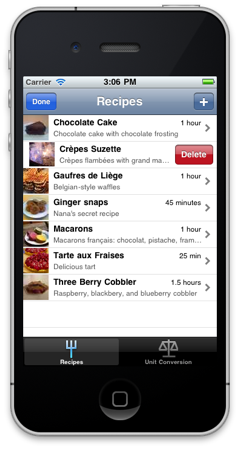
When deleting a recipe, all related objects (ingredients and picture) in the database will also be deleted.
How To Remove An Existing Ingredient
In the RecipeDetailViewController controller, everything is arranged in a similar way, except for adding a picture (it will not be considered).
- (UITableViewCellEditingStyle)tableView:(UITableView *)tableView editingStyleForRowAtIndexPath:(NSIndexPath *)indexPath { UITableViewCellEditingStyle style = UITableViewCellEditingStyleNone; // Only allow editing in the ingredients section. // , (. tableView:cellForRowAtIndexPath:), , , if (indexPath.section == INGREDIENTS_SECTION) { if (indexPath.row == [recipe.ingredients count]) { style = UITableViewCellEditingStyleInsert; } else { style = UITableViewCellEditingStyleDelete; } } return style; } - (void)tableView:(UITableView *)tableView commitEditingStyle:(UITableViewCellEditingStyle)editingStyle forRowAtIndexPath:(NSIndexPath *)indexPath { // if ((editingStyle == UITableViewCellEditingStyleDelete) && (indexPath.section == INGREDIENTS_SECTION)) { // Ingredient *ingredient = [ingredients objectAtIndex:indexPath.row]; [recipe removeIngredientsObject:ingredient]; [ingredients removeObject:ingredient]; NSManagedObjectContext *context = ingredient.managedObjectContext; [context deleteObject:ingredient]; [self.tableView deleteRowsAtIndexPaths:[NSArray arrayWithObject:indexPath] withRowAnimation:UITableViewRowAnimationTop]; } } The form for adding and removing ingredients is as follows.
Conclusion
In this article, I did not specifically consider creating a picture for a recipe - assuming the reader would independently study this functionality (see the RecipeDetailViewController method of the photoTapped controller). The examples of the source code are excerpts; you can study the source code completely by downloading the project (see the References section). I hope that the work I have done on writing this series of articles has been useful to you - dear reader! Thank you all for your attention and for your patience.
References
Source: https://habr.com/ru/post/136344/
All Articles