Prototype Lane Departure Warning or how to remind the driver that he did not have a very long time to live
I read a little about the auto show in Detroit, about the fact that Lane Departure Warning is becoming more and more popular and decided that I should share my experience in making a prototype of this system from simple components in the form of a webcam, Python, OpenCV and a couple of days of hard work meditation :)
The history of the prototype can be read and viewed under the cut ... (there are a lot of pictures, a lot ...)
Foreword
It all started with the fact that I had to choose the final projects for two courses: "Autoelectronics" and "Image Processing". As a lazy person, I could not but cross both projects and thereby save time, and if we consider that for a couple of lectures before that, we were just told about Lane Departure Warning (to be honest, I still do not know adequate Russian, and most importantly short name of this system, so I will use the abbreviation LDW), then I wanted to try to do such a thing on my own.
')
Some general information
So, what kind of beast is this named “Lane Departure Warning”. Let's start with the fact that while driving the car is most often in its lane and should not leave it, but in reality the driver can be distracted from driving and the car can start moving to the next lane, which can lead to particularly sad consequences in case of move to the oncoming lane. According to statistics from the National Highway Traffic Safety Administration (NHTSA), 40-60% of all accidents on highways in the USA are directly or indirectly related to the fact that a car leaves its lane. To prevent this, people came up with tracking the position of the car in the lane and if it starts to leave it, give a signal to the driver or take more active actions: turn the steering wheel or apply brakes on the wheels of the opposite side to prevent the car from leaving its lane. In fact, such systems are not something very new, the Japanese 10 years ago began to experiment with them on some models. Moreover, various companies used to implement quite different approaches: ordinary cameras looking forward or backward, as well as infrared cameras looking down.
Implementation
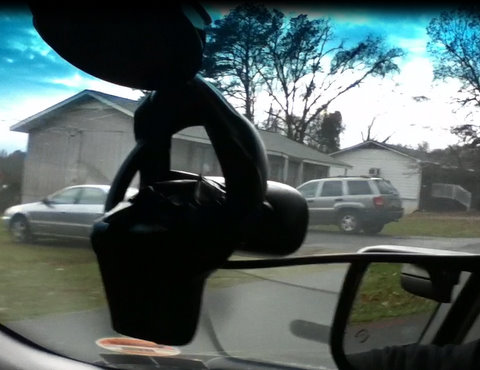
So, the task is to determine the position of the car on the highway and give a signal to the driver in case of leaving the lane, and with the least amount of modifications to the car. In my case, the basis of the system was a webcam bolted with an electrical tape to the mount from the GPS receiver and located on the windshield near the rearview mirror plus a laptop located on the lap.
For processing the video stream, the OpenCV library was traditionally chosen, and for the implementation of the Python algorithm.
A little bit about Python
Here I will make a small lyric-advertising retreat about Python. It so happened that I wrote a lot on the pluses, and a lot on what else, but I never came across a Python and I sincerely believed that it was quite slow. Immediately it was required in real time to process the video and do some amount of any calculations. But, looking ahead a bit, I can say that the impressions were only positive: it was very easy to write on it (actually I started writing this project on the second day of studying Python), he handled the video processing (not without the help of using NumPy , which allows you to quickly process data arrays and OpenCV), and if I look forward a little more, now I am rewriting part of my research project on it and when using OpenGL I get 300+ fps. On this Python ad can be considered complete, use it for prototypes - you will not regret.
Attempt the first - color model
So, I began by trying to separate the strip from the background. At first I tried the simplest approach: to have some kind of color model of a dividing strip, count the Euclidean distance from each pixel to the model and apply some predetermined threshold. In general, this idea is not deprived of meaning and gives quite a good result:
But only until there is a shadow on the road, and it appears very, very often. Then it turns out like this:
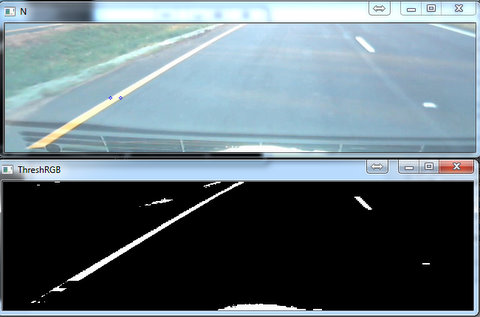
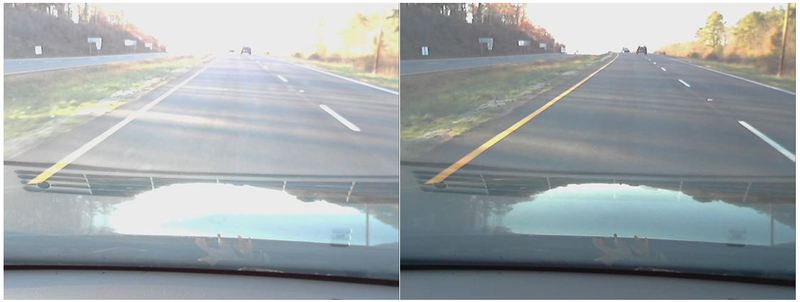
which is generally good, but a much more serious bummer was waiting for me: the camera periodically adjusts the exposure (for some reason, I never managed to manage it manually) and very seriously changes the brightness of the frame. It looks like this (in the picture there are two consecutive frames with a large difference in brightness):
In order to get rid of this problem, the idea to work with the HSV color space came to me, saying that there the color does not really depend on the brightness, then the shadow and autoexposure should not affect. On the one hand, the idea is quite reasonable, but with extreme brightness values, quite a lot of noise appears in the tone channel. As a result, it looks like this:

In general, I was tormented with trying to separate the bands from the background for any situations and I realized that this idea was not very good. And I tried to use a lot of different filters and video processing methods, and my monitor was littered with all kinds of windows with results like the following:
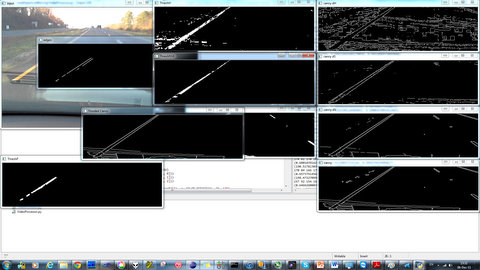
and so two more monitors nearby :)
Attempt the second - virtual sensors
After the unsuccessful first attempt, I realized that this would not work, but I didn’t want to look at the finished algorithm somewhere, I wanted everything of my own. The truth is, once I still counted a little and spied one picture on the first page of Google’s issue:
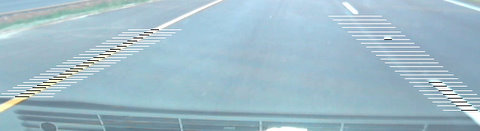
From this picture was born the idea of using several “virtual sensors”, which are trying to track not the entire strip of pillars, but its section in some selected horizontal area.
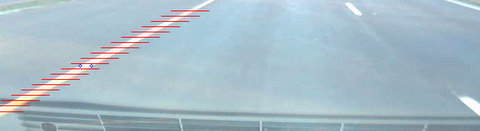
Here on the image horizontal red stripes show the working areas of these sensors. They all work independently, which allows them to filter relative to each other. Those. if everyone shows that the band is on the left and one is on the right, his results can be discarded, even if this sensor is 100% sure that the band is there.
Each sensor is smart enough, it contains a model of a dividing strip and tries to find it in its working area. Actually, the model uses two properties: the color already familiar to us, which works well, but not always the width of the strip (everything is not quite simple, due to the fact that the camera can be located in the car in different ways and because of perspective distortions , we cannot set the bandwidth, so at the very beginning of the program, the sensors are trained in it). Thus, the following algorithm is used for each frame:
0) First, we crop the image only to the area where the road is visible. This allows you to improve performance and not embarrass the algorithm with reflections on the hood and sky.
1) Then we apply Canny to the whole image. This allows us to forget about auto exposure and sometimes shadows.
2) Then for each sensor:
2.1) we are looking for all closed regions (areas bounded on both sides by borders)
2.2) look for those regions whose width is equal to the width of the strip
2.3) if there are several such regions (due to shadows and similar problems), then we consider the average color of the region and its distance from our color model of the dividing strip and choose the most similar one.
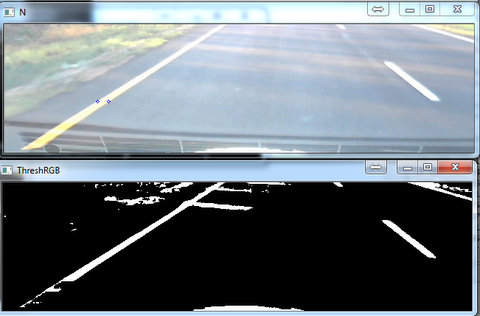
Here are the results for each sensor (black - dividing strip, white - road):
Dividing strip model
So, we have data from each sensor and the next step is to determine the position of the dividing strip, and in order to do this you need to have some kind of model. I decided not to philosophize much and present a dividing strip near the car just as a straight line. It could of course be said that it was not at all direct, but I experimented a little with the second-order curve, I realized that there wasn’t much difference and quit this disastrous matter. As a result, my dividing lines sometimes intersect on the horizon, but that's not a big deal. In order to take into account all the data from the sensors, I use the method of minimum squares, to which the input receives the midpoints of all the segments, which the virtual sensors consider as a dividing strip. As a result, it looks like this:

Vehicle position determination
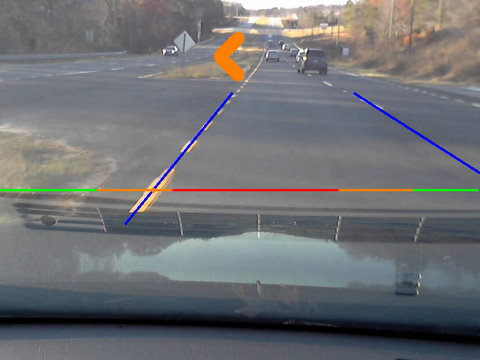
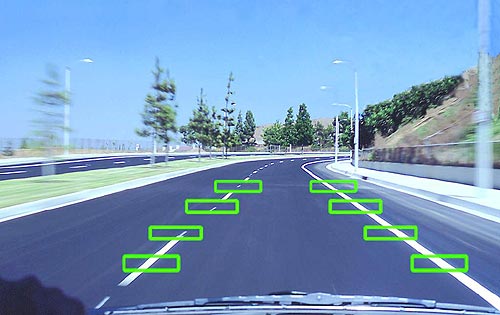
After we learned where the dividing lanes are located, it is time to determine where the car is located on the lane. Then a rather simple way came to my mind: take some horizontal line closer to the hood, mark several zones on it, find the intersection points of this straight and dividing lines and use these points to determine the position of the car within the band. Depending on which zone the point of intersection is located in, we can tell how close the machine is to the dividing strip, and even with such a simple method it turns out quite accurately. I use 3 zones: green - everything is good, the car in the center; orange - we are already close to the edge; red - we already ran into the strip. The whole thing looks like this:

Moreover, the choice of the position of these zones is already in the process of movement, since everything strongly depends on the size of the machine and the position of the camera. And in my case it looked like this: the car moves at the edge, drives the wheel to the strip and by the sound (moving through light reflectors) the border of the red zone is set, i.e. This is the moment when the wheel of the car has already begun to move to the next lane. A little later on the video you can hear it.
Actually this is almost the end, it remains only to inform the driver about what is happening there. To do this, I show the arrows, which are directed towards moving the machine:

Testing
So, the most interesting is tests. To begin with, let's take a look at how the developed prototype handles the pre-recorded video:
Everything is not so bad, except for a couple of frames where he could not correctly determine the position of the dividing line. Moreover, it was possible to handle such a situation, in this case, the implementation of the least squares method from NumPy showed an exception and one could simply use the old position of the strip, but at that time it was too late and it was too lazy to mess around :)
And now the main thing is tests on a real track:
And here is the promised video on which you can hear the sound of hitting the reflectors, which are located on the dividing strip (by the way, a useful thing, and not only for tests):
the end
That's all, I can only say that a simple prototype of such a system is not a tricky business, but how to make it work steadily in all weather and road conditions is another question, because quite often the lane is almost invisible and even my brain I hardly understand where I am going.
Another interesting point: now my prototype feels very bad when moving from one lane to another. At first, I thought about making the correct operation of changing lanes and all that, but everything is far from being so obvious: the task of this system is not to let go to another lane, and in order to understand what the driver really wants, you need to have more information, such as data on the inclusion of turn signals, data navigation systems, radar, etc. etc., but that's completely another story.
And once again I will say that Python is a great thing for prototyping, I say this as a person who has been writing in C ++ for quite a few years (and even 2 days to develop such a thing from scratch without knowing the language confirm this, I wouldn’t managed).
PS: I apologize for not continuing the previous theme with the 3-D kettle , as it turned out, the 3D monitor is good for 3D, but doesn’t work with 2D, so I had to change it, but I hope this theme is not worse :)
PS2: I forgot about the source code, they live on github
Source: https://habr.com/ru/post/136294/
All Articles