Integration of some features of Scoreloop social gaming network into an Android application
 Tables of records appeared in games many, many years ago. At first they were very simple, remember, for example, games for consoles with three-character player names.
Over time, the record tables became more complicated, the results became possible to publish on the Internet to see themselves in the global list.
Nowadays, in the days of the Internet, social networks and mobile devices, high score tables have grown into entire social gaming networks.
')
Below I will talk about the integration into my Android application of one of these social gaming networks called Scoreloop.
Main features
 Scoreloop provides SDK for applications on Android, Bada, iOS and Windows Phone 7, opening access to the following features:
- Points and results table. A player can score points during the game, which are sent to the server and can then be shown as a global table, best points per day, a table based on nationality, based on geographic location, or a table among player's friends.
- Fights A player can call another player to a duel: the first competitor, having gained a certain number of points, sends the result to the server, setting the reward for the duel (a certain amount of money in the in-game currency). Another person can accept the challenge and try to beat this result. The winner receives an award.
- Awards and achievements. A player can receive rewards in the in-game currency for certain achievements (find and kill all monsters at the level, complete the level without killing any monster, etc.)
- Social posts. A player can send e-mail, MySpace, Facebook and Twitter messages about certain events, such as receiving a certain number of points, creating a duel, winning a duel, receiving a reward, information about the game or an invitation to join Scoreloop.
- Activity A player can receive messages about events that happened to his friends, or from any player passing the same level as him. For example: "Player001 received 50 points in the game SLDemoCore".
- News. The developer can show the news directly to the player within the game.
Result table
Step 1. Register on developer.scoreloop.com (without this, it will not work) and download the SDK (the link only works if you are logged in)
Step 2. Add our application, get the game id and secret code for it.
Then you can go two ways - use the CoreSocial SDK and do it all by hand or use ScoreloopUI and get a ready UI for the results table, etc. We will go the second way.
Step 3. Unzip the SDK to a directory.
I assume that you are using Eclipse to develop your application. We open the ScoreloopUI project from the SDK using the File -> Import -> Existing Projects Into Workspace command.
Then connect the ScoreloopUI project to your project as a library (right-click on the project of your game, select 'Properties', select 'Android', click the 'Add' button in the 'Library' section, find the ScoreloopUI project and select it).
You also need to connect the scoreloop-core.jar library to your project (Project -> Properties -> Libraries -> Add external JAR)
Step 4. Set the required permissions for your application.
<! - Permission configuration required by Scoreloop ->
<uses-permission android: name = "android.permission.INTERNET" />
<uses-permission android: name = "android.permission.READ_PHONE_STATE" />
<uses-permission android: name = "android.permission.READ_CONTACTS" />
Obviously, the application will need Internet access (INTERNET). I don’t know exactly what READ_PHONE_STATE is for, and READ_CONTACTS can be omitted if you set ui.feature.address_book = false in the scoreloop.properties file.
Step 5. Specify ScoreloopUI activations that your application will use.
<! - Defining the ScoreloopUI activities ->
<activity android: name = "com.scoreloop.client.android.ui.EntryScreenActivity" android: theme = "@android: style / Theme.Black.NoTitleBar.Fullscreen" />
<activity android: name = "com.scoreloop.client.android.ui.ShowResultOverlayActivity" android: theme = "@ style / sl_dialog" />
<activity android: name = "com.scoreloop.client.android.ui.component.market.MarketHeaderActivity" />
<activity android: name = "com.scoreloop.client.android.ui.component.market.MarketListActivity" />
<activity android: name = "com.scoreloop.client.android.ui.component.entry.EntryListActivity" />
<activity android: name = "com.scoreloop.client.android.ui.component.post.PostOverlayActivity" android: theme = "@ style / sl_dialog" />
<activity android: name = "com.scoreloop.client.android.ui.component.score.ScoreHeaderActivity" />
<activity android: name = "com.scoreloop.client.android.ui.component.score.ScoreListActivity" />
<activity android: name = "com.scoreloop.client.android.ui.component.user.UserAddBuddyListActivity" />
<activity android: name = "com.scoreloop.client.android.ui.component.user.UserHeaderActivity" />
<activity android: name = "com.scoreloop.client.android.ui.component.user.UserDetailListActivity" />
<activity android: name = "com.scoreloop.client.android.ui.component.user.UserListActivity" />
<activity android: name = "com.scoreloop.client.android.ui.component.game.GameDetailHeaderActivity" />
<activity android: name = "com.scoreloop.client.android.ui.component.game.GameDetailListActivity" />
<activity android: name = "com.scoreloop.client.android.ui.component.game.GameListActivity" />
<activity android: name = "com.scoreloop.client.android.ui.component.profile.ProfileSettingsListActivity" />
<activity android: name = "com.scoreloop.client.android.ui.component.profile.ProfileSettingsPictureListActivity" />
<activity android: name = "com.scoreloop.client.android.ui.LeaderboardsScreenActivity" android: theme = "@android: style / Theme.Black.NoTitleBar.Fullscreen" />
<activity android: name = "com.scoreloop.client.android.ui.framework.ScreenActivity" android: theme = "@android: style / Theme.Black.NoTitleBar.Fullscreen" />
<activity android: name = "com.scoreloop.client.android.ui.framework.TabsActivity" />
Step 6. Get the scoreloop.properties file
Return to the scoreloop.com web panel, set the game properties (Game Properties tab), then click the “Get scoreloop.properties” link on the same page and save the scoreloop.properties file in the / assets folder of your project.
Step 7. Initialization and destruction of the Scoreloop framework
To initialize and destroy framework classes, use the ScoreloopManagerSingleton class. Please note that the operations described below must be performed in the application class, not activated. When you create an application class (if you do not already have one), do not forget to specify the name of the application class in the application tag of your manifest.
Initialization:
ScoreloopManagerSingleton. init ( this , "secret code received via the web interface" ) ;
Destruction:
ScoreloopManagerSingleton. destroy ( ) ;
In addition, the SDK strongly recommends that all calls be implemented within the main UI flow. If your application uses streams, it is recommended that you use Android Handler objects (http://developer.android.com/reference/android/os/Handler.html) and call the ScoreloopUI API from the main thread.
Step 8. Sending the result of the game to the server
Your activation should implement the OnScoreSubmitObserver interface. It consists of the onScoreSubmit method, which will be called after sending points to the server (obviously, this operation takes time and it is impossible to block the UI stream for such time).
We register activations as an observer of the results of sending:
ScoreloopManagerSingleton. get ( ) . setOnScoreSubmitObserver ( this ) ;
Sending points to the server:
Double scoreResult = 1450.0 ;
ScoreloopManagerSingleton. get ( ) . onGamePlayEnded ( scoreResult, null ) ;
In the onGamePlayEnded method, the second parameter is the game mode (for example, easy, complex, etc.). Since we have not configured the modes through the web interface, we pass null.
Step 9. Displaying the results table
With this, everything is quite simple:
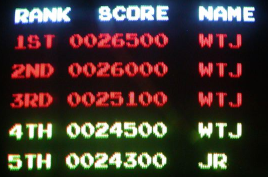
startActivity ( new Intent ( this , LeaderboardsScreenActivity. class ) ) ;
Here's what it looks like:

Branding
Scoreloop for using its service requires that the icon of your application have a small Scoreloop logo on top of the main image, such as here:

This is supposedly done so that users can immediately see that this application is integrated with Scoreloop and began to download it with terrible force, but we know that ...
Afterword
If any questions remain incomprehensible, I will try to answer in the comments. In addition, the SDK includes detailed and very clear documentation.
You can see the integration results described in this article in the Qbrix game ( link to Market , link to .apk ):

PS Taking this opportunity, I want to say thanks to the authors of articles on the integration of AdMob and ACRA into the Android application. These guides saved me a few hours of development.
Source: https://habr.com/ru/post/136218/
All Articles