How to use the webcam in the Android emulator
Many developers, especially beginners, use the Android emulator to create their applications. This allows you to do a lot without connecting the phone. Almost all. It is this “almost” that applies, for example, to a webcam. For most applications, it may be sufficient to have this type, because you can transfer the “desired” image to the processor, and finally test it on a real device. For applications that work with augmented reality, this will not work at all. I would like to have a video stream. If there is no phone with android at hand, this is a problem.
In the last post I wrote about how the methods of recognition of augmented reality marker work. This article will be devoted to how to use the webcam in the Android emulator.
The essence of the problem
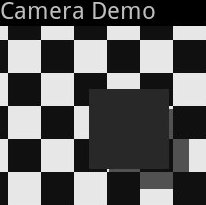
If we use an emulator and a camera in our application, then at the output we get approximately the following picture:

I wish there were images from the computer webcam instead.
Approaches to the solution
1)
2) Transfer the stream from the webcam over the network and use it in the application.
3) Use Android x86.
The emulator source for honeycomb is not available since March 2011, there are deprecated versions available, it is fun to work with them, but unproductive. A pity, it would be the most acceptable option. Moreover, the experience of finishing applications that work with video stream and v4l2 under Linux is.
Androidx86 is a way out, it can help many, but ... I didn’t manage to lift a webcam.
The first and third approaches are not available to us, then we will fight for the second approach.
The idea has long been proposed and even implemented for older versions of the emulator and API. For new versions of API, a solution is proposed, but only for JMF Great solution, but my JMF camera did not recognize. Making the camera work with JMF did not work either in Linux or in Windows (maybe I did something wrong, in theory this solution should run in Windows). I carried out all further actions exclusively in Linux. We modify the solution of this problem on the basis of a ready-made code.
The source code implements the classic client-server system. The server on the computer broadcasts the images from the camera to the network, and the client in the emulator (in the application) receives these images.
')
What is set
Jdk
Android SDK
Eclipse + google ADT
v4l4j
/ dev / video0 - webcam.
Server
To create a server, I decided to move along the path of least resistance and use the v4l4j library - which perfectly supports my camera.
It is necessary to modify the source code so that instead of JMF it uses v4l4j. That's what happened.
Modified WebBroadcaster (I am citing the code completely so that the logic of the work is clear. By Tom Gibara, I just adapted it to v4l4j):
package com.webcambroadcaster; import java.io.BufferedOutputStream; import java.io.DataOutputStream; import java.io.IOException; import java.io.OutputStream; import java.net.ServerSocket; import java.net.Socket; import au.edu.jcu.v4l4j.DeviceInfo; import au.edu.jcu.v4l4j.FrameGrabber; import au.edu.jcu.v4l4j.V4L4JConstants; import au.edu.jcu.v4l4j.VideoDevice; import au.edu.jcu.v4l4j.VideoFrame; /** * A disposable class that uses JMF to serve a still sequence captured from a * webcam over a socket connection. It doesn't use TCP, it just blindly * captures a still, JPEG compresses it, and pumps it out over any incoming * socket connection. * * @author Tom Gibara * */ public class WebcamBroadcaster { public static boolean RAW = false; public static void main(String[] args) { int[] values = new int[args.length]; for (int i = 0; i < values.length; i++) { values[i] = Integer.parseInt(args[i]); } //Parse inputs WebcamBroadcaster wb; if (values.length == 0) { wb = new WebcamBroadcaster(); } else if (values.length == 1) { wb = new WebcamBroadcaster(values[0]); } else if (values.length == 2) { wb = new WebcamBroadcaster(values[0], values[1]); } else { wb = new WebcamBroadcaster(values[0], values[1], values[2]); } //Start the grabbing procedure wb.start(); } public static final int DEFAULT_PORT = 9889; public static final int DEFAULT_WIDTH = 320; public static final int DEFAULT_HEIGHT = 240; private final Object lock = new Object(); private final int width; private final int height; private final int port; private boolean running; private boolean stopping; private Worker worker; private VideoDevice vd=null; private FrameGrabber fg=null; public WebcamBroadcaster(int width, int height, int port) { this.width = width; this.height = height; this.port = port; } public WebcamBroadcaster(int width, int height) { this(width, height, DEFAULT_PORT); } public WebcamBroadcaster(int port) { this(DEFAULT_WIDTH, DEFAULT_HEIGHT, port); } public WebcamBroadcaster() { this(DEFAULT_WIDTH, DEFAULT_HEIGHT, DEFAULT_PORT); } public void start() { synchronized (lock) { if (running) return; //Starting capture startCapture(); worker = new Worker(); worker.start(); System.out.println("Start capture"); running = true; } } public void releaseCapture(){ fg.stopCapture(); vd.releaseFrameGrabber(); vd.release(); } public void startCapture(){ try{ String dev = "/dev/video0"; vd = new VideoDevice(dev); fg = vd.getJPEGFrameGrabber(width, height, 0, 0, 80); fg.startCapture(); }catch(Exception e){ e.printStackTrace(); } } public void stop() throws InterruptedException { synchronized (lock) { if (!running) return; // //Stop capture at this place releaseCapture(); // stopping = true; running = false; worker = null; } try { worker.join(); } finally { stopping = false; } } private class Worker extends Thread { private final int[] data = new int[width*height]; public byte[] b=null; @Override public void run() { ServerSocket ss; VideoFrame frm; try { ss = new ServerSocket(port); } catch (IOException e) { e.printStackTrace(); return; } while(true) { synchronized (lock) { if (stopping) break; } Socket socket = null; try { socket = ss.accept(); //Grab image here try{ // frm = fg.getVideoFrame(); System.out.println("Datagrabbed"); OutputStream out = socket.getOutputStream(); DataOutputStream dout = new DataOutputStream(new BufferedOutputStream(out)); dout.write(frm.getBytes(), 0, frm.getFrameLength()); dout.close(); System.out.println("Datasent"); frm.recycle(); // }catch(Exception e){ e.printStackTrace(); return; } socket.close(); socket = null; } catch (IOException e) { e.printStackTrace(); } finally { if (socket != null) try { socket.close(); } catch (IOException e) { /* ignore */ } } } try { ss.close(); } catch (IOException e) { /* ignore */ } } } } What is the logic of work:
When starting, turn on the camera and prepare to receive images:
public void startCapture(){ try{ String dev = "/dev/video0"; vd = new VideoDevice(dev); fg = vd.getJPEGFrameGrabber(width, height, 0, 0, 80); fg.startCapture(); }catch(Exception e){ e.printStackTrace(); } } Then, when the client connects - send him an image to the stream:
try{ // frm = fg.getVideoFrame(); System.out.println("Datagrabbed"); OutputStream out = socket.getOutputStream(); DataOutputStream dout = new DataOutputStream(new BufferedOutputStream(out)); dout.write(frm.getBytes(), 0, frm.getFrameLength()); dout.close(); System.out.println("Datasent"); frm.recycle(); // }catch(Exception e){ e.printStackTrace(); return; } Of the improvements for the future, the code uses the outdated getVideoFrame (), which should be replaced with a callback function call when a new frame appears on the camera, but it would also have to make changes to the logic of the entire bundle, so leave everything as is, I will probably rewrite later when there is time. After all, this is an auxiliary function at the development stage ... Ideally, it is necessary to make the program read the stream in the MJPEG format, that is, parse the multipart / x-mixed response from the HTTP server and draw pictures as it arrives.
Customer
Link to a classic example of using a conventional camera. We will shorten it a bit, simplify it (for training and testing) and get an example for an ordinary camera.
Important lines: The class that will be responsible for the display.
preview = new Preview(this); ((FrameLayout) findViewById(R.id.preview)).addView(preview); And the class itself:
package com.example; import android.app.Activity; import android.os.Bundle; import android.util.Log; import android.widget.Button; import android.widget.FrameLayout; public class CameraDemo extends Activity { private static final String TAG = "CameraDemo"; Preview preview; Button buttonClick; /** Called when the activity is first created. */ @Override public void onCreate(Bundle savedInstanceState) { super.onCreate(savedInstanceState); setContentView(R.layout.main); preview = new Preview(this); ((FrameLayout) findViewById(R.id.preview)).addView(preview); Log.d(TAG, "It were created"); } } And inside this class Preview, every time we redraw the surface onto which the preview is displayed.
package com.example; import java.io.IOException; import android.content.Context; import android.hardware.Camera; import android.view.SurfaceHolder; import android.view.SurfaceView; class Preview extends SurfaceView implements SurfaceHolder.Callback { SurfaceHolder mHolder; public Camera camera; Preview(Context context) { super(context); // Install a SurfaceHolder.Callback so we get notified when the // underlying surface is created and destroyed. mHolder = getHolder(); mHolder.addCallback(this); mHolder.setType(SurfaceHolder.SURFACE_TYPE_PUSH_BUFFERS); } public void surfaceCreated(SurfaceHolder holder) { // The Surface has been created, acquire the camera and tell it where // to draw. camera = Camera.open(); try { camera.setPreviewDisplay(holder); } catch (IOException e) { e.printStackTrace(); } } public void surfaceDestroyed(SurfaceHolder holder) { // Surface will be destroyed when we return, so stop the preview. // Because the CameraDevice object is not a shared resource, it's very // important to release it when the activity is paused. camera.stopPreview(); camera = null; } public void surfaceChanged(SurfaceHolder holder, int format, int w, int h) { // Now that the size is known, set up the camera parameters and begin // the preview. Camera.Parameters parameters = camera.getParameters(); parameters.setPreviewSize(w, h); camera.setParameters(parameters); camera.startPreview(); } } If this code is run in the emulator, then we get a box as in the screenshot above.
Now, we modify the class so that it shows pictures from our server.
1) Take the source code for the SocketCamera class from here . Add to our project.
2) Change the source code of the class Preview so:
package com.example; import java.io.IOException; import android.content.Context; import android.hardware.Camera; import android.view.SurfaceHolder; import android.view.SurfaceView; class Preview extends SurfaceView implements SurfaceHolder.Callback { SurfaceHolder mHolder; //public Camera camera; public SocketCamera camera; Preview(Context context) { super(context); // Install a SurfaceHolder.Callback so we get notified when the // underlying surface is created and destroyed. mHolder = getHolder(); mHolder.addCallback(this); //mHolder.setType(SurfaceHolder.SURFACE_TYPE_PUSH_BUFFERS); mHolder.setType(SurfaceHolder.SURFACE_TYPE_NORMAL); } public void surfaceCreated(SurfaceHolder holder) { // The Surface has been created, acquire the camera and tell it where // to draw. //camera = Camera.open(); camera = SocketCamera.open(); try { camera.setPreviewDisplay(holder); } catch (IOException e) { e.printStackTrace(); } } public void surfaceDestroyed(SurfaceHolder holder) { // Surface will be destroyed when we return, so stop the preview. // Because the CameraDevice object is not a shared resource, it's very // important to release it when the activity is paused. camera.stopPreview(); camera = null; } public void surfaceChanged(SurfaceHolder holder, int format, int w, int h) { // Now that the size is known, set up the camera parameters and begin // the preview. Camera.Parameters parameters = camera.getParameters(); parameters.setPreviewSize(w, h); camera.setParameters(parameters); camera.startPreview(); } } Result
Now start the server:
java -Djava.library.path = / opt / Android / v4l4j-0.8.10 -cp "/opt/Android/v4l4j-0.8.10/v4l4j.jar:./" com / webcambroadcaster / WebcamBroadcaster
where -Djava.library.path = / opt / Android / v4l4j-0.8.10 is the path to your v4l4j library
Run the CameraDemo application on the emulator. As a result, we get a video stream from the webcam in the emulator. The stream twitches a little, comes late, but it's better than nothing.

Client Sources: CameraDemo.zip
Server sources: WebBroadcaster.zip
Afterword
I thought about the existing threshold for entering the technology. It seems to be a small threshold, but the purchase of a device is very often not available to a novice developer. The emulator removes this threshold only partially.
And what is the threshold for entering the development of applications for the iPhone?
Faced with the fact that a member of the open source community closes it after some time, questions arise:
Is it only profit?
Maybe the community’s work didn’t meet Google’s expectations?
Is there really something to hide from the community?
And what does the giant lose when it closes itself from studying and adding code to third-party developers?
UPD: This is all possible and not relevant. skl1f suggests that the camera is supported in the SDK.
developer.android.com/sdk/tools-notes.html - like the documentation says yes, and the official manual: developer.android.com/guide/developing/devices/emulator.html - no. Need to try.
UPD2: Checked. The camera in the emulator works and is available for SDK tools rev. 14 and above and only for Android 4.0 and above . For older platforms, the above described method is still relevant.
Source: https://habr.com/ru/post/136075/
All Articles