Debian on Iomega StoreCenter Ix2-200 or do a full-fledged servachok from a network drive
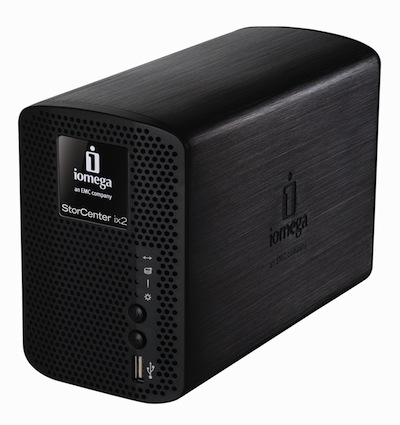
Somehow, at work, there was a need to organize a repository in the network for documentation of any different kind. Requirements: reliability, small size, volume of several terabytes. My choice was on the Network Attached Storage of the Iomega StoreCenter Ix2-200. In the process of market research, it turned out that this device uses a trimmed version of Debian Lenny, and it is possible to install a full-fledged Debian Squeeze. Thereby get all the features provided by this OS.
So, the device was purchased, I overlaid with the documentation found on the Internet and proceeded to install the Debian Squeeze OS for the armel architecture. Unfortunately, the available documentation was in English, not complete and not accurate, in general, there was room for thought. In addition, for the initial boot and reinstall of the OS, a rather specific RS-232 cable was required.
')
As a result, my experiment (successful) was described under the cut, the necessary pieces of the instructions of others were translated, and the experimental information I received is presented.
About cable
For installation, we need an interface cable that uses the rs-232 protocol with an ordinary DB9 on the one hand and an extraordinary (I don't know if it has its own name) connector on the other. I myself am confused from which side they approach the soldering iron, so I turned to my colleagues, who soldered to me this:
UPD from 01/19/2012 : As I was told, the connector from the other end (not DB9) is called BLS-04. Some technical details about the cable here .

Pinout:
 Pin 1 VCC (3.3V)
 Pin 2 TxD
 Pin 3 gnd
 Pin 4 RxD

 Pin 1 is signed "JP1"
Instead, the original instructions recommend using a TTL-232-R-3V3-AJ cable. It is better than mine because on the computer side it is plugged into USB, and everything around me does not fonit (when the board touched the computer case, there was great noise), but worse than that, I couldn’t buy it with little blood in Moscow.
Therefore, made their own.
UPD from 01/19/2012 : Other interface cable options are written in the comments, for which many thanks to their authors.
Iomega Storcenter ix2-200 Features
Iron parameters:
  CPU 1.0 GHz Marvell Kirkwood 88F6281
 RAM 256 MB Zentel / Hynix
 Flash ROM 32 MB Hynix
 Gigabit Marvell Alaska 88E81116R network
 USB 3x USB 2.0 ports
 Internal HDD Two SATA-II drives
 HDD Capacity Supplied with 1/2/4 TB total volume options
Serial Connection Parameters:
- Speed: 115200 baud
- parity: no (none)
- flow control (flow control): xon / xoff
- 8 data bits
- 1 stop bit (stop bit)
Pro installation files
Files (uImage - the kernel and uInitrd - initrd.img) for downloading the NAS installer can be taken from partitions on one of the hard drives installed inside, from a USB flash drive or over a network from a tftp server. I chose the last option and used tftpd32 (there is also a 64-bit version of tftpd64 in the same place) under the working Windows and net-ftp / tftp-hpa under the home gent.
Download the notorious files from here and throw in the directory from which the tftp-server distributes.
We start the terminal (putty, hyperterminal, etc.) in the listening mode of the corresponding port (in my case it was COM1), having correctly set the parameters of the serial connection (see above).
We connect NAS:
- to a computer with a tftp server over the network
- to the computer from which we will manage the installation via the rs-232 cable (it may coincide with item 1)
- to electricity
If everything went well, then we see the following picture in the terminal:
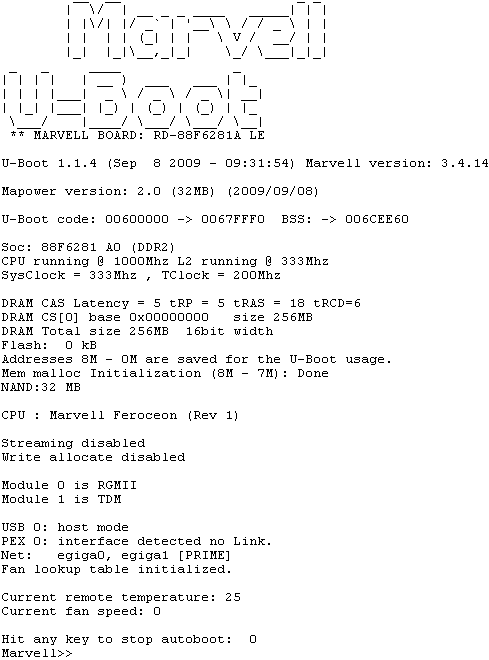
We stop autoloading at the right time by pressing any key and proceed to the next step.
Installer download
Enter the following commands:
  setenv mainlineLinux yes
 setenv arcNumber 1682
 saveenv
 reset
Thus, we set the configuration parameters so that the NAS boots from the kernel we need and restarts the device.
Ship the installer kernel:
For TFTP:
  setenv serverip 192.168.1.2
 setenv ipaddr 192.168.1.147
 tftpboot 0x01100000 uInitrd
 tftpboot 0x00800000 uImage
192.168.1.2 - the address of the tftp server, 192.168.1.147 - the address assigned by the NAS.
For flash drives (FAT only):
  usb start
 fatload usb 0: 1 0x01100000 / uInitrd
 fatload usb 0: 1 0x00800000 / uImage
Install debian
I will not describe the standard Debian installer in detail, since this has been done a lot before me. For example, in the official manual . I will dwell only on the following fine points in the order of occurrence during installation.
Partitioning
I have done it this way: each of the two two-hard drive hard drives is divided into two sections: 230 megabytes and all the rest. The 230 MB partitions on the first and second disks are used under / boot and the root partition, respectively. As the output df -hT below shows, the size of 200 megabytes is quite redundant.
The second sections on each of the disks are combined into a software raid 1 (mirroring) and LVM is created on it.
df -hT:
 F. System Type Size Isp Isp% mounted on
 / dev / sda1 ext2 223M 18M 194M 9% / boot
 / dev / sdb1 ext4 230M 79M 140M 36% /
 / dev / mapper / vg-home
               ext4 1,8T 267G 1,6T 15% / home
 / dev / mapper / vg-opt
               ext4 938M 18M 873M 2% / opt
 / dev / mapper / vg-tmp
               ext2 893M 17K 845M 1% / tmp
 / dev / mapper / vg-usr
               ext4 4,6G 782M 3,6G 18% / usr
 / dev / mapper / vg-var
               ext4 19G 802M 17G 5% / var
There is also / dev / mapper / vg-swap at 512MB (double the number of operatives).
I broke into sections deep into the night, hardly coming to my senses after the night of December 31 to January 3, so it turned out, obviously, far from ideal. But it was frankly lazy to redo it. Now, having already thought, I would do this:
1) The root and / boot can NOT be on the raid and \ or lvm, so they are created as ordinary partitions on hard drives. At the same time, since everything else will be on raids - the root and / boot partitions must lie on different disks and be of equal size. 150 megabytes should be enough for the root and especially for / boot. Although / boot can most likely be with ext [3-4], there is no point in journaling, since the data will be written there only when the kernel is updated.
I'm not sure if this is necessary, but it is better to do / boot on sda1.
2) / tmp and swap should not be done on raid 1. Raid 0 should be created for them, it has its own volume group on it and already has / tmp and swap sections per gigabyte and 512 megabytes, respectively.
3) We give the rest of the free space on both screws for raid 1, create lvm on it, and breaking up the sections as you prefer.
I want to note that the proposed partitioning scheme is focused on network storage intended for backups, i.e. basic requirement is reliability. If you plan to store movies \ music, i.e. that is easily pumped out of the Internet, the main section (I have this / home, but it may well be / var, for example) should lie on raid 0.
Kernel transform
Unfortunately, the bootloader in this device does not know how to use the standard vmlinuz-2.6.32-5-kirkwood and initrd.img-2.6.32-5-kirkwood, and the Debian installer does not know anything about our device and does not flush the kernel to the right place. . Therefore, we ourselves need to convert it to the desired format and feed the loader.
This is done by the following two commands (in / boot):
 mkimage -A arm -O linux -T kernel -C none -a 0x00008000 -e 0x00008000 -n "Debian kernel" -d vmlinuz-2.6.32-5-kirkwood uImage
 mkimage -A arm -O linux -T ramdisk -C gzip -a 0x0 -e 0x0 -n "Debian InitRD" -d initrd.img-2.6.32-5-kirkwood uInitrd
Unfortunately, I don’t remember if mkimage is installed by default, if not, then it can be supplied from the uboot-mkimage package.
It is executed either at the end of the installation, or later, by rebooting into rescue mode, typing at the start instead of
setenv bootargs console = ttyS0,115200n8 base-installer / initramfs-tools / driver-policy = mostthis
setenv bootargs console = ttyS0,115200n8 rescue / enable = true
Automatic download
After installing the system, so that our
 setenv bootargs_console console = ttyS0,115200 root = / dev / sdb1
 setenv bootcmd_sata 'ide reset;  ext2load ide 0: 1 0x01100000 / uInitrd;  ext2load ide 0: 1 0x00800000 / uImage '
 setenv bootcmd 'setenv bootargs $ (bootargs_console);  run bootcmd_sata;  bootm 0x00800000 0x01100000 '
 saveenv
And, finally, we are loading into our full-fledged system, rebooting, or giving the command:
run bootcmd
Notes
Harmless bug
A similar error message will appear in the kernel logs at boot time:
 kernel: [6.327359] uncorrectable error:
 kernel: [96.499883] uncorrectable error:
 kernel: [96.503342] end_request: I / O error, dev mtdblock0, sector 8
This is perfectly normal, as it turned out from deep googling. It is connected, as I understand it, with some problems in the uboot bootloader, or maybe not. The main thing is that everything works fine with this error. Now, if the error was about mtdblock1, then it would be bad.
Iron monitoring
I would very much like to monitor the temperature of the device, especially since it writes it at boot, but sensors-detect at a certain stage hangs the system tightly. Saves only power off and on. In the logs while quiet. Only smartmontools work, allowing you to see the temperature of hard drives.
Used materials
nas-central wiki:
Ix2-200
Ix2-200 Debian Installation
Installing Debian on OpenRD from syrius
Source: https://habr.com/ru/post/135992/
All Articles