JRebel Quickstart
In the last article I talked a little about JRebel and what can I use it for. Now I will try to describe how you can try using JRebel, step by step.
For example, take the Petclinic application, the source code of which can be found on GitHub . As IDE I will use my favorite IntelliJIDEA .
')
First, install the JRebel plugin for IntelliJIDEA. Go to Settings -> Plugins , click Browse repositories ... , in the list of plug-ins you can easily find JRebel Plugin - you can install.

When you first install, of course, you will need to register.

Get the project code for the exercise.
Open the resulting project in the IDE ( as a Maven project ).
1. Generate rebel.xml

Save rebel.xml is best in the directory that will be marked as a directory for sources in this project, i.e. either in src / main / java , or in src / main / resources . This is needed in order for the project to be built, the rebel.xml would appear in the WEB-INF / classes of the deployed application.
2. Add main / java / resources to rebel.xml
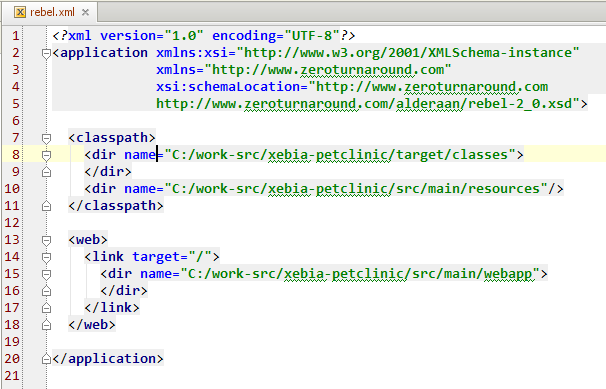
Since this plugin generates rebel.xml , the paths of which are obtained based on where the source code will be compiled ( target \ classes ), and where the web-parts of the application ( main / webapp ) are located, in some cases you have to add additional paths . At the moment, there is just such a case - the src / main / resources directory will not be turned on by the generator in rebel.xml . And in this directory are just some resources that we want to change later.
After adding the appropriate element, our new rebel.xml will look like this:
This approach was chosen in order to point out some nuances. In fact, if Maven is used to build the project, it is more reasonable to use a special plugin to generate rebel.xml, which can be configured accordingly.
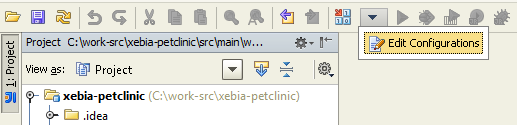
We will run the application on Tomcat 7. To do this, select Edit Configurations ..
Choose Tomcat configuration -> Local

Next, you need to add an artifact for deployment. In the selection it is proposed to decide whether this application will be deployed in a packaged or unpacked ( exploded ) mode. At the moment, this choice is not fundamental. Suppose we chose the unpacked mode.
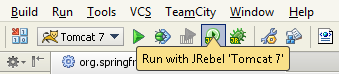
After the done manipulations, we are ready to start the project.
When starting up, in the startup console we will see the following:

That is - everything is fine - JRebel has been enabled. Further, as the application is being scanned, you will see messages that JRebel will track changes in some directories:

These are the same directories that were written in rebel.xml . At the time of downloading the application, the first thing that JRebel will do is try to find our configuration file in WEB-INF / classes , and, if successful, ask the classloader to look for resources along the paths that were found in rebel.xml . If the required resource is not found in those directories that are specified in rebel.xml , then a “rollback” to the usual bootloader logic will be sent, i.e. the resource will be searched from the deployed application.
Let's see first what we generally have at the beginning, by opening the application at localhost : 8080
Let's follow the link Find owner , then Add owner , and try to save empty values in the form. The result of validation is visible in the picture below:

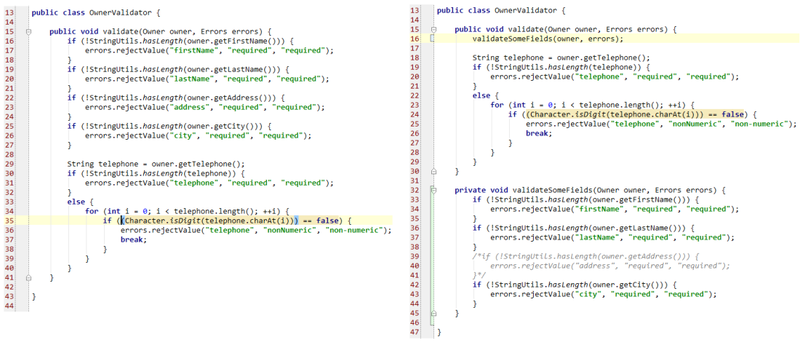
Let's try to make some changes to the code so that it is easy to see the result. The class OwnerValidator is responsible for checking the form fields. We will carry out part of the checks in a separate method, and for clarity, we remove the address check altogether. Those. As a result of the changes made to the OwnerValidator class, a new method was added, with minor changes in the original logic, which will be seen on the next attempt to save the data.
You should copy the modified class, after which we can repeat the attempt to save empty data, as a result we will see the following result:
As you can see, the Address field is no longer required, as expected. The following messages from JRebel will be displayed in the console:

When calling the OwnerValidator # validate method, the file was checked for an update, and since the code was compiled for some reason, JRebel determined that the class should be updated. Thus, we can see that JRebel updates classes only at the very last moment, before the call - in a lazy mode, so to speak.
Now let's try something more interesting. Suppose we would like to “hang” another class for testing on the same form. Let's call it FirstNameValidator . Also add a new entry in the messages.properties
Moreover, I would like to add a new class using the capabilities of Spring . Add a new component to petclinic-servlet.xml :

The last step is to add components using the @Autowired annotation to the controller code, which is implemented in the AddOwnerForm class:
In total, 4 files were changed:
Now you need to compile the new and modified classes, and you can try filling out the form again. If you enter a value other than “Anton” in the First name field, the check will give “Should be Anton” - the same message that we added to the messages.properties and use in FirstNameValidator , which, in turn, was added to the application using Spring .
I hope this little guide will help those who are interested, and want to try using JRebel in their project. If you have questions - write - I will answer with pleasure!
For example, take the Petclinic application, the source code of which can be found on GitHub . As IDE I will use my favorite IntelliJIDEA .
Training
JRebel4IntelliJ
')
First, install the JRebel plugin for IntelliJIDEA. Go to Settings -> Plugins , click Browse repositories ... , in the list of plug-ins you can easily find JRebel Plugin - you can install.
When you first install, of course, you will need to register.
Petclinic
Get the project code for the exercise.
git clone git://github.com/xebia-france-training/xebia-petclinic.gitOpen the resulting project in the IDE ( as a Maven project ).
Small setup
1. Generate rebel.xml
Save rebel.xml is best in the directory that will be marked as a directory for sources in this project, i.e. either in src / main / java , or in src / main / resources . This is needed in order for the project to be built, the rebel.xml would appear in the WEB-INF / classes of the deployed application.
2. Add main / java / resources to rebel.xml
Since this plugin generates rebel.xml , the paths of which are obtained based on where the source code will be compiled ( target \ classes ), and where the web-parts of the application ( main / webapp ) are located, in some cases you have to add additional paths . At the moment, there is just such a case - the src / main / resources directory will not be turned on by the generator in rebel.xml . And in this directory are just some resources that we want to change later.
After adding the appropriate element, our new rebel.xml will look like this:
This approach was chosen in order to point out some nuances. In fact, if Maven is used to build the project, it is more reasonable to use a special plugin to generate rebel.xml, which can be configured accordingly.
We work with JRebel
Launch
We will run the application on Tomcat 7. To do this, select Edit Configurations ..
Choose Tomcat configuration -> Local
Next, you need to add an artifact for deployment. In the selection it is proposed to decide whether this application will be deployed in a packaged or unpacked ( exploded ) mode. At the moment, this choice is not fundamental. Suppose we chose the unpacked mode.
After the done manipulations, we are ready to start the project.
When starting up, in the startup console we will see the following:
That is - everything is fine - JRebel has been enabled. Further, as the application is being scanned, you will see messages that JRebel will track changes in some directories:
These are the same directories that were written in rebel.xml . At the time of downloading the application, the first thing that JRebel will do is try to find our configuration file in WEB-INF / classes , and, if successful, ask the classloader to look for resources along the paths that were found in rebel.xml . If the required resource is not found in those directories that are specified in rebel.xml , then a “rollback” to the usual bootloader logic will be sent, i.e. the resource will be searched from the deployed application.
Initial position
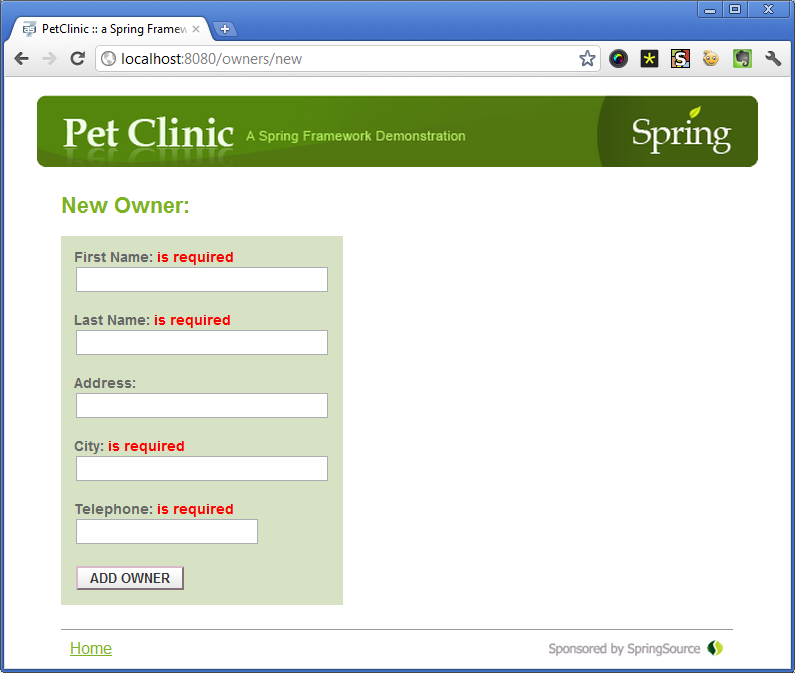
Let's see first what we generally have at the beginning, by opening the application at localhost : 8080
Let's follow the link Find owner , then Add owner , and try to save empty values in the form. The result of validation is visible in the picture below:
Make changes
Let's try to make some changes to the code so that it is easy to see the result. The class OwnerValidator is responsible for checking the form fields. We will carry out part of the checks in a separate method, and for clarity, we remove the address check altogether. Those. As a result of the changes made to the OwnerValidator class, a new method was added, with minor changes in the original logic, which will be seen on the next attempt to save the data.
You should copy the modified class, after which we can repeat the attempt to save empty data, as a result we will see the following result:
As you can see, the Address field is no longer required, as expected. The following messages from JRebel will be displayed in the console:
When calling the OwnerValidator # validate method, the file was checked for an update, and since the code was compiled for some reason, JRebel determined that the class should be updated. Thus, we can see that JRebel updates classes only at the very last moment, before the call - in a lazy mode, so to speak.
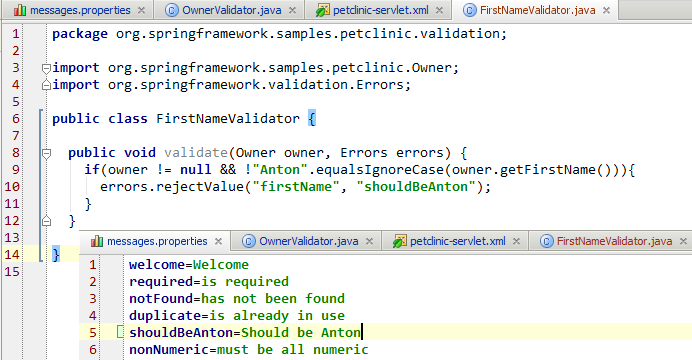
Now let's try something more interesting. Suppose we would like to “hang” another class for testing on the same form. Let's call it FirstNameValidator . Also add a new entry in the messages.properties
Moreover, I would like to add a new class using the capabilities of Spring . Add a new component to petclinic-servlet.xml :
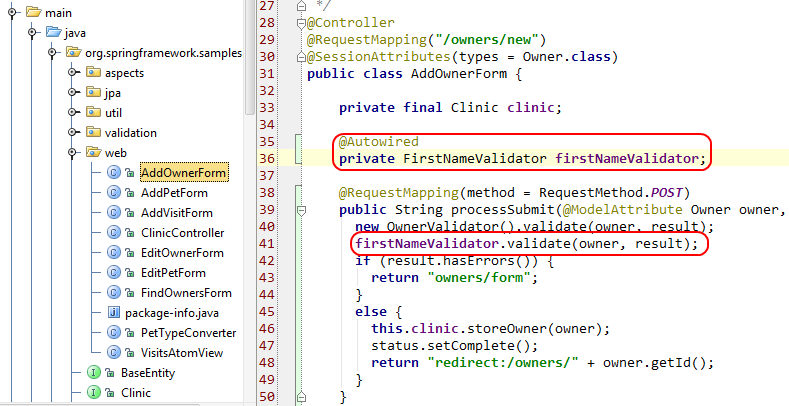
The last step is to add components using the @Autowired annotation to the controller code, which is implemented in the AddOwnerForm class:
In total, 4 files were changed:
- Added new class FirstNameValidator
- changed existing class AddOwnerForm
- changed messages.properties
- changed petclinic-servlet.xml
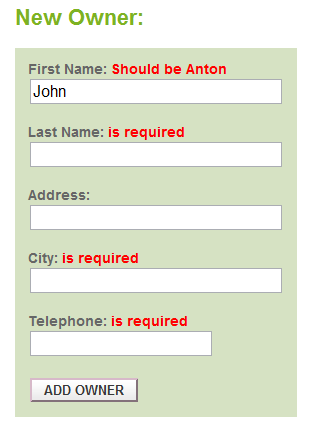
Now you need to compile the new and modified classes, and you can try filling out the form again. If you enter a value other than “Anton” in the First name field, the check will give “Should be Anton” - the same message that we added to the messages.properties and use in FirstNameValidator , which, in turn, was added to the application using Spring .
Total
I hope this little guide will help those who are interested, and want to try using JRebel in their project. If you have questions - write - I will answer with pleasure!
Source: https://habr.com/ru/post/135922/
All Articles