CRACKL @ B Contest 2010. Analysis of the first task

Ended 2010, there were global reforms on the resource. These were troubled times. And in this harsh time, the idea of creating a local tournament is born. This idea was very well received by the local community. After some time, 3 assignments were created (although it was planned to be 5), the jury members and the evaluation system were selected. And so it began.
Foreword
The first task was KeyGenMe by PE_Kill. The task was to write KeyGen'a, which was supposed to generate multiple keys for a single name. Here is the original description of the author:
Here you have a KeyGenMe. The name speaks for itself - you need to write a key generator,
which will be successfully tested in KeyGenMe. For any name, the generator must
issue many unique serial numbers. KeyGenMe is packed with unpretentious homemade
packer.
I would like to warn. KeyGenMe is not as complicated as it may seem, but not trivial.
and requires a non-standard approach. A small plus will be provided unpacked.
KeyGenMe option.
Good luck!
')
Analysis
As you can see from the description, the keygenmes are covered with a homemade packer, which causes some antiviruses to give out false positives. Well, I didn't bother with him and took it off with QU . Then I opened the unpacked file in OllyDbg and saw the code on the EP (Entry point), which was written in Delphi with keygens. Knowing this, I decided to shove keygenmes into the IDR ( Interactive Delphi Reconstructor ), which would recognize my VCL and Delphi run-time functions. This is only needed for two things:
- creating a .map file for importing it into OllyDbg;
- finding the function of processing the test button.
After the complete analysis of the file has ended, create a .map file.
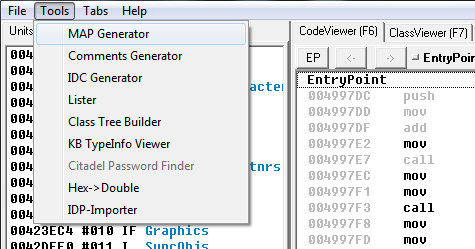
And find the address of the button click handler.

To use the .map file in OllyDbg you will need to install the mapimp plugin. By default, the .map file is saved in the same folder with which the program was opened and with the same name as the program, if everything is done correctly and the plugin is installed, then when opening the keygens in a pop up message should appear prompting you to download the .map file, click "Yes" and everything is fine. If something is wrong, then you can download it manually through the main menu.
All preparations are made. Go to OllyDbg to the address of the processing function of pressing the check button, which you had to remember / write / copy from IDR. And we see how the name and the serial number comes first (it is not so important), but the most interesting goes further.
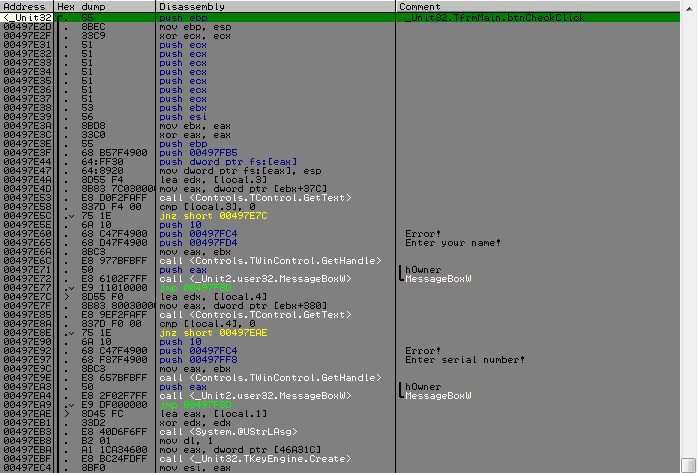
Namely, TKeyEngine.Create creates an instance of the TKyeEngine class. According to the logic of things, this class is the heart of the whole regChem. It is followed by two functions; the result of the second participates in one of the conditions immediately following its call. That's all they concluded. So, a little more detail about each of them.
In the first function, we encounter another insignificant thing, which, as it were, should have complicated the analysis - this is a small obfuscation, which is easily removed by the mask mask.
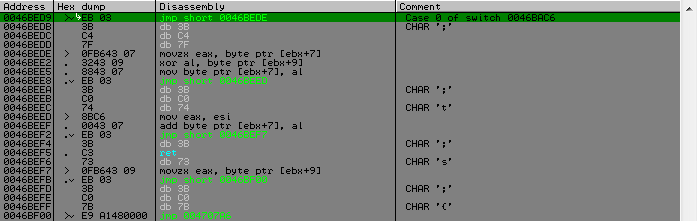
It will also be further in the child functions. Therefore, I simply found the address of the first meeting with a mask search and this address became the starting point. In the script, we will search from here until the
MOV addr, 0046BED9 @loop: FIND addr, #EB033BC?7?# CMP $RESULT, 0 JE @exit MOV addr, $RESULT FILL addr, 5, 90 ADD addr, 5 JMP @loop @exit: RET Well, before meeting this obfuscation there were a couple of actions - this is that a 16-byte array is made from the name for the subsequent "simple" manipulations, people with a weak psyche who didn’t see so much code that needed to be analyzed were terrified But "the devil is not so bad as he is painted." A more detailed analysis revealed that it does not carry a deep semantic load. I here about this big cycle with a switch in 10001 * 16 iterations.

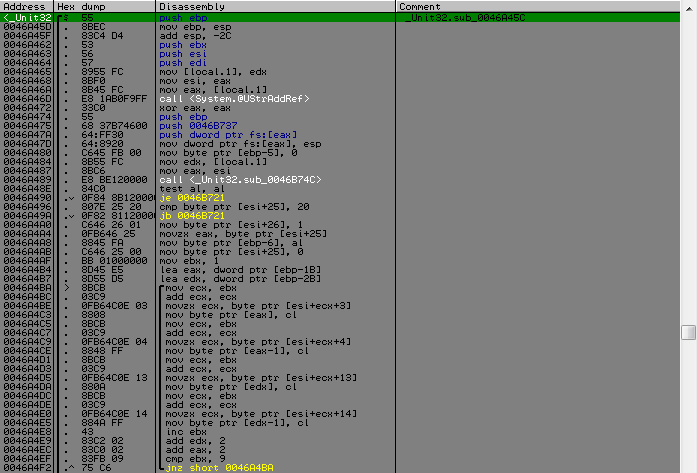
It is enough to rip it. True, this ripped piece of code will be over 12k lines, but after cleaning it from the buttons after deobfuscation, there will be a little less than 6k lines. But before you rip it, you can bring it into a more correct form. Because Since all regshema works with a class instance, then this array is somewhere inside with a shift of 5 bytes relative to the pointer to this instance. Therefore, it is necessary to correct all offsets for transferring to our ripped code only an array, no frills. For this, I wrote this script.
MOV addr, 0046BED9 @loop: OPCODE addr CMP $RESULT_2, 3 JB @next MOV temp, addr ADD temp, $RESULT_2 SUB temp, 2 MOV val, [temp], 1 CMP val, 43, 1 JE @ok CMP val, 53, 1 JNE @next @ok: INC temp MOV val, [temp], 1 SUB val, 5 MOV [temp], val, 1 @next: ADD addr, $RESULT_2 CMP addr, 004707A1 JA @exit JMP @loop @exit: RET Then you can rip this whole thing. It was possible to stuff all this with the help of asm-inserts, but some troubles arose that I could not solve in a reasonable time, so it was decided to put this all into an asm file as a separate function and connect it to the project, which immediately solved all the problems. There are two more hesitations on ripped code, it uses a local variable of one byte in size and located not at the beginning of the stack, but just not there and not here ebp-5, you could replace it all, but I again followed the path of the smallest Resistance allocated under the local needs of the stack of 8 bytes (such as taking into account the alignment). And the second stumble is that there is still a call for one more function, but it is small only 2 commands, we rip / rewrite manually (I don’t even know what is faster) and replace call names with our own. That's all, a quarter of the way behind.
So we finished the analysis of the first function that worked only with the name, but the second one is already working with the serial and the fact that it pulls it out and the data from the first function. Immediately upon entering the second function there will be a check on the validity of the entered serial and its conversion.
The first is to check the length and location of hyphens in it, from which it will be possible to know that the serial has the form:
XXXXX-XXXXX-XXXXX-XXXXX-XXXXX-XXXXX-XXXXX-XXXXX

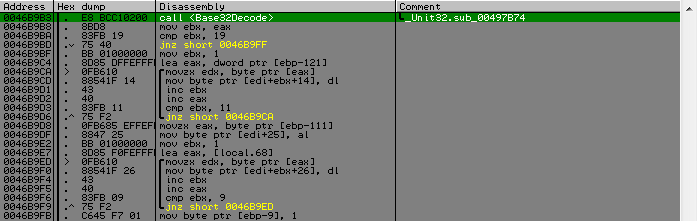
Next, hyphens are cut from it and the resulting string is decoded. The decoding function is a standard algorithm that I didn’t quickly figure out. The key clue is that the characters of the serial are checked against the alphabet.

Googling this alphabet, it was found that this is Base32 , a decoding function. After which we have an array of 25 bytes in size, and which is then split into three parts, the first is an array of 16 bytes, the second is a value of 1 byte, and the third is an array of 8 bytes.
typedef struct _KEY { unsigned char SomeBytes[16]; unsigned char SomeCount; unsigned int CipherText[2]; } KEY, *LPKEY; As you can see, the third element of the structure I have a meaningful name, looking ahead to say that there should be an encrypted string, which is compared with the reference line in the most recent test. So, the verification of the serial and its decomposition into components is complete. When exiting this function there will be a check that the KEY.SomeCount is greater than 32, if so, then we go further. Next comes a small loop, in which the swap in WORD is a KEY.SomeBytes and an array, which is derived from the name, it serves more to stretch the code, since it has no logical meaning, because then work with the same array and with their respective elements, the first with the first, the second with the second, and so on.
And then there is another switch. Those who have the first did not discourage all desire, then the second weed out even more people. By itself, it is simple, for each value of a byte, the function is called by the same prototype, but the functions are different for everyone.
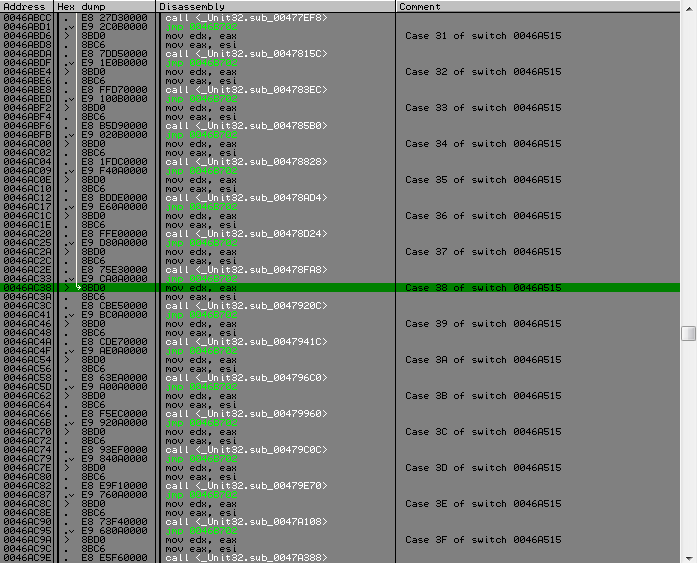
From this place in more detail. So, the array again comes into play, which was obtained from the name (I will tell you a secret that he will participate further in one more function). It will serve as a certain pcode, depending on what value of the byte is this and the action will be executed. And the elements of the KEY.SomeBytes array will serve as the input value to these functions. And those functions to which it is transferred have a similar uncomplicated logic, a byte that is fed into it is parsed bit by bit, depending on whether this or that bit is set, a small series of actions are performed on a single byte.
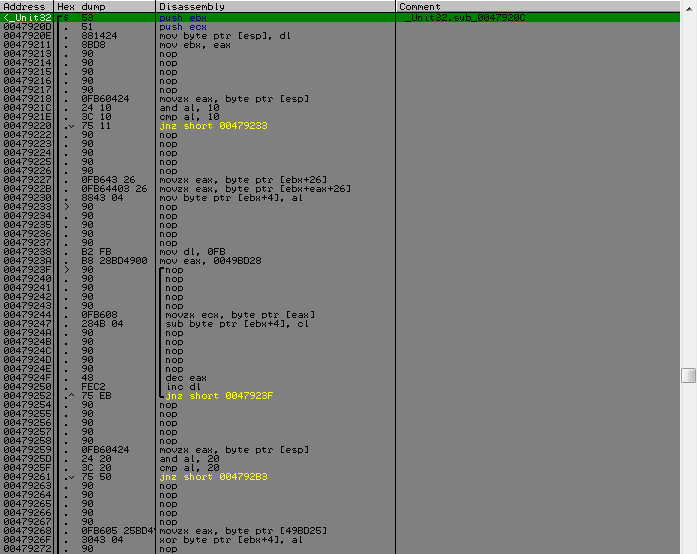
Each such function has its own actions for each bit, but the most important thing is that if there is one specific bit, the result of all these manipulations is placed in a certain position in KEY.CipherText and the separate counter is incremented, provided that it is greater than eight (t .e. 8 replacements were made in KEY.CipherText) completes the function with an error. There is also another counter, which increases with each operation, i.e. if the bit is set, except for the very first one, when we receive a byte, over which all these gestures occur. In the analysis of all this vulnerability was revealed, which allowed to completely ignore all these manipulations. It lies in the fact that if the bit responsible for writing to KEY.CipherText is not set, then KEY.CipherText will never change, which is very cool, it allows you to leave KEY.CipherText in a virgin form, in the one we set.
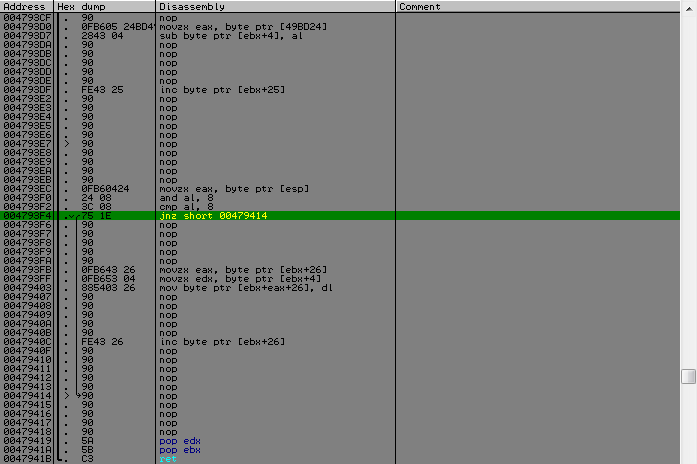
And the fact that there is a need to build a table of masks for each value of a byte, in which this bit will not be taken into account. You also need to prevent the establishment of bits, which turns out a byte at the beginning, it is necessary for easy counting of bits for the second counter (we need it for one check). To avoid this routine of searching for bits for each byte value, I wrote a small script that finds the necessary bits, and also creates the necessary masks from them and writes them to the table.
MOV addr, 004707FC ALLOC 100 CMP $RESULT, 0 JE @error MOV table, $RESULT PUSHA MOV c, 0 @loop: FIND addr, #751190909090900FB643260FB6440326884304# CMP $RESULT, 0 JE @exit MOV cl, [$RESULT - 1], 1 MOV addr, $RESULT ADD addr, 13 FIND addr, #751E90909090900FB643260FB65304885403269090909090FE4326# CMP $RESULT, 0 JE @exit MOV bl, [$RESULT - 1], 1 OR bl, cl NOT bl MOV [table + c], bl, 1 MOV addr, $RESULT ADD addr, 20 INC c CMP c, 100 JE @exit JMP @loop @exit: POPA DM table, 100, "table.bin" FREE table, 100 @error: RET After this cycle, the bit counter is compared with the KEY.SomeCount value, if they are equal, then we are already at the finish line. Next comes the function call to which KEY.CipherText is passed as data and an array with a name as a key, inside there will be several more occurrences until we get to the desired function, by the constants in it it was immediately clear that this is something from the TEA family of algorithms, where the delta is used, it was determined that it is something with XTEA . What it turned out, with only a small change in the original algorithm.
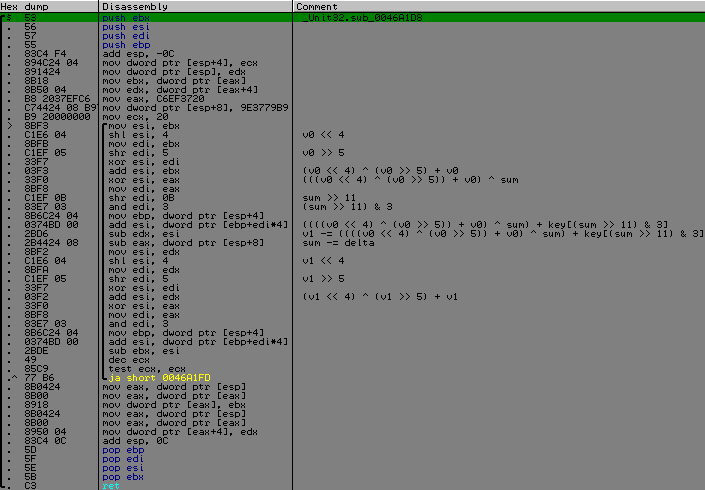
As you can see from the screen, I analyzed each step to find out where the modification was made. It consisted in the fact that the position of brackets was changed in two places, i.e. priority action.
Original:
void xtea_decipher(unsigned int num_rounds, uint32_t *v, uint32_t const *k) { unsigned int i; uint32_t v0=v[0], v1=v[1], delta=0x9E3779B9, sum=delta*num_rounds; for (i=0; i < num_rounds; i++) { v1 -= (((v0 << 4) ^ (v0 >> 5)) + v0) ^ (sum + k[(sum>>11) & 3]); sum -= delta; v0 -= (((v1 << 4) ^ (v1 >> 5)) + v1) ^ (sum + k[sum & 3]); } v[0]=v0; v[1]=v1; } Modified:
void xtea_decipher(unsigned int num_rounds, uint32_t *v, uint32_t const *k) { unsigned int i; uint32_t v0=v[0], v1=v[1], delta=0x9E3779B9, sum=delta*num_rounds; for (i=0; i < num_rounds; i++) { v1 -= ((((v0 << 4) ^ (v0 >> 5)) + v0) ^ sum) + k[(sum>>11) & 3]; sum -= delta; v0 -= ((((v1 << 4) ^ (v1 >> 5)) + v1) ^ sum) + k[sum & 3]; } v[0]=v0; v[1]=v1; } So, everything is over, it remains to cross the finishing tape. In the place of which there is a comparison of data after decryption with the word CRACKLAB, from which it follows that this word had to be encrypted.
That's it, we write keygen.
Total
To write keygens, we need: ripped code to create an array from the name, the implementation of Base32Encoding, the implementation of the modified XTEA, a table of masks and a little finish your code. First, the dump of the table is translated into an array, which can be inserted into the code, everyone can do it as it is more convenient for him. The serial generation algorithm has the following form:
- Name => name_array [16]
- Morf (name_array)
- KEY.SomeBytes [i] = random () & table [name_array [i]]
- KEY.SomeCount = bitscount (KEY.SomeBytes)
- KEY.CipherText = xtea_encode (“CRACKLAB”)
- SerialBase = Base32Encode (KEY)
- Serial = InsertDefis (SerialBase)
My keygen: github.com/reu-res/CRACKLAB-Contest-2010
In the next article I will analyze the second task, which will probably be more interesting than this. Attention SPOILER! There you will find analysis VM (well, the author said so), the implementation of which differs from ordinary implementations, which are similar in structure to each other. See you.
Source: https://habr.com/ru/post/135848/
All Articles